Table of contents
Linked pages:
By clicking the name, you will be directed to a new page.
1. Basic Functions ^
1. Pages ^
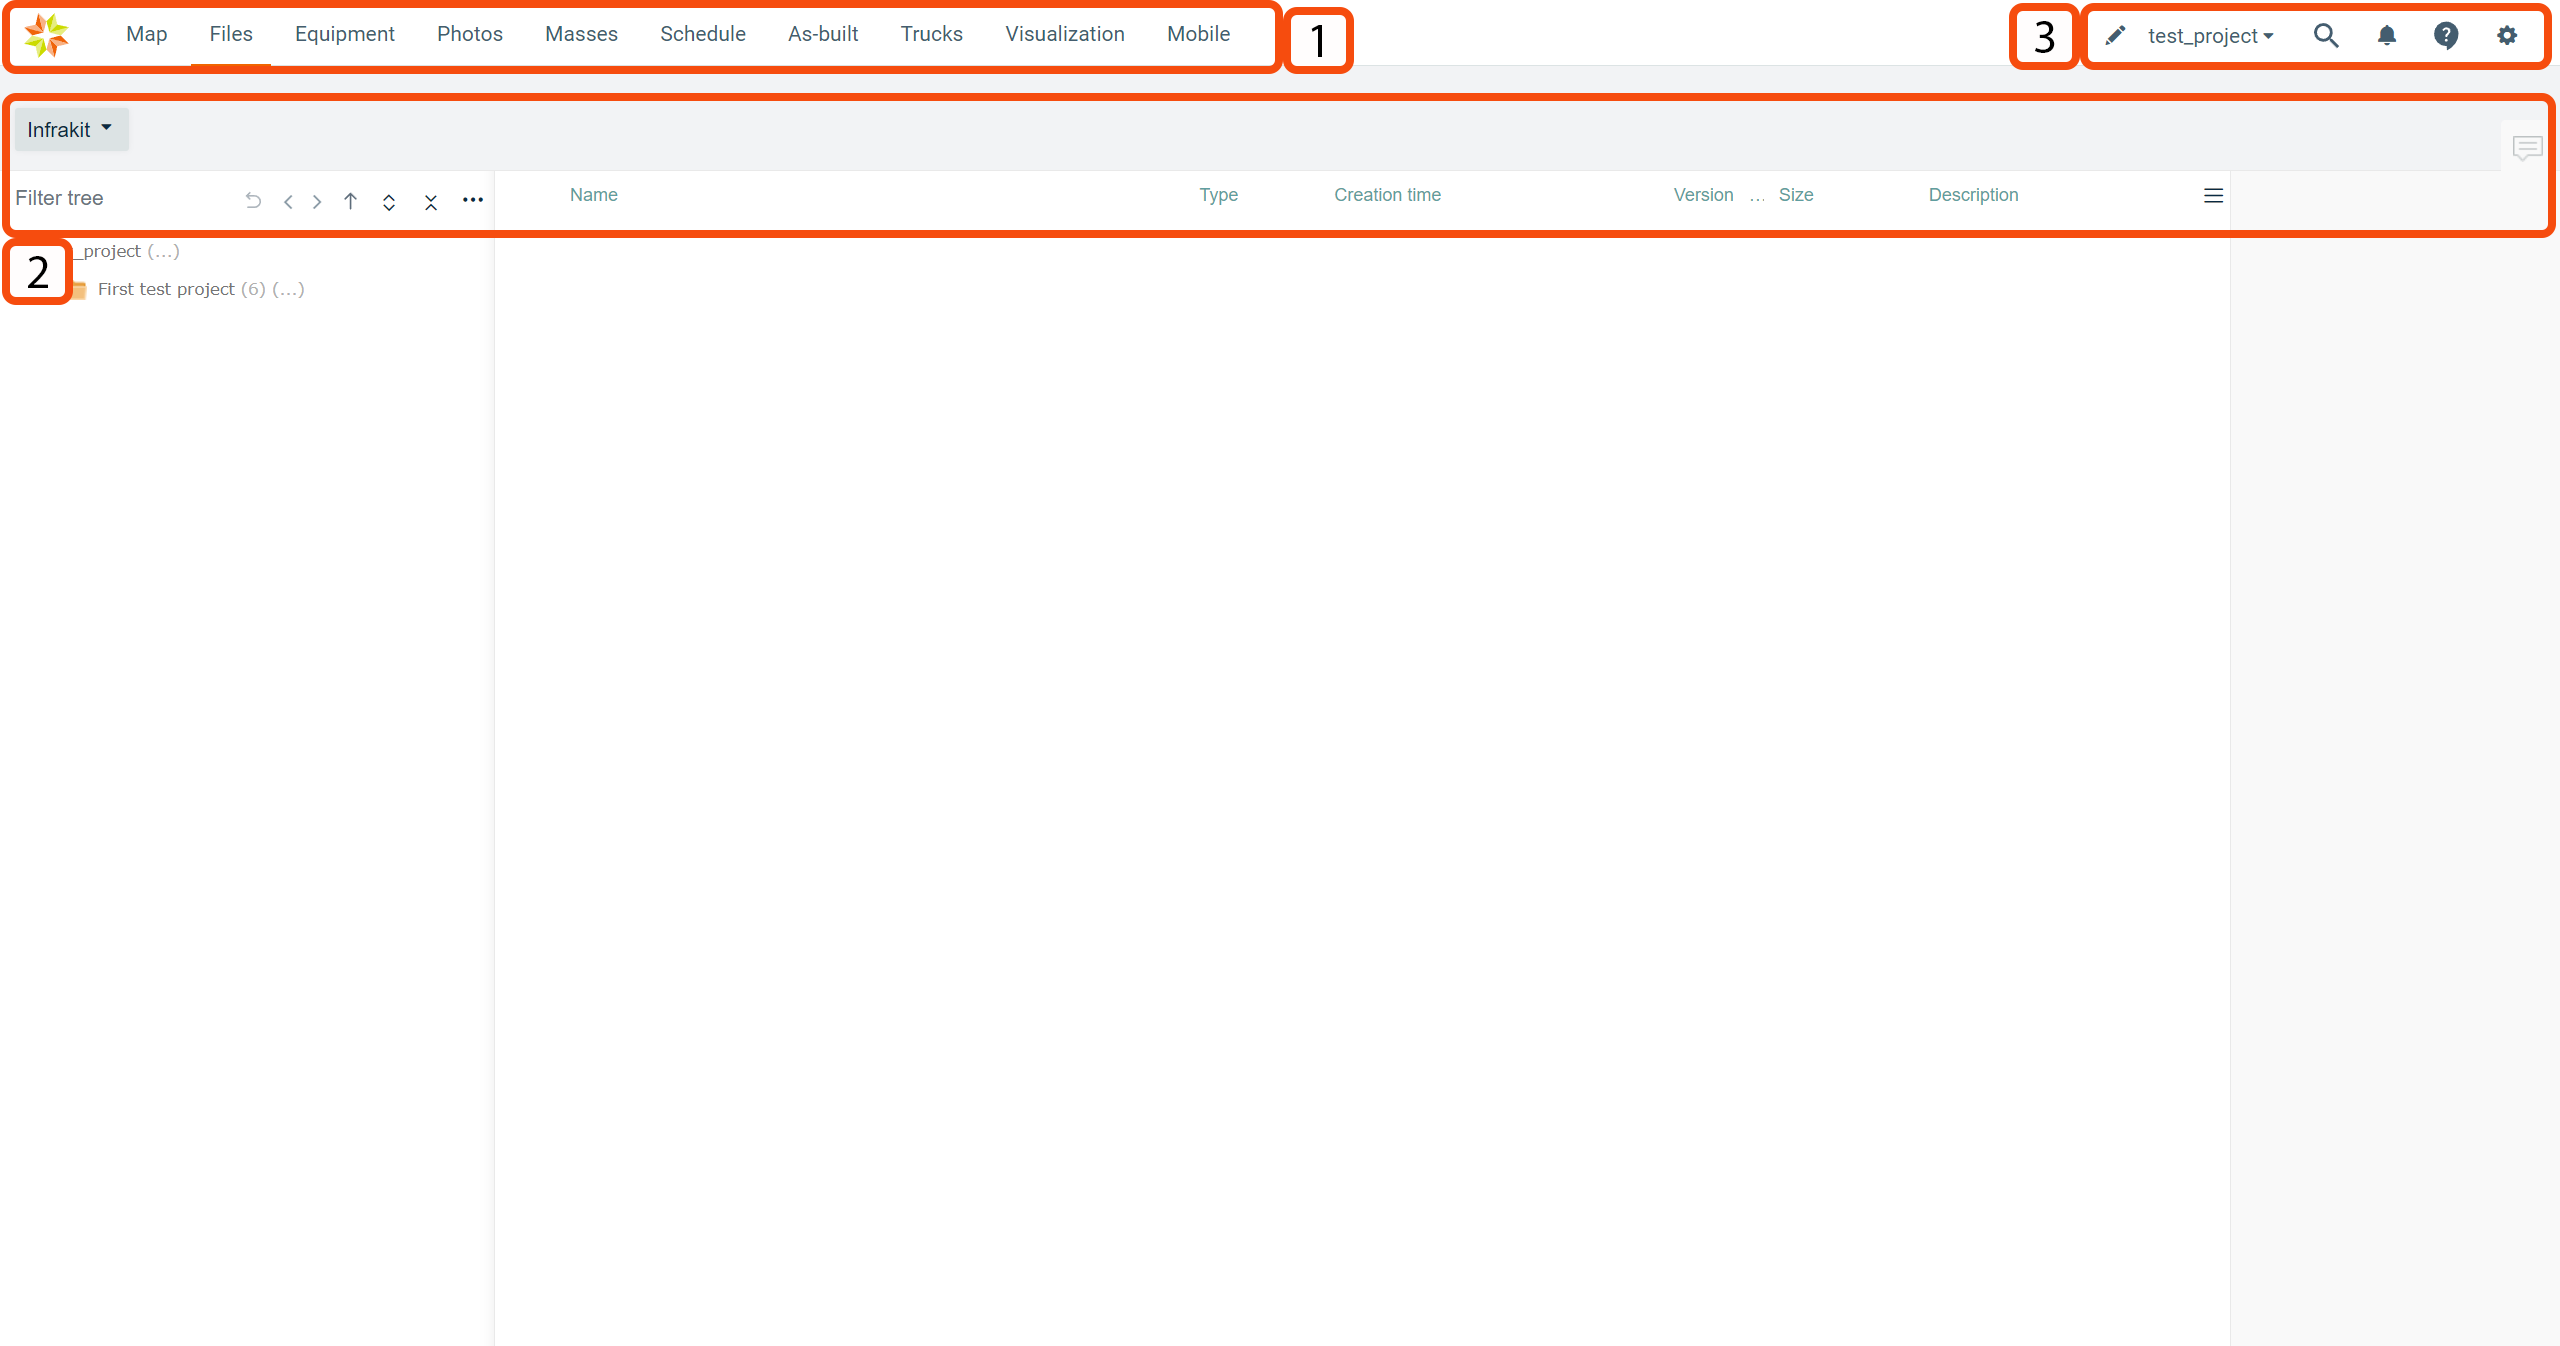
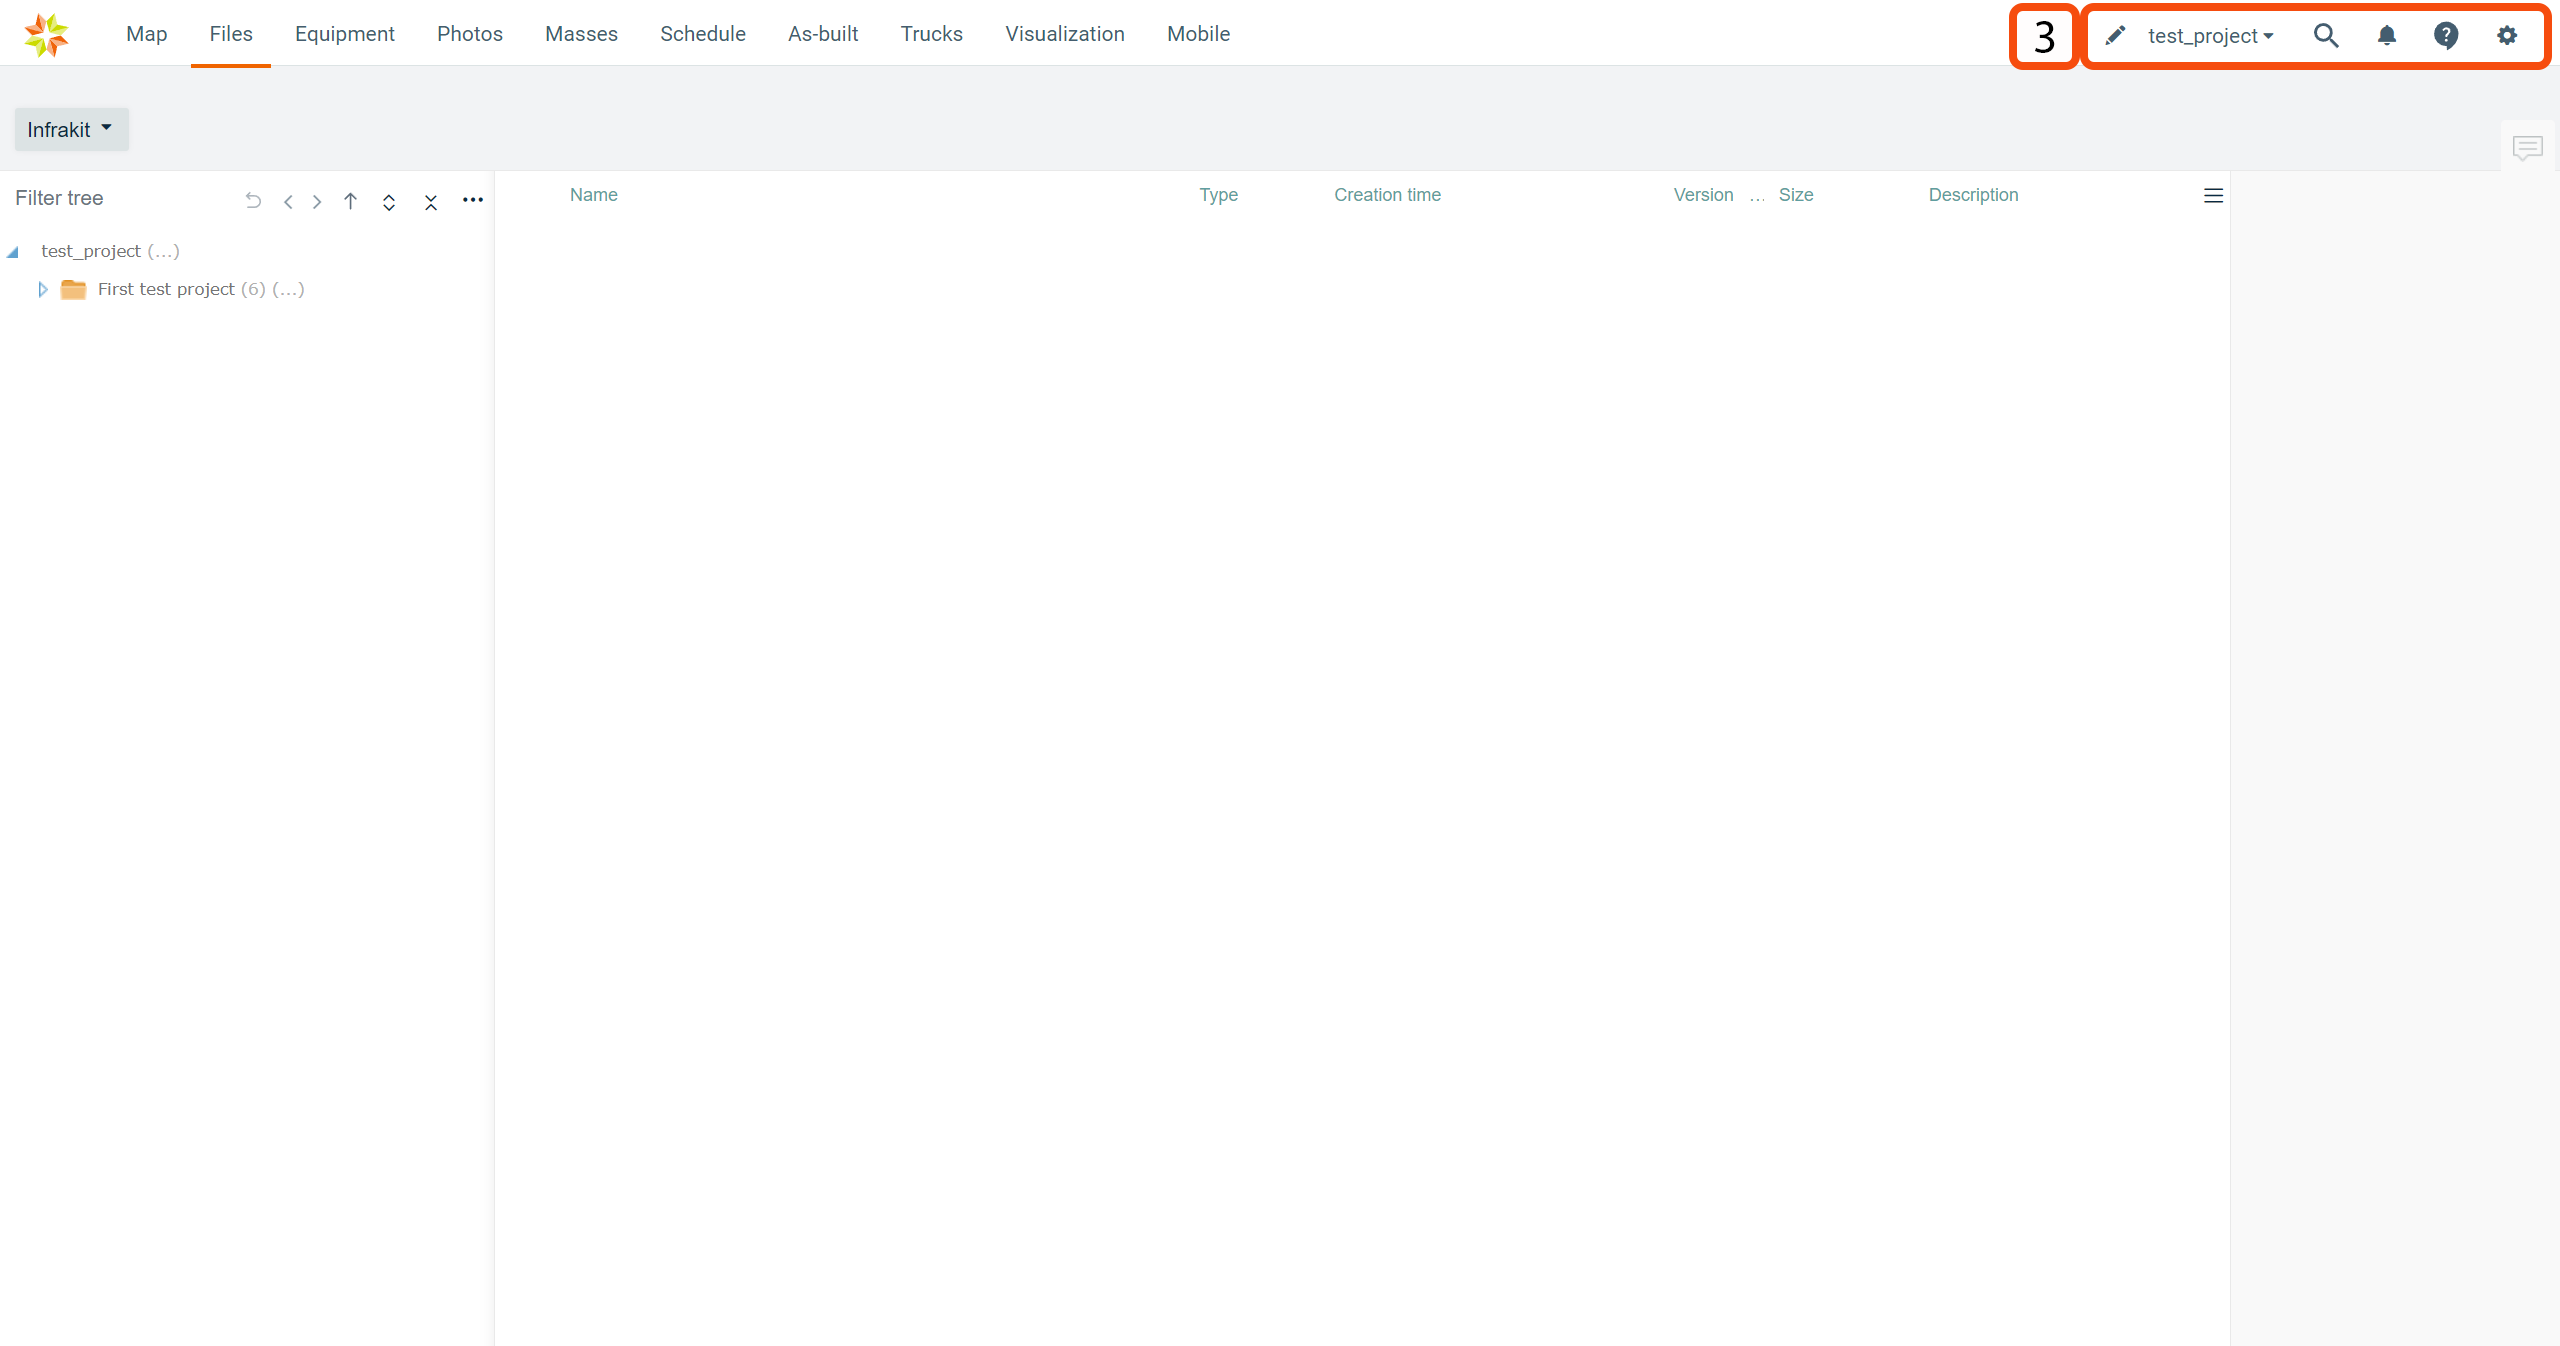
The ribbon at the top indicates all the pages that are included in the Infrakit software. Map is the default starting page when you log in to Infrakit software.
By clicking the page icon below, you can find more information about each page.


By clicking the Infrakit logo on the left-top corner of the page, the user will be directed to the Infrakit starting page.

2. General Tools ^
Selecting an Integrated Storage ^
From the drop-down box, the user can switch between the integrated cloud storage and Infrakit's storage.
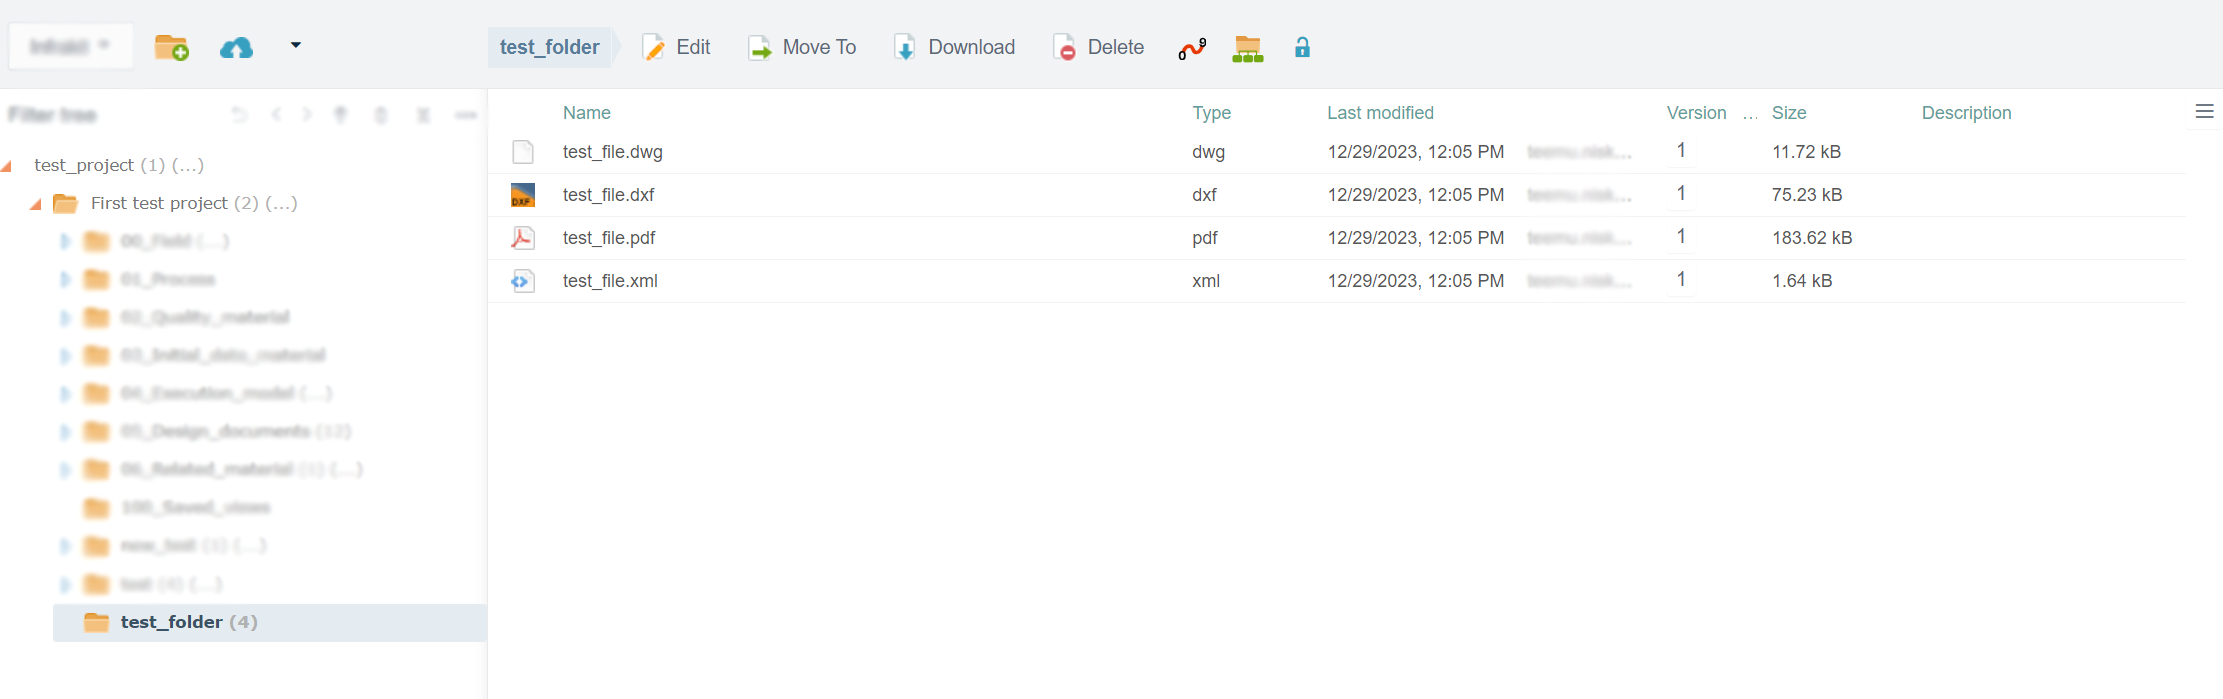
Folders ^
When a folder is activated, new tools and features become available.
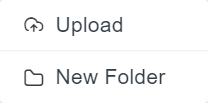
Create Folder ^

By clicking the "Create Folder" button, a new box will open.
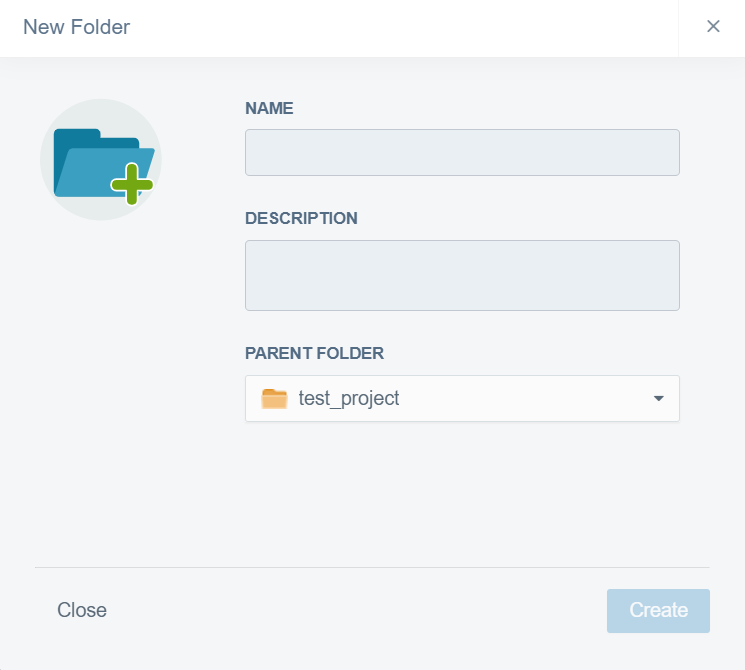
In this box, the user can create a new folder.
In the "NAME" bar, the user must insert a name for the folder.
In the "DESCRIPTION" box, the user can provide additional information about the folder.
From the "PARENT FOLDER" drop-down bar, the user can select the parent folder for the new folder.
The user must click the "Create" button at the end to complete the creation. If the user wants to close the box without creating a folder, the "Close" button can be clicked.
Upload File ^

By clicking the "Upload" button, a new box will open.

In this box, the user can upload files individually or in bulk. The size limit for an individual file is 5 GB.
By dragging and dropping, the user can select files to upload.
By clicking "browse files" or "My Device", the user can browse local folders to select files to upload.
By clicking "Camera", the user can use the web camera to upload image or video files.
In the "Add to assignments" tab, the user can add the files to an assignment created in the "Equipment" page, section "ASSIGNMENTS".
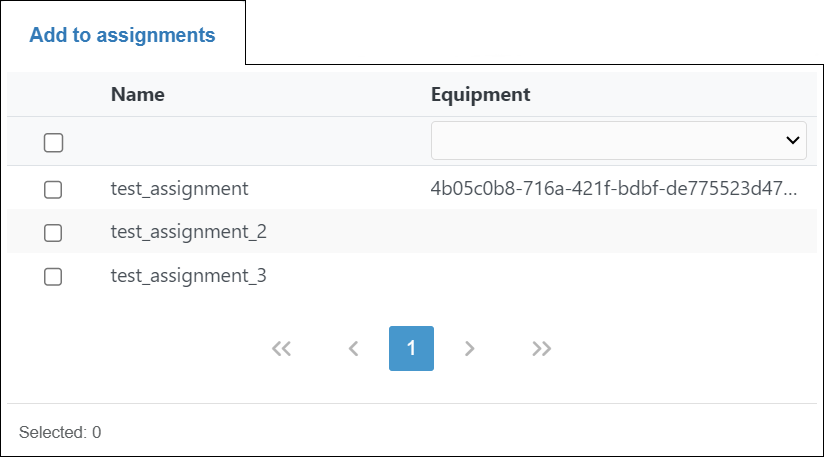
By checking the box next to the assignment, the user can select to which assignment the file will be added.
From the "Equipment" drop-down bar, the user can filter the assignments based on specific equipment.
In the "Email users" tab, the user can send an email to users to notify them that new files have been uploaded.
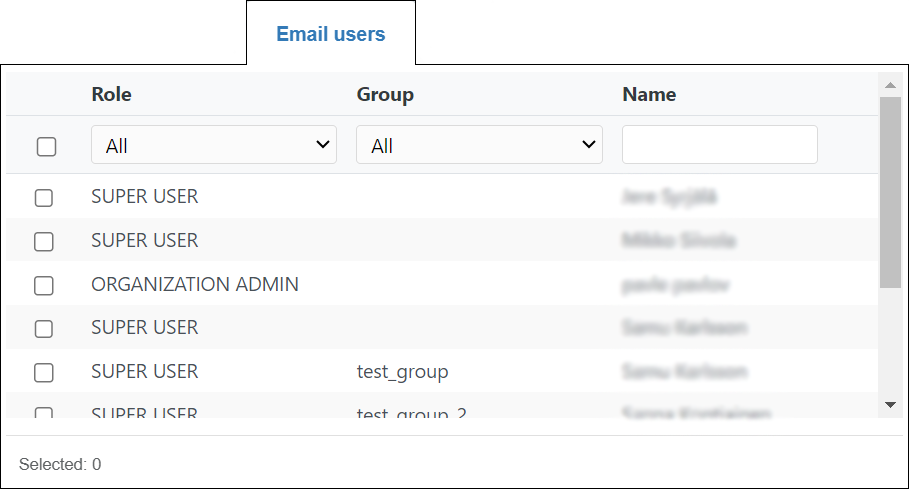
By checking the box in the user's row, the user can select to which users the notification will be sent.
By using the "Role" and "Group" drop-down bars or the "Name" bar, the user can filter the users based on the role, group, or name. Groups can be created in the "Project Settings" page, section "Groups".
When the files to upload have been selected, they can be observed at the top of the box.
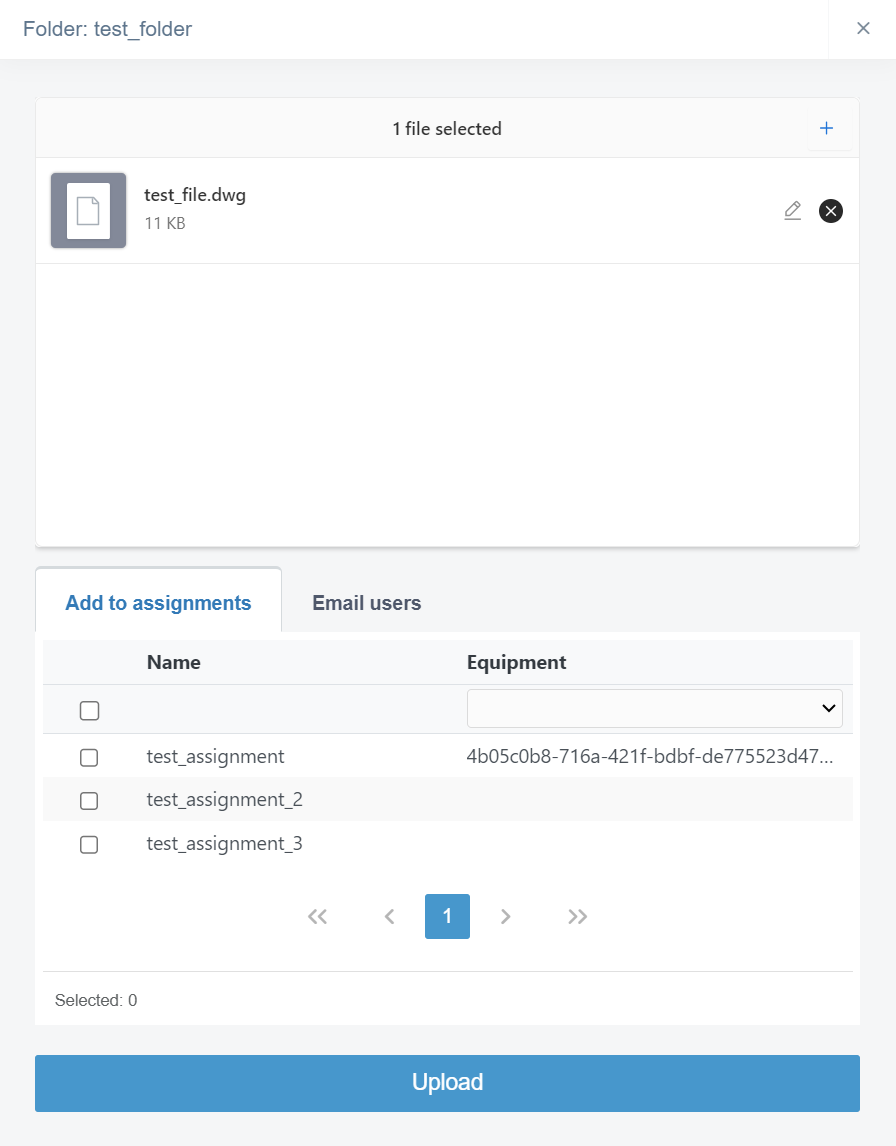
By clicking the pen icon next to a file, a new box will open.

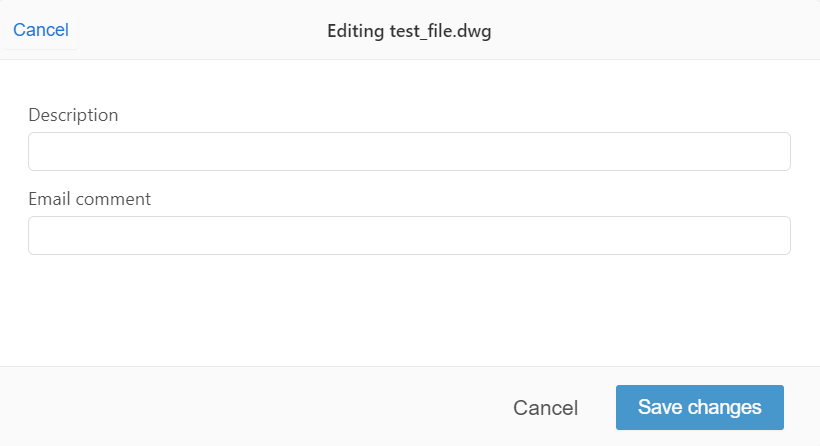
In the "Description" bar, the user can provide a description for the file.
In the "Email comment" bar, the user can write a comment that will be visible on the email that will be sent to the selected users.
The user must click the "Save changes" button at the end to save the modification. If the user wants to close the box without modifications, the "Cancel" button can be clicked.
By clicking the x icon next to a file, the user can delete the file from the upload list.

By clicking the "Uploading" button, the user can start uploading the files to the selected folder.

By clicking the downward arrow icon, two options appear.
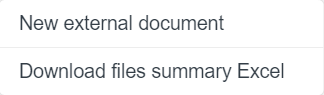
By clicking "New external document", a new box will open.
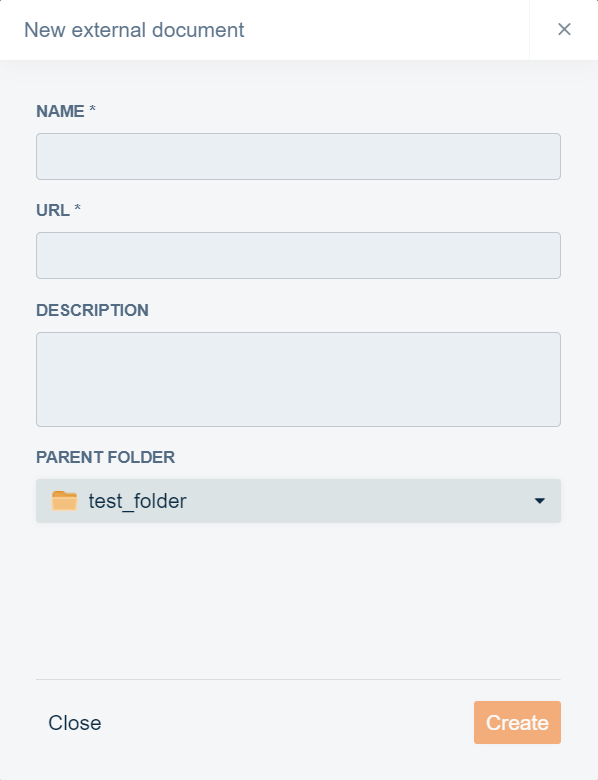
In this box, the user can create a new external document.
In the "NAME" bar, the user must insert a name for the document.
In the "URL" bar, the user must provide a link to the external document.
In the "DESCRIPTION" box, the user can provide additional information about the document.
From the "PARENT FOLDER" drop-down bar, the user can select the folder where the document will be located.
The user must click the "Create" button at the end to complete the creation. If the user wants to close the box without creating a document, the "Close" button can be clicked.
By clicking "Download files summary Excel" , the user can download an Excel file that contains the whole folder structure with files included.
Folder Tools and Features ^
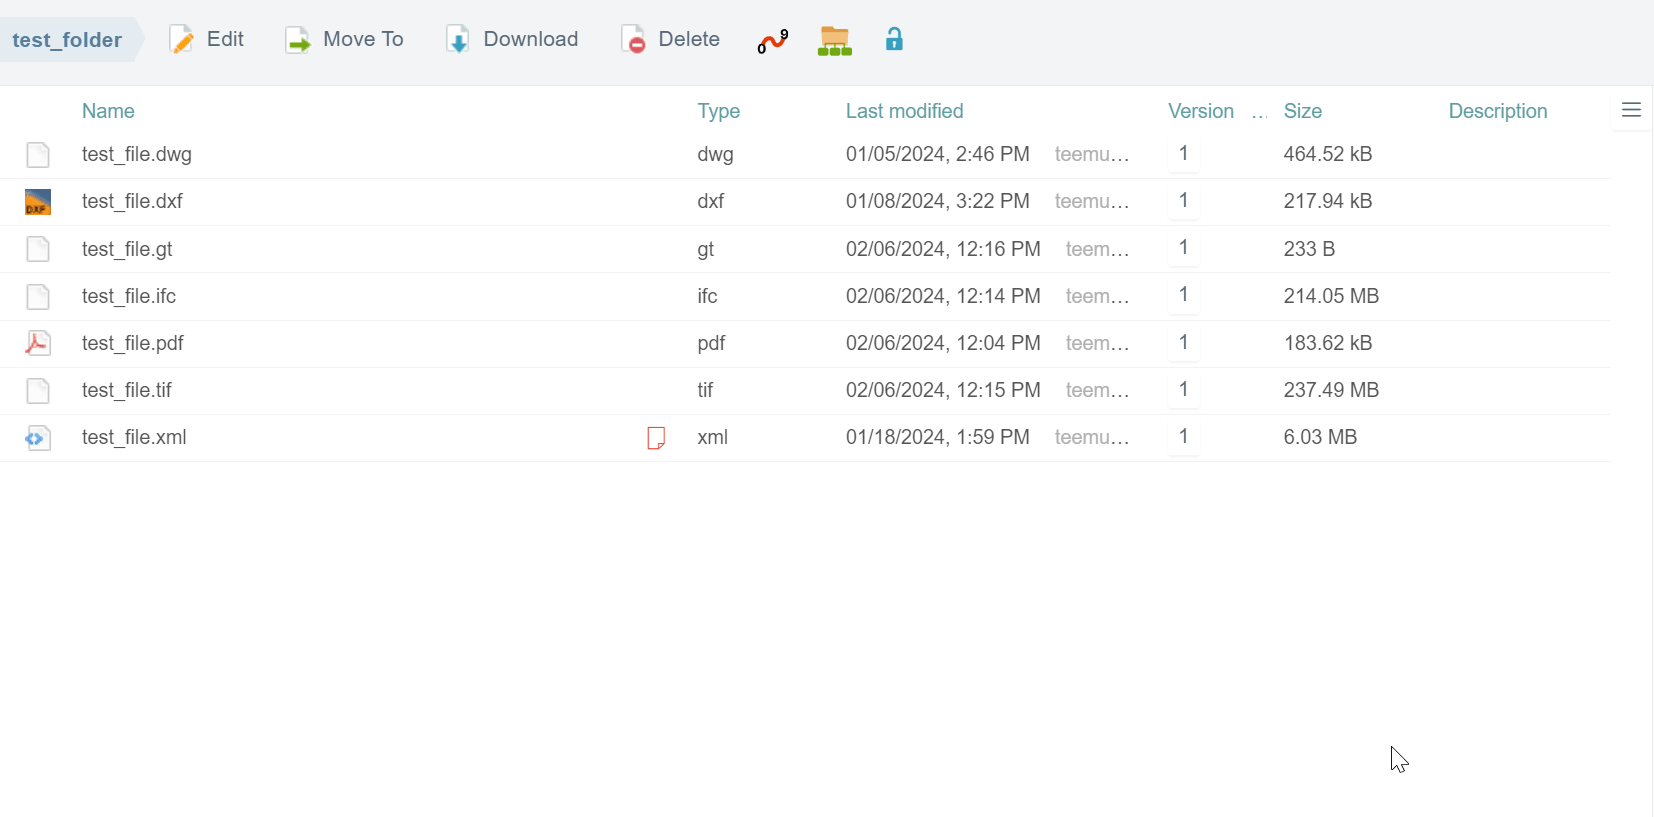
At the top of the page, tools and features can be found that can be used with an individual folder.

By clicking the "Edit" button, a box will open.

In this box, the user can modify the basic properties of the folder.
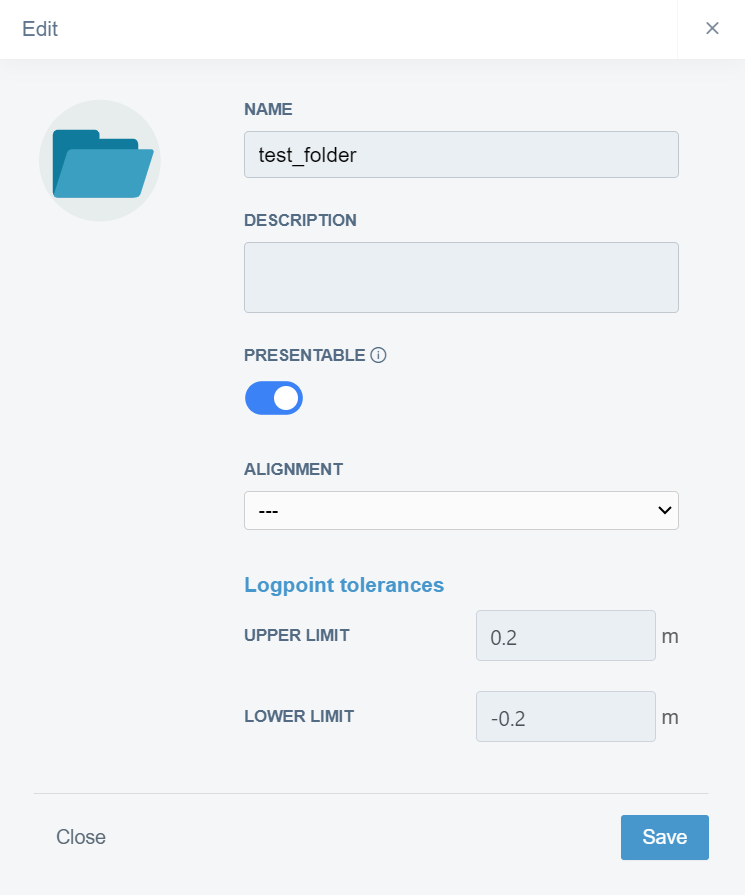
In the "NAME" bar, the user can alter the name of the folder.
In the "DESCRIPTION" bar, the user can provide a description for the folder.
In the "PRESENTABLE" section, the user can determine if the content of the folder is available in the 2D, 3D, and cross-section views by moving the knob left and right. If turned off, the folder will not be visible in the "Models" and "Drawings" tabs on the "Map" page.
From the "ALIGNMENT" drop-down bar, the user can attach an alignment to the folder. The alignment will be inherited for all the log points uploaded to the folder.
In the "Logpoint tolerance" section, the user can define the upper and lower limits for the log points uploaded to the folder by inserting values into the "UPPER LIMIT" and "LOWER LIMIT" bars.
The user must click the "Save" button at the end to save the modifications. If the user wants to close the box without modifying folder basic properties, the "Close" button can be clicked.
By clicking the "Move To" button, a box will open.

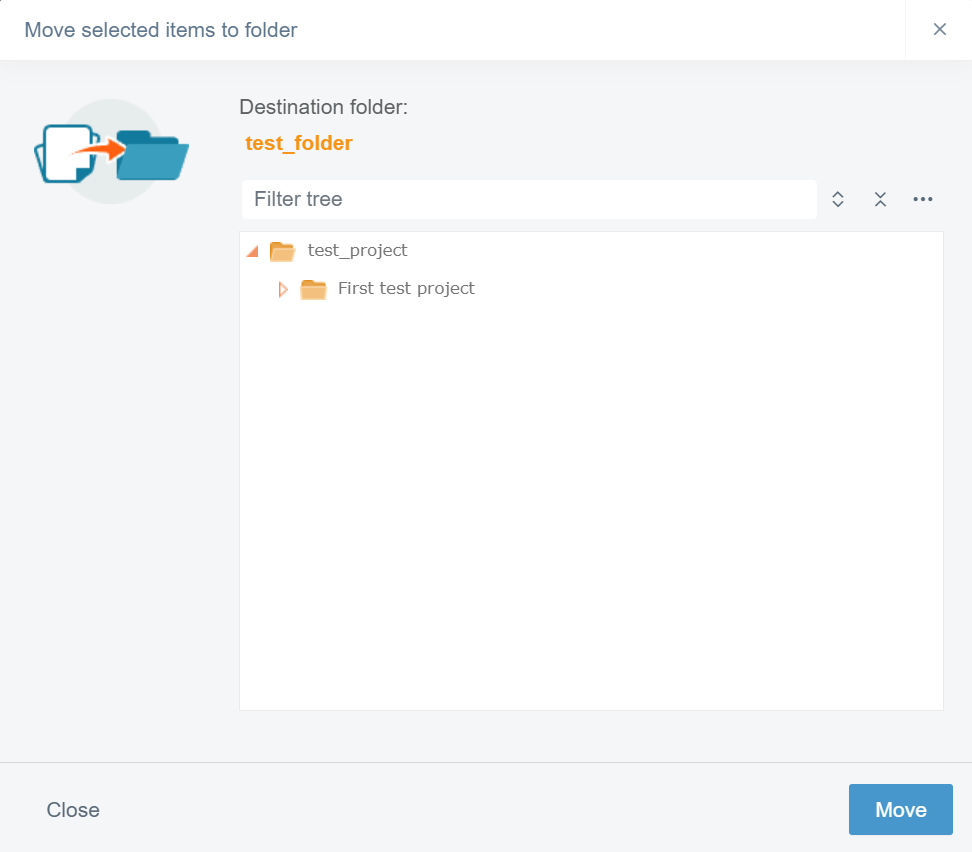
In this box, the user can change the folder's location.
In the "Filter tree" bar, the user can search folders from the folder tree.
The folder tree can be managed with the same tools introduced in the section "Folder Tree Tools".
The user must click the "Move" button at the end to move the folder. If the user wants to close the box without moving the folder, the "Close" button can be clicked.
By clicking the "Download" button, a box will open.
In this box, the user can select from different options on how the folder will be downloaded.
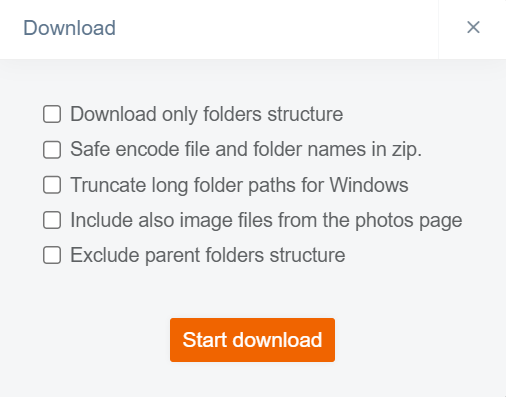
By checking the box next to "Download only folders structure", the user can download the folder structure without files.
By checking the box next to "Safe encode file and folder names in zip", the user can download the folder structure with files. The names of the folders and files will be encoded in such a way that special characters will be replaced with common characters. For example, empty spaces will be replaced with underscores.
By checking the box next to "Truncate long folder paths for Windows", the user can download the folder structure with files. The path of the files will be shortened to better comply with the requirements of the Windows proprietary extraction tool.
By checking the box next to "Include also image files from the photos page", the user can download the folder structure with files and also include the image files uploaded to the "Photos" page.
By checking the box next to "Exclude parent folders structure", the user can download the folder without the parent folder structure.
By clicking the "Start Download" button, the user can start downloading the files.
By clicking the "Delete" button, a box will open.
In this box, the user can observe the content that will be deleted, including the folder and the files.
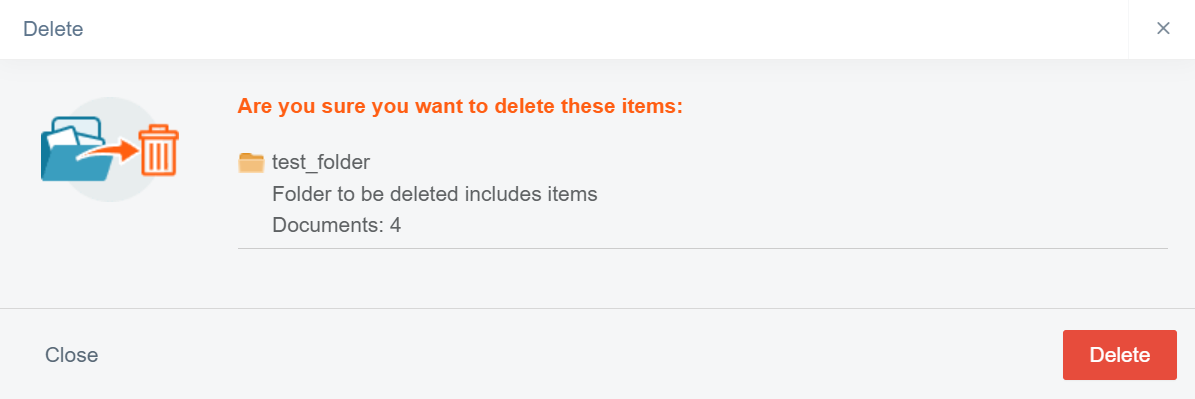
The user must click the "Delete" button to execute the deletion. If the user wants to close the box without deleting, the "Close" button can be clicked.
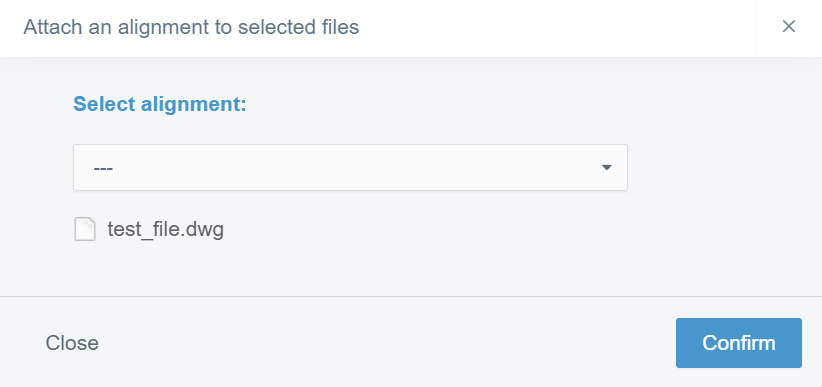
By clicking the "Attach alignment" button, a box will open.

In this box, the user can attach an alignment to the folder.

From the "Select alignment" drop-down bar, the user can select the alignment that will be attached to the folder. The alignment will be inherited for all the log points uploaded to the folder.
The user must click the "Confirm" button to complete the attachment. If the user wants to close the box without attaching an alignment, the "Close" button can be clicked.
By clicking the "Assign properties" button, a box will open.

In this box, the user can assign properties to the folder. Properties can be created in the "Project Settings" page, section "Properties".
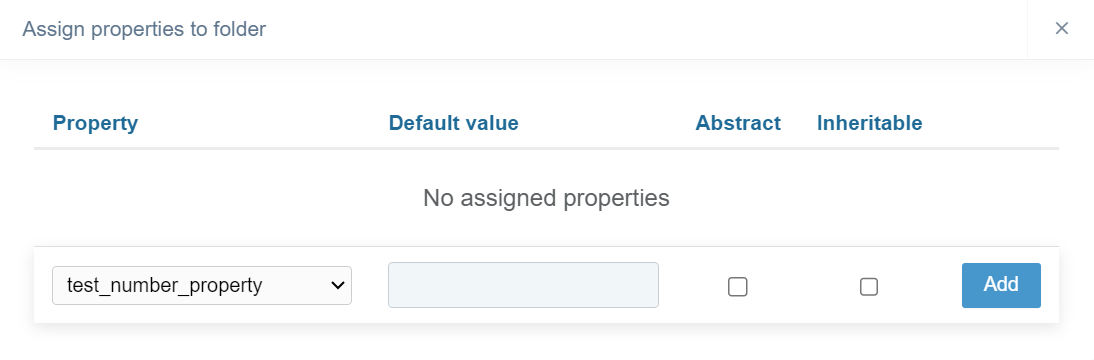
From the "Property" drop-down bar, the user can select the property that will be assigned to the folder.
From the "Property" drop-down bar, the user can select the property that will be assigned to the folder.
By checking the "Abstract" box, the user can determine that the default value will not be automatically added to the files that are uploaded to the folder.
By checking the "Inheritable" box, the user can determine if the property will be inherited for the subfolders.
By clicking the "Add" button, the property will be added to the assigned property list of the folder.
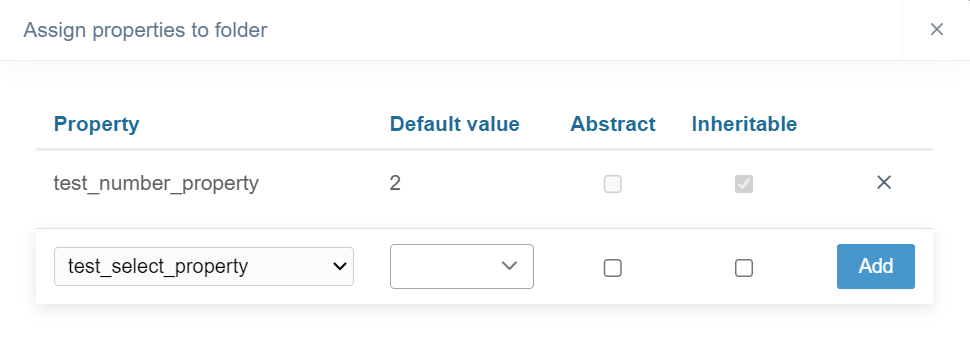
By clicking the x icon button at the end of the row, the user can delete the assigned folder property.

By clicking the "Folder permissions" button, a box will open.

In this box, the user can manage folder permissions by providing reading and writing rights for groups or all users. Groups can be created in the "Project Settings" page, section "Groups".
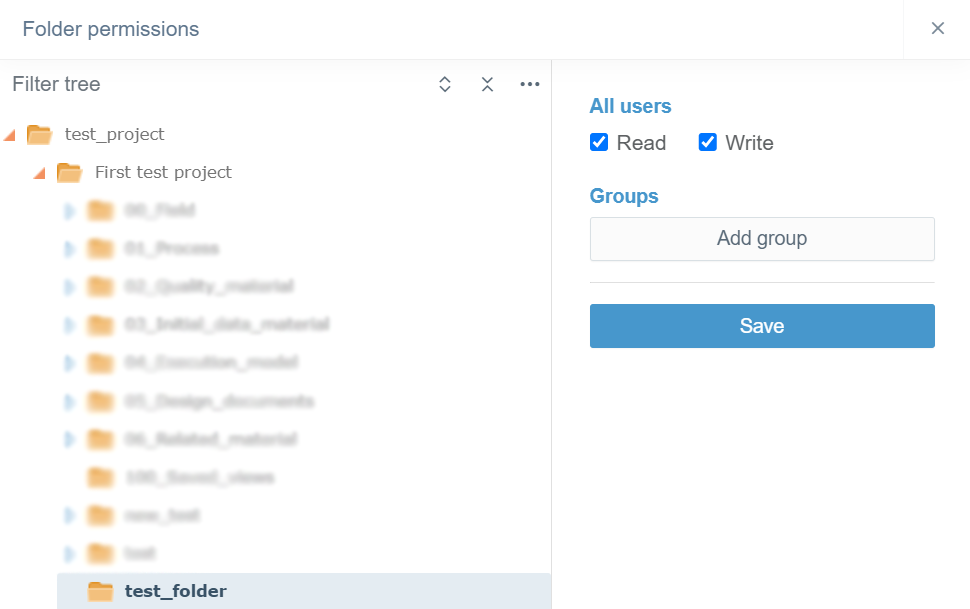
In the "All users" section, the user can disallow reading and writing rights for all users to the folder by unchecking the "Read" or "Write" boxes.
By clicking "Add group", the user can define rights for individual groups.
From the drop-down bars in the section "Groups", the user can select a group. By checking and unchecking the "Read" and "Write" boxes, the user can define the rights for a specific group.
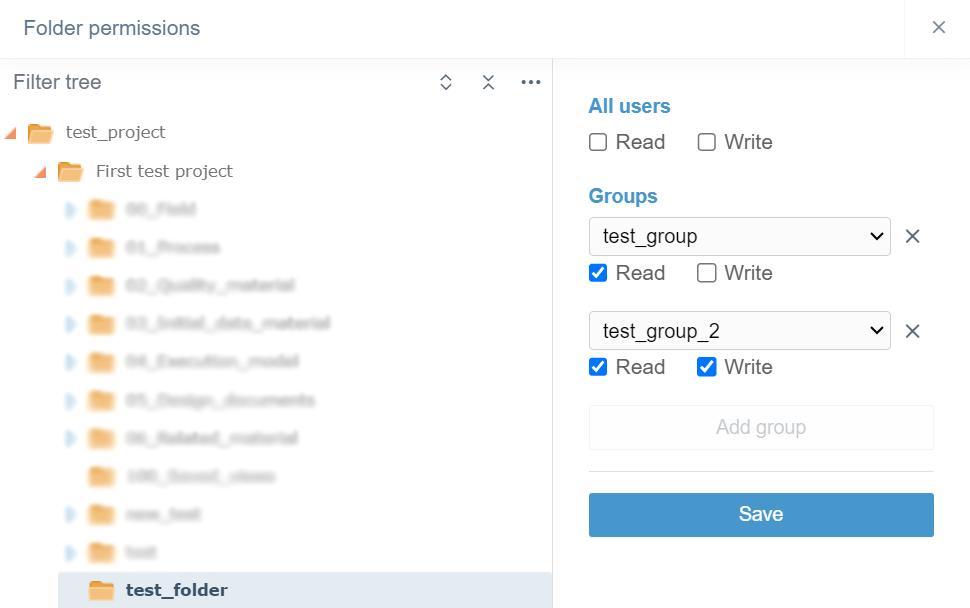
If the permissions for a certain group are restricted, the user must allow the permissions for other groups.
By clicking the x icon next to the group, the user can delete the group from the folder's permissions.

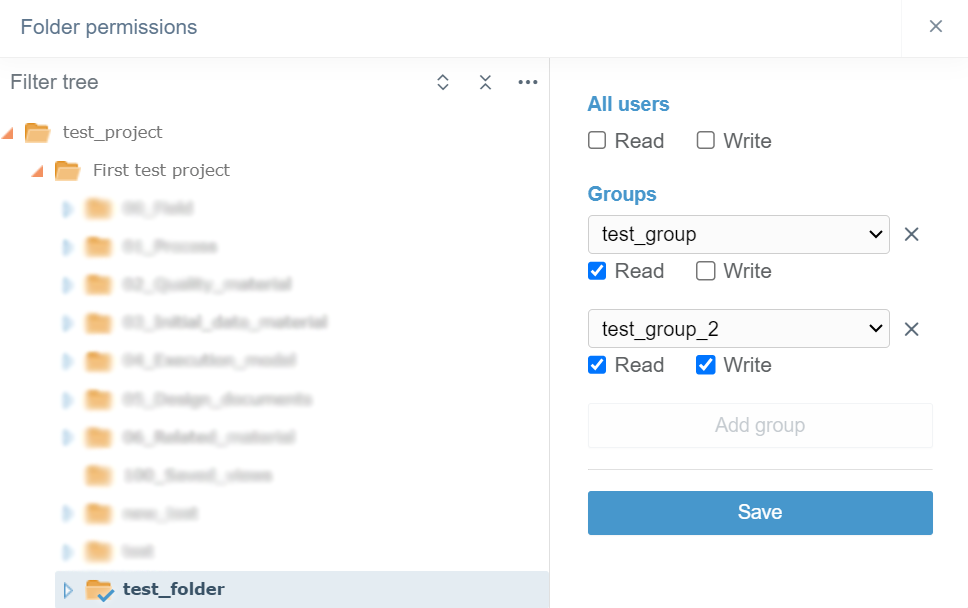
By clicking the "Save" button, the user can save the created changes for folder permissions. Next time the "Folder permissions" button is clicked, the restricted folder will have a check mark.
By clicking the burger menu at the top right corner of the file view, a box will open.

In this box, the user can turn on and off certain columns in the view.
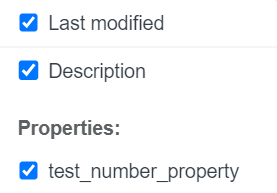
By checking and unchecking the boxes next to the attribute, the user can choose which columns are visible.
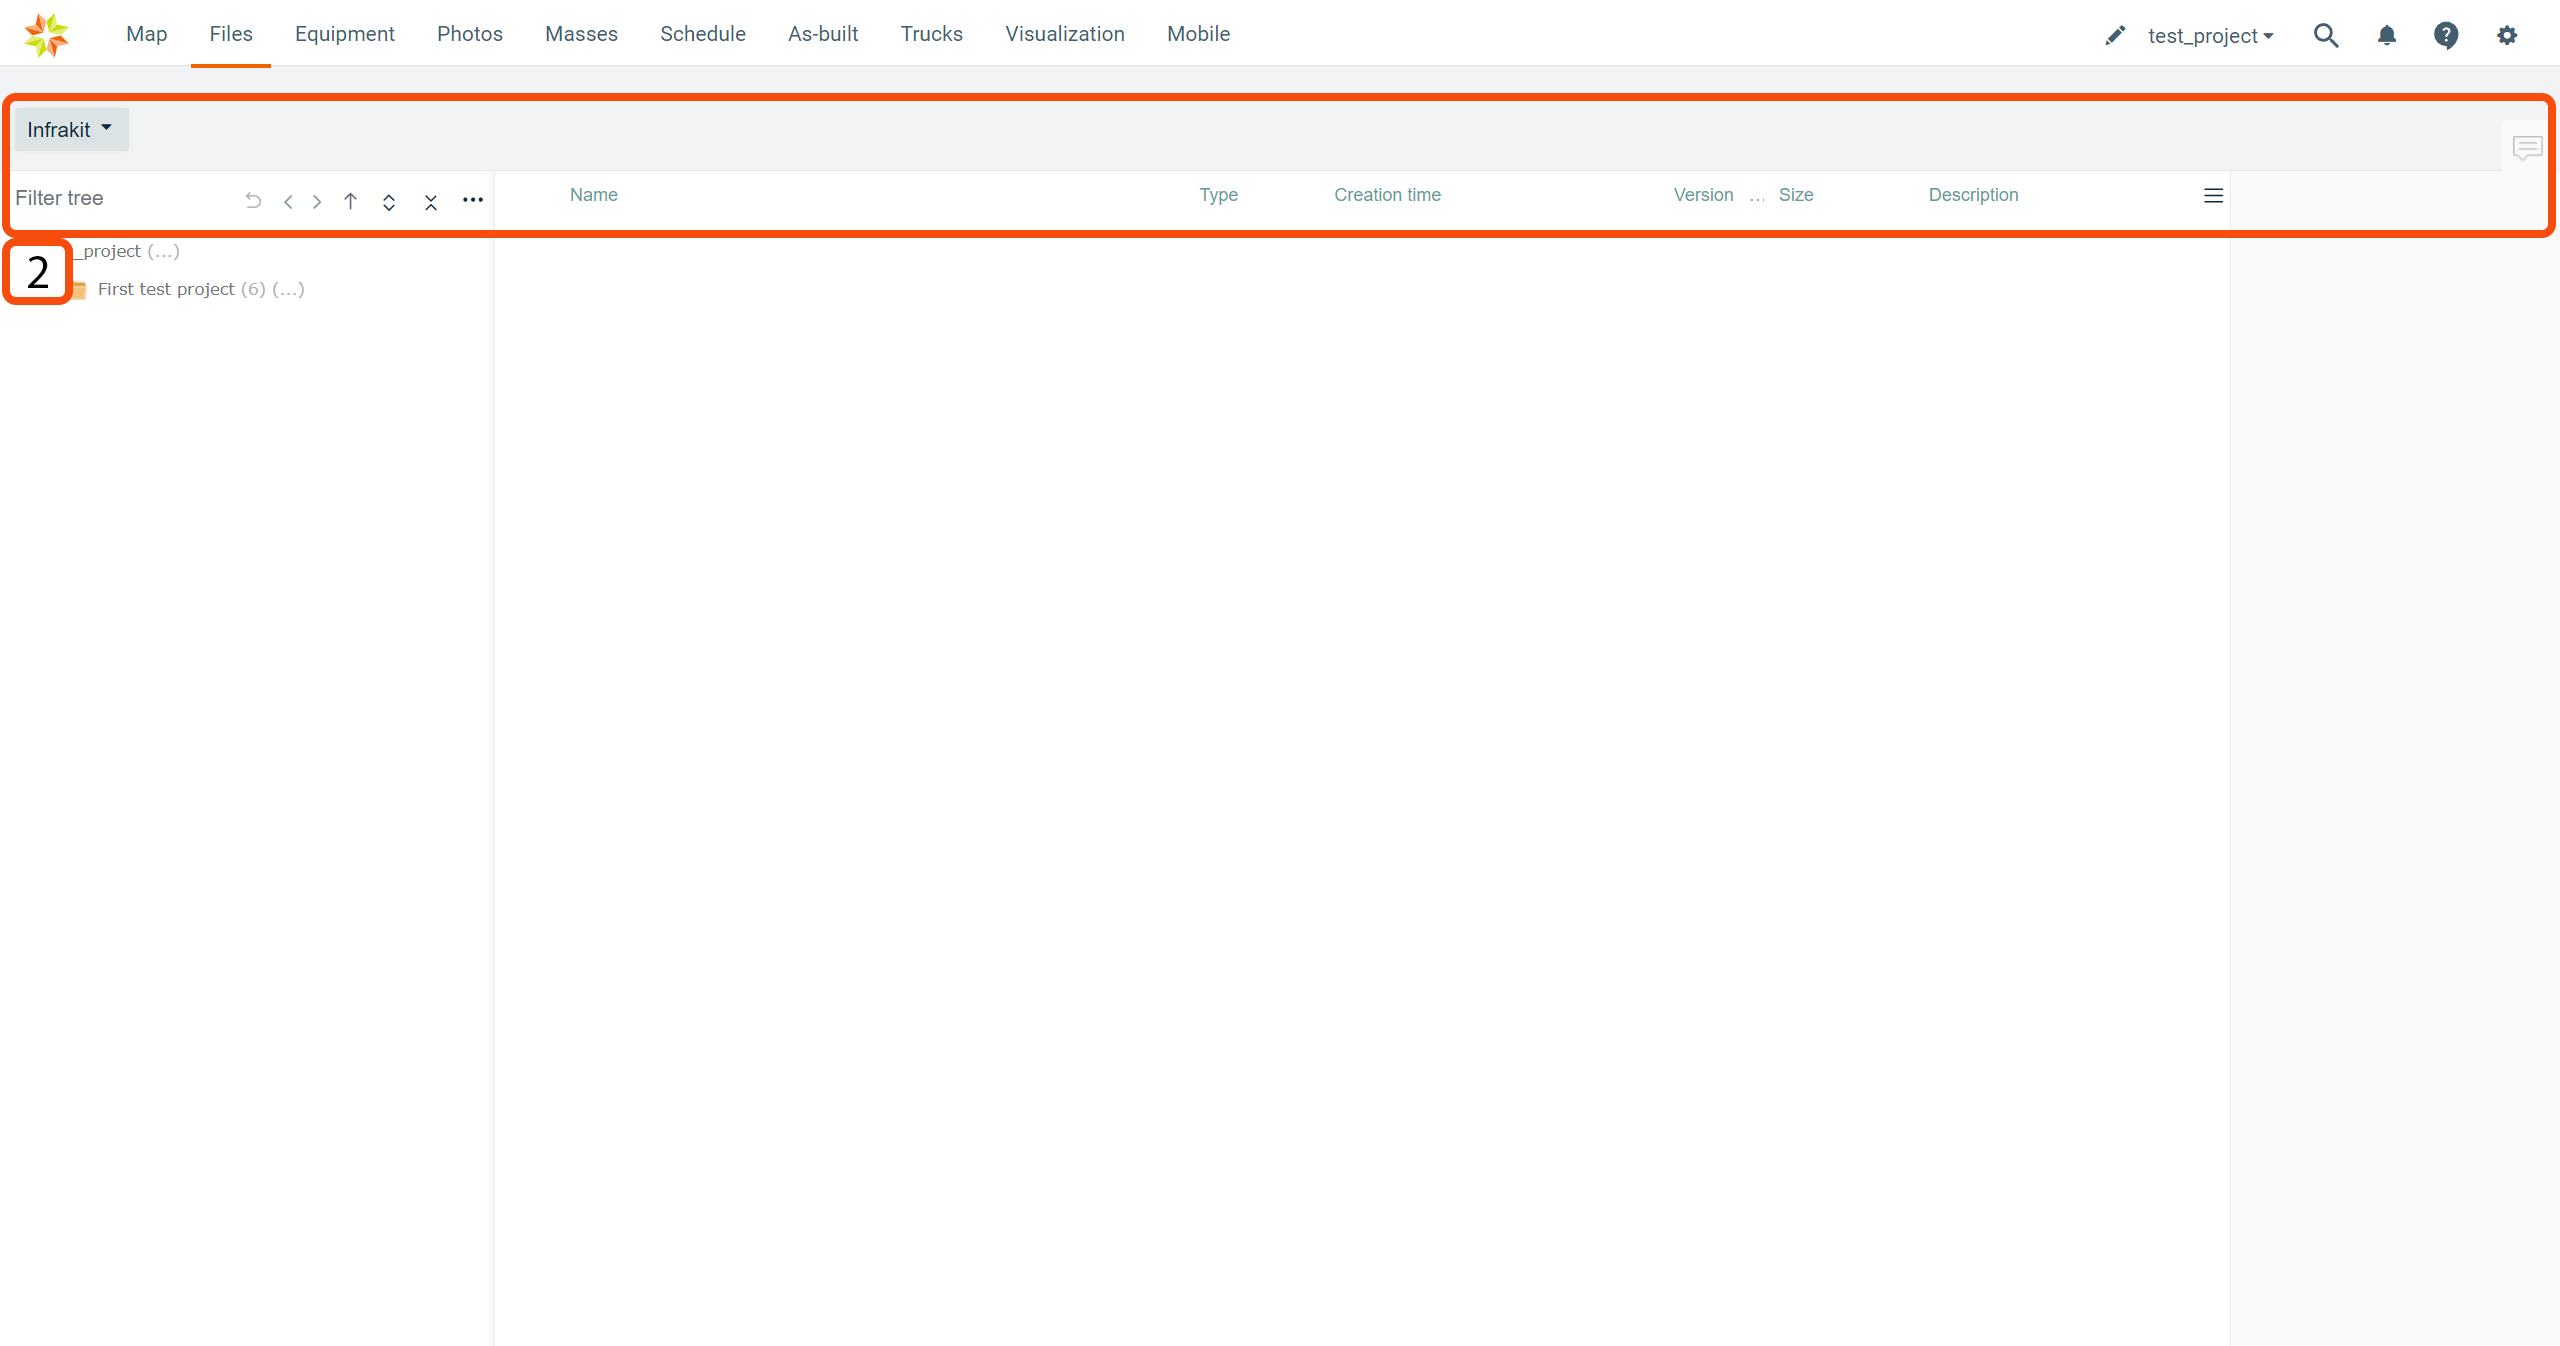
Folder Tree Tools ^
Above the folder tree, different tools can be found to browse the folders.

In the "Filter tree" bar, the user can search folders from the folder tree.

By clicking the "Recently selected" button, a list of recently visited folders appears, and the user can move back to these folders.

By clicking "Back" and the "Forward" buttons, the user can move between folders recently selected.

By clicking the "Up" button, the user can move to the parent folder of the current selected folder.

By clicking the "Expand tree" button, the whole folder tree will be revealed.
By clicking the "Collapse tree" button, the folder tree will be collapsed so that only the root folder will be visible.


By clicking the "Tree settings" button, a box will appear.
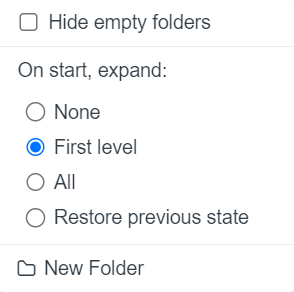
By adding a check mark to "Hide empty folders" all the empty folders in the folder tree will be hidden.
"On start, expand", the user can determine how the folder tree is shown after the browser page has been reloaded, for example, when the user logs in to Infrakit or refreshes the page. "None" means that only the root folder is shown; "First level" means that only the direct subfolders of the root folder will be shown; "All" means that all the folders in the folder tree will be shown; and "Restore previous state" means that the previous state of the folder tree will be restored.
By clicking "New Folder", the user can create a new folder under the folder that has been chosen.
Files ^
Edit File ^
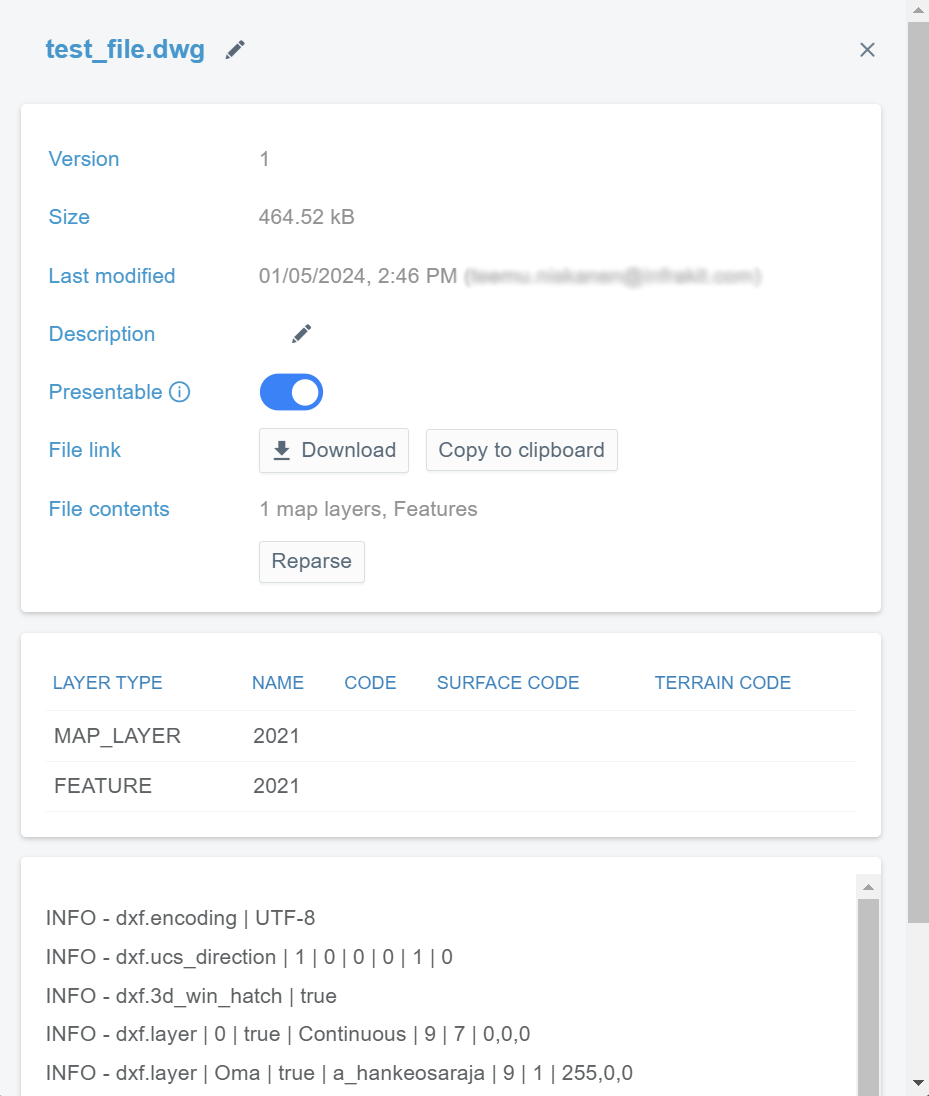
By clicking the file's name, a box will open.
In this box, the user can modify the file's basic properties.
By clicking the pen icon next to the file's name, a new view will appear.

In this view, the user can modify the file's name or upload a new version of the file.
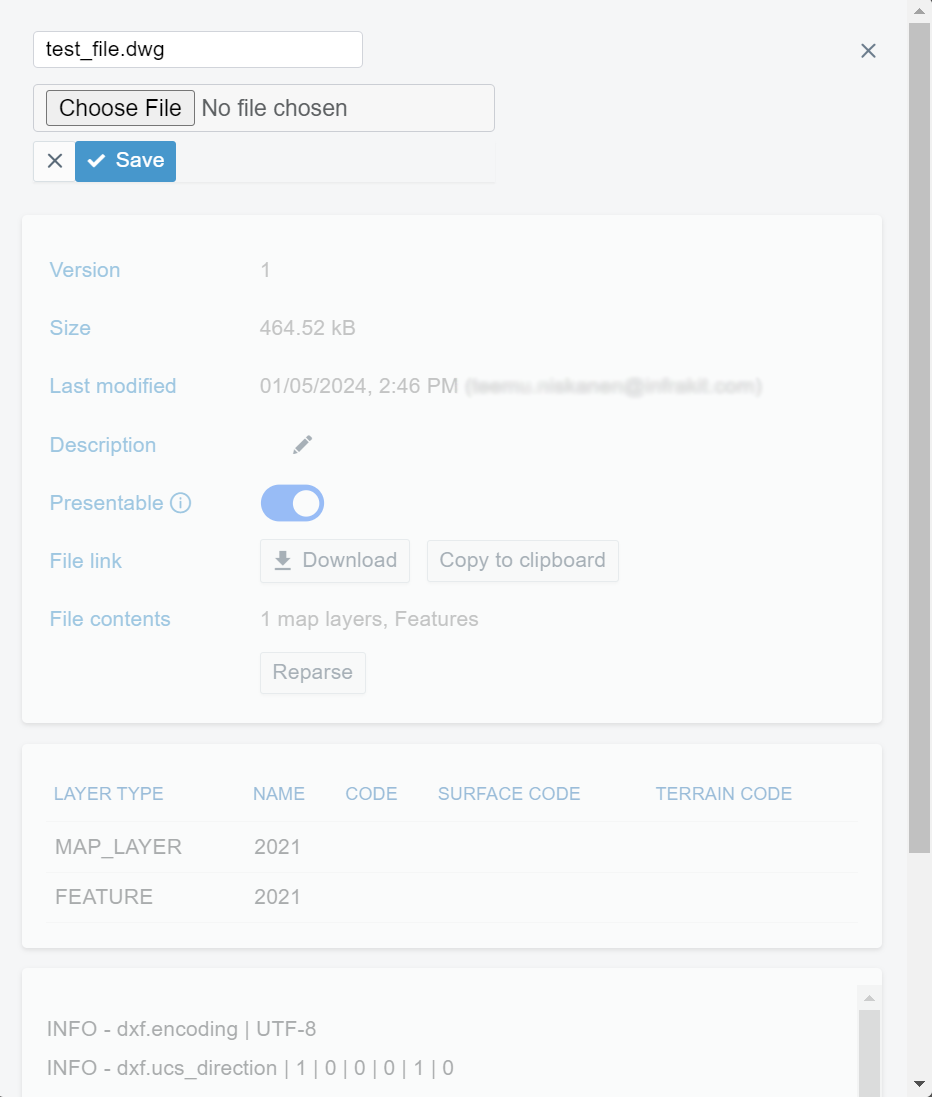
By clicking the "Choose file" button, the user can browse local folders to select a new version of the file.
By clicking the "Save" button, the user can save the changes.
By clicking the x icon button, the user can close the view without saving modifications.

In the "PRESENTABLE" section, the user can determine if the file is available in the 2D, 3D, and cross-section views by moving the knob left and right. If turned off, the file will not be visible in the "Models" and "Drawings" tabs on the "Map" page.
By clicking the "Download" button, the user can download the file to a local computer.
By clicking the "Copy to clipboard" button, the user can copy a link that can be used to download the file.
By clicking the "Reparse" button, the user can reparse the file.
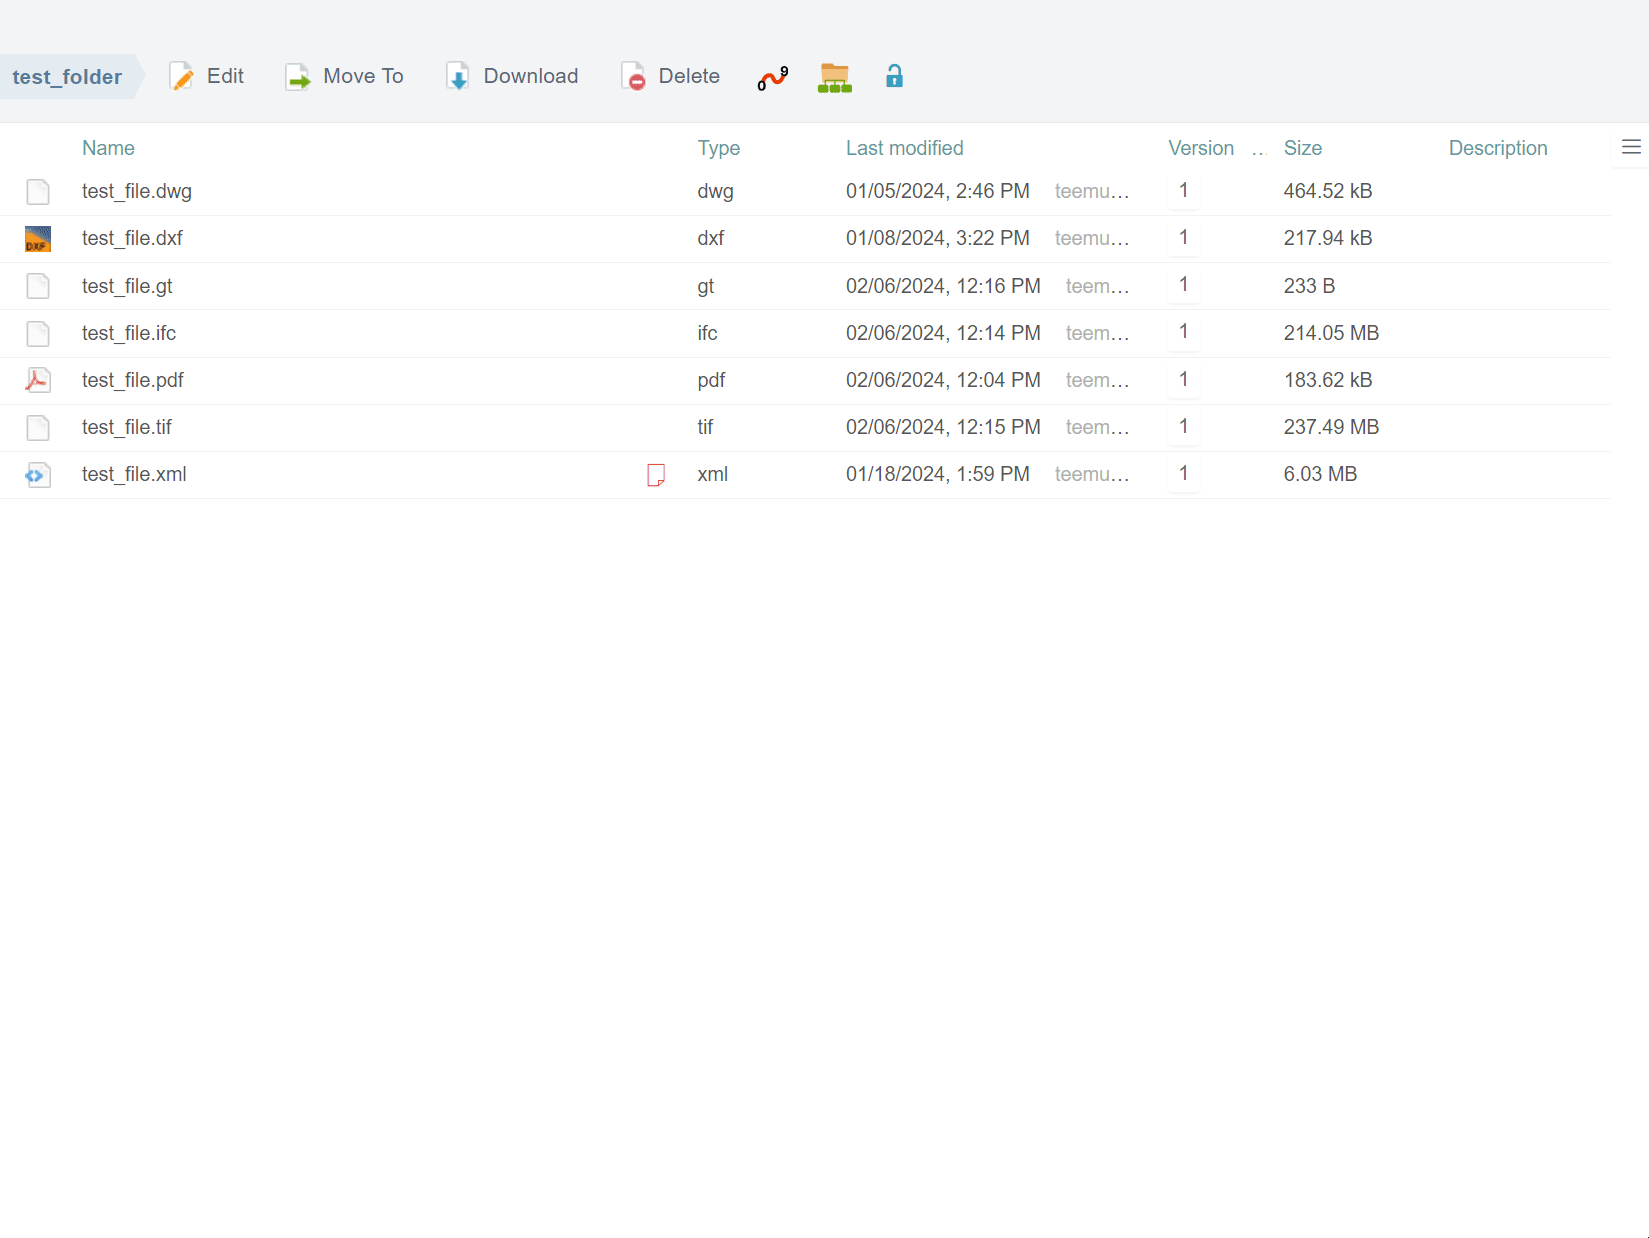
Basic File Tools and Features ^
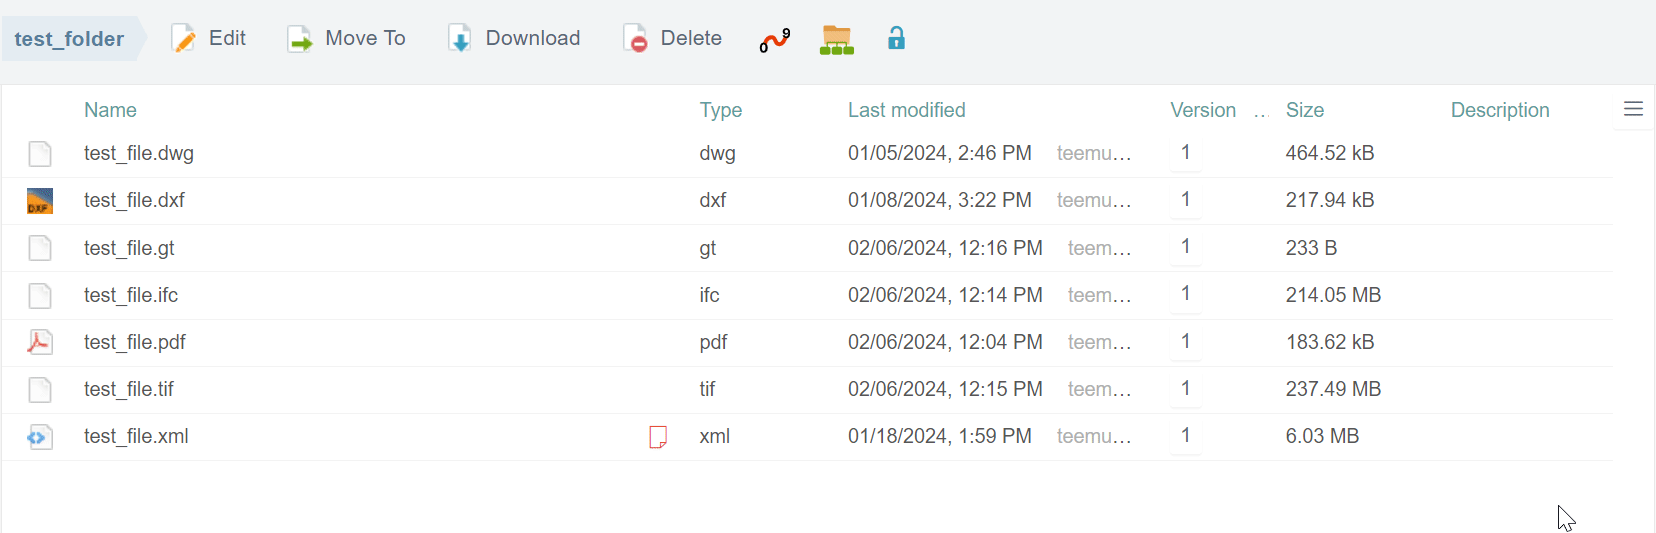
When a file is activated, new tools and features become available at the top of the page. Depending on the file format, the variety of tools and features differs.
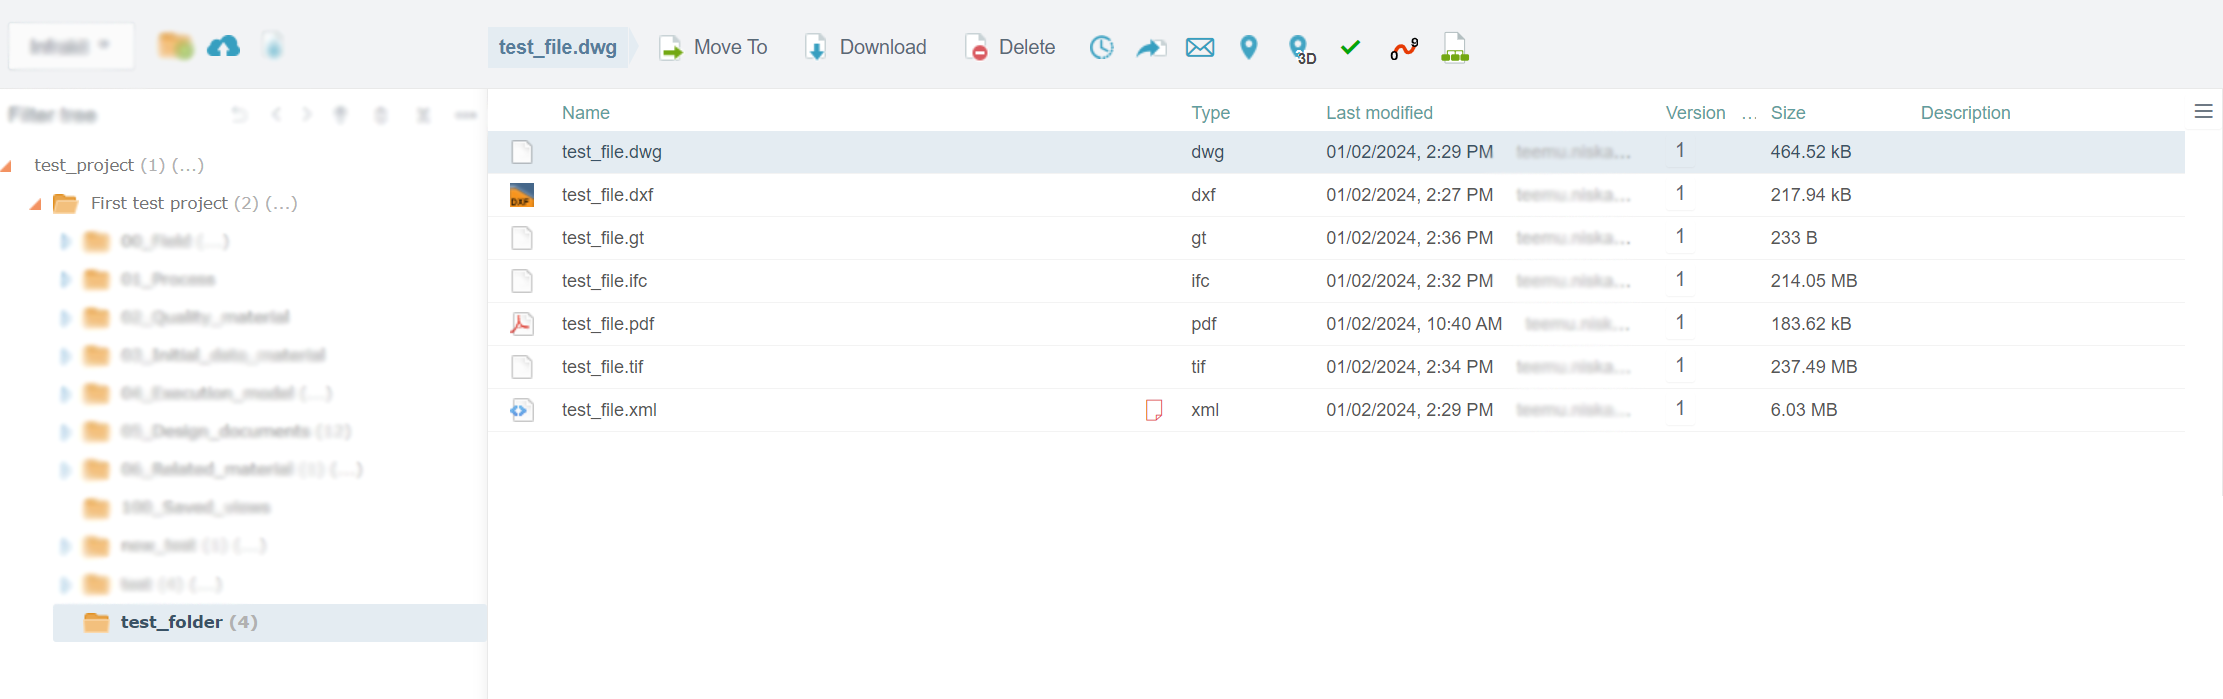
The basic tools for all file formats are:

By clicking the "Move To" button, a box will open.


In this box, the user can change the file's location.
In the "Filter tree" bar, the user can search folders from the folder tree.
The folder tree can be managed with the same tools introduced in the section "Folder Tree Tools".
The user must click the "Move" button at the end to move the file. If the user wants to close the box without moving the file, the "Close" button can be clicked.
By clicking the "Download" button, the user can download the file to a local computer. The download will start instantly when the button is clicked.

By clicking the "Delete" button, a box will open.

In this box, the user can observe the content that will be deleted.
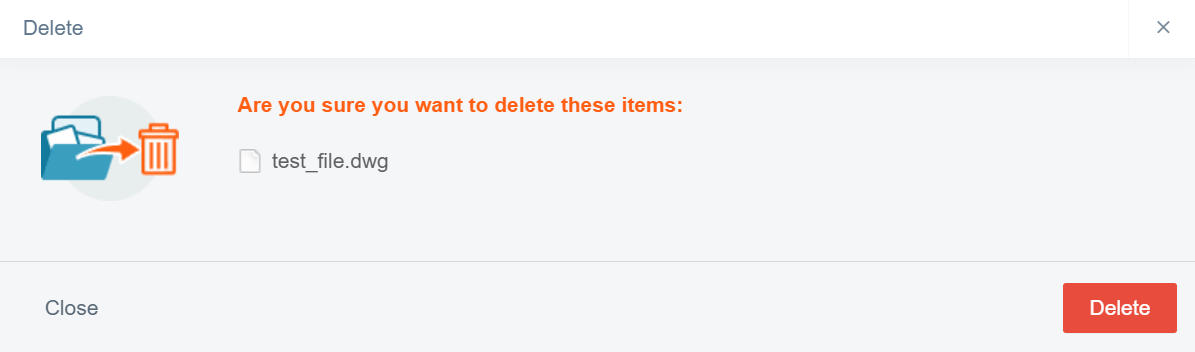
The user must click the "Delete" button to execute the deletion. If the user wants to close the box without deleting, the "Close" button can be clicked.
By clicking the "History" button, a box will open.

In this box, the user can observe the file's version history.
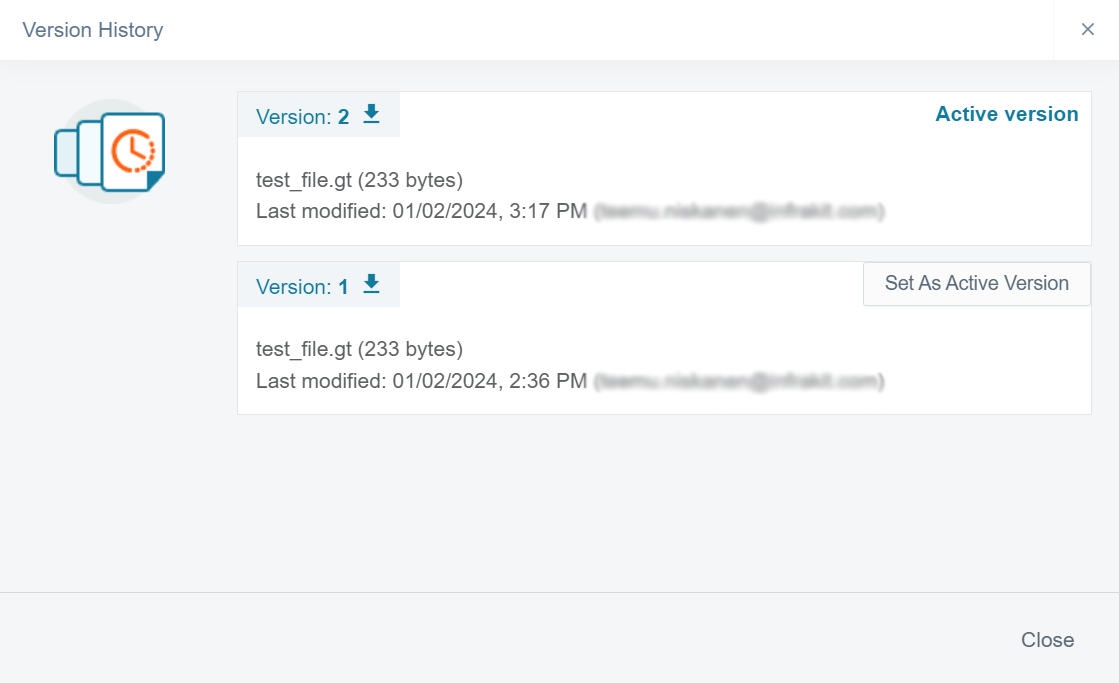
By clicking the downward arrow next to the version name, the user can download the version.

By clicking the "Set As Active Version" button, the user can change the file's active version.
By clicking the "Close" button, the user can close the box.
By clicking the "Create Shortcut" button, a box will open.

In this box, the user can create a shortcut for a file by browsing the folder tree and activating the folder where the shortcut will be created.
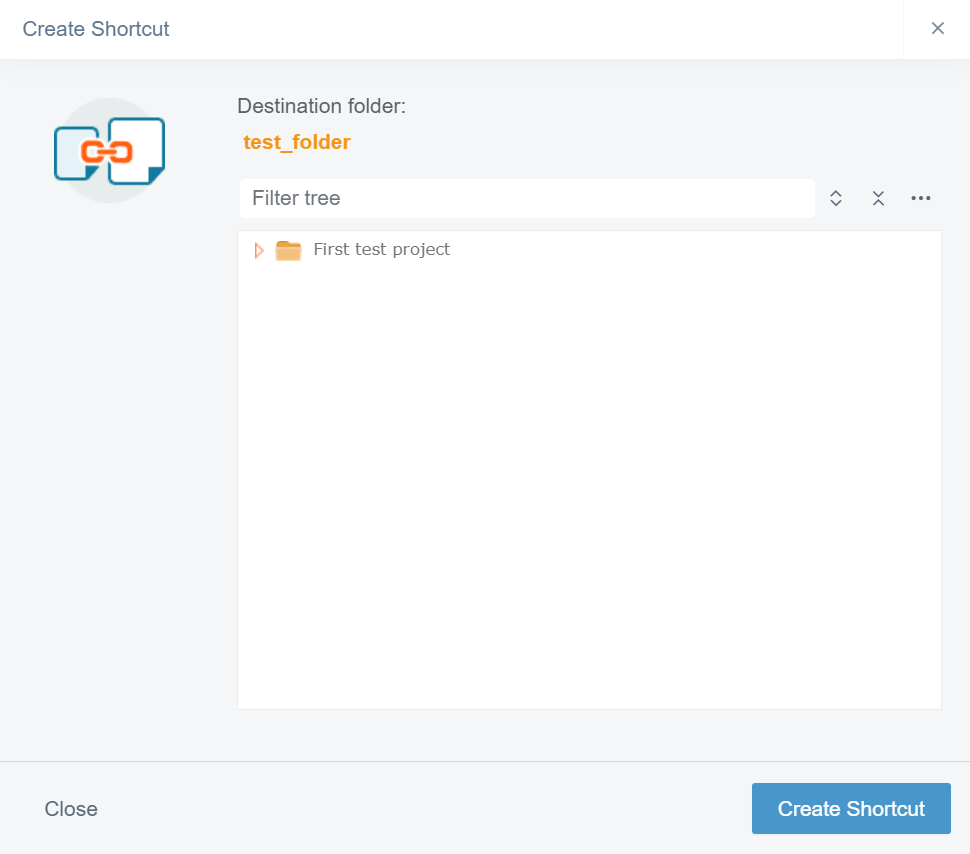
In the "Filter tree" bar, the user can search folders from the folder tree.
The folder tree can be managed with the same tools introduced in the section "Folder Tree Tools".
The user must click the "Create Shortcut" button to complete the creation. If the user wants to close the box without creating a shortcut, the "Close" button can be clicked.
By clicking the "Send email" button, a box will open.

In this box, the user can send an email notification about a file to project users.
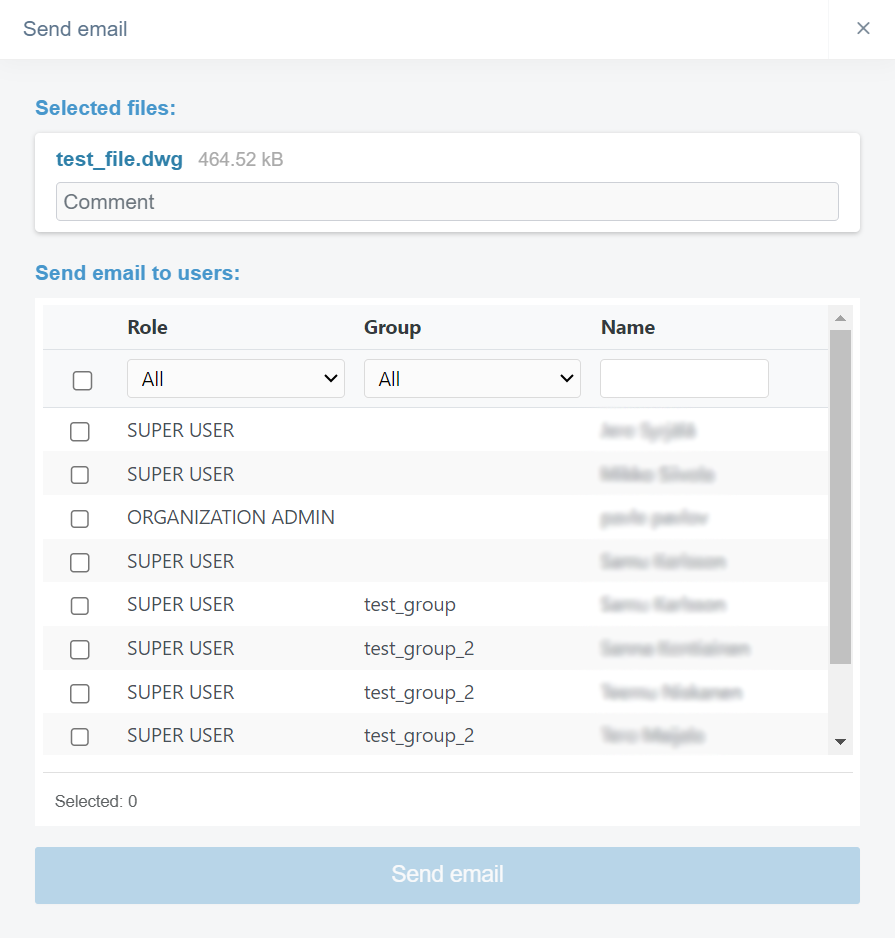
In the "Comment" bar, the user can write a comment, which will be shown in the email message.
By checking the box in the user's row, the user can select to which users the notification will be sent.
By using the "Role" and "Group" drop-down bars or the "Name" bar, the user can filter the users based on the role, group, or name. Groups can be created in the "Project Settings" page, section "Groups".
By clicking the "Send email" button, the user can send the email message.
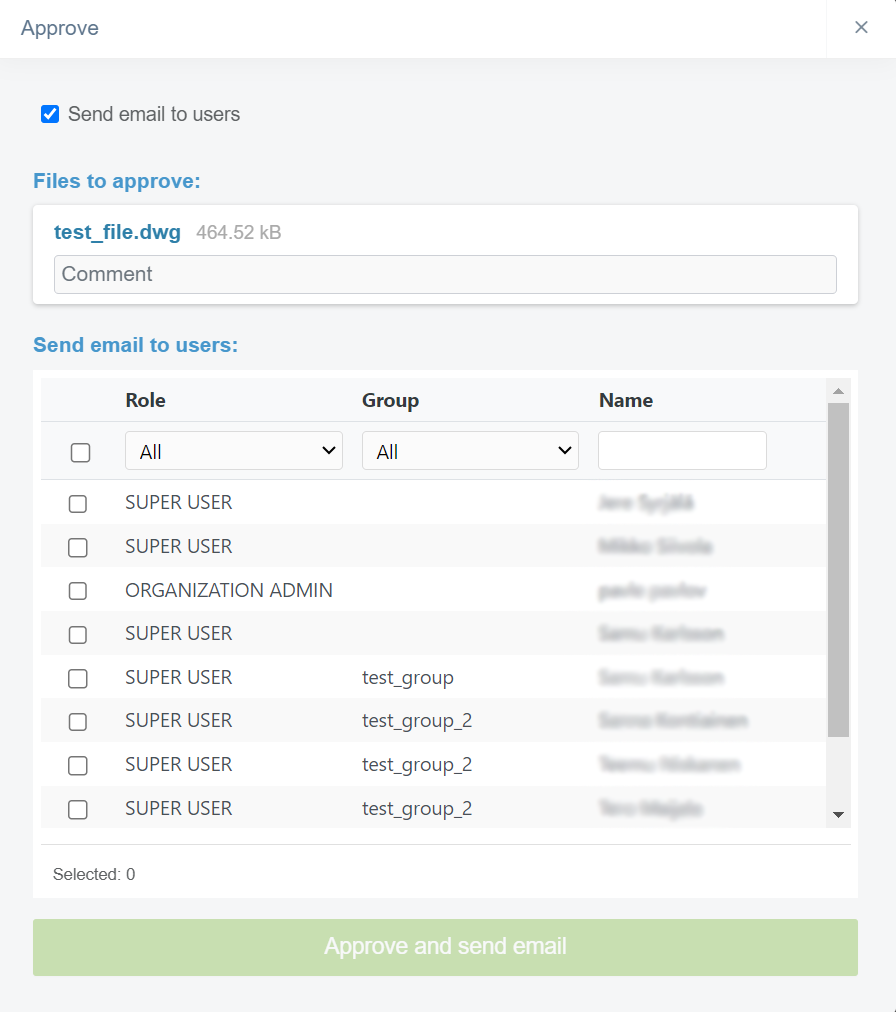
By clicking the "Approve" button, a box will open.

In this box, the user can give an approved tag for a file.
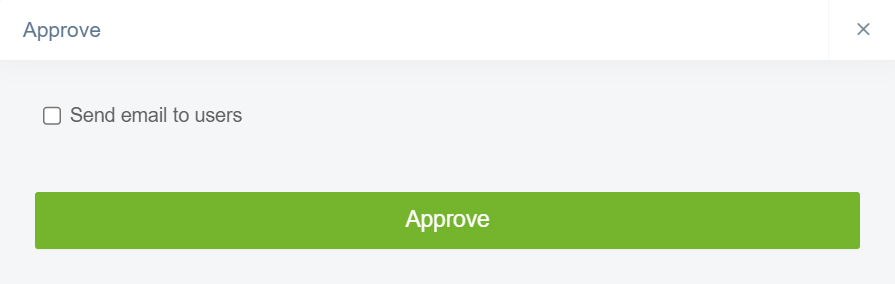
By checking the "Send email to users" box, a new box will open.
In this box, the user can send an email notification about the approval of a file to project users.
By unchecking the "Send email to users" box, the user can return to the previous box.
In the "Comment" bar, the user can write a comment, which will be shown in the email message.
By checking the box in the user's row, the user can select to which users the notification will be sent.
By using the "Role" and "Group" drop-down bars or the "Name" bar, the user can filter the users based on the role, group, or name. Groups can be created in the "Project Settings" page, section "Groups".
By clicking the "Approve and send email" button, the user can approve the file and send the email message.
By clicking the "Approve" button, the user can approve the file.
By clicking the "Attach alignment" button, a box will open.

In this box, the user can attach an alignment to the file.
From the "Select alignment" drop-down bar, the user can select the alignment that will be attached to the file.
The user must click the "Confirm" button to complete the attachment. If the user wants to close the box without attaching an alignment, the "Close" button can be clicked.
By clicking the "Edit properties" button, a box will open.

In this box, the user can modify the properties that the file received when uploaded to the folder. The folder properties can be created in the section "Folder Tools and Features" with the feature "Assing properties".
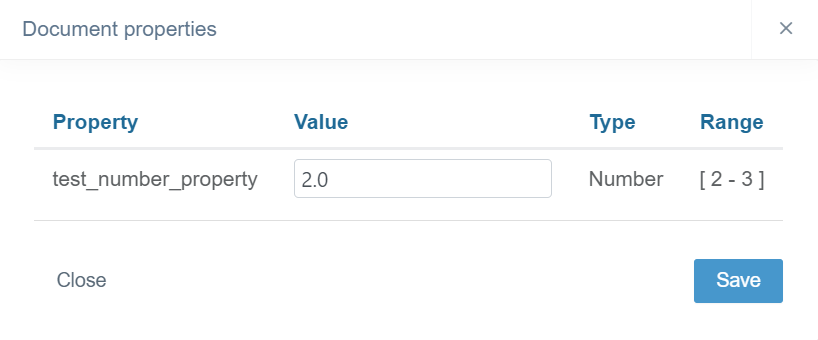
In the "Value" bar, the user can modify the property value assigned to the file.
The user must click the "Save" button at the end to save the modifications. If the user wants to close the box without making any modifications, the "Close" button can be clicked.
Format-Specific Tools and Features ^
In addition to the basic tools and features for files, some format-specific tools are also provided.
DWG, DXF, XML, IFC, GT
By clicking the "View On Map" button, the user will be directed to the "Map" page, and the file can be observed in 2D.

By clicking the "View on 3D map" button, the user will be directed to the "Visualization" page, and the file can be observed in 3D.

By clicking the "Reparse" button, a confirmation box will appear.


By clicking "OK", the user can confirm the reparsing, and the reparsing will start.
By clicking "Cancel", the user can close the box without reparsing the files.
XML
By clicking the "Download InfraModel Checker report" button, the user can download an InfraModel Checker report about the file in PDF format.

GT
By clicking the "Link GT file to a document" button, a box will open.

In this box, the user can attach a PDF file or an external link to the GT file. The attached file or the external link can be observed on the "Map" page when an individual point from the GT file is activated.
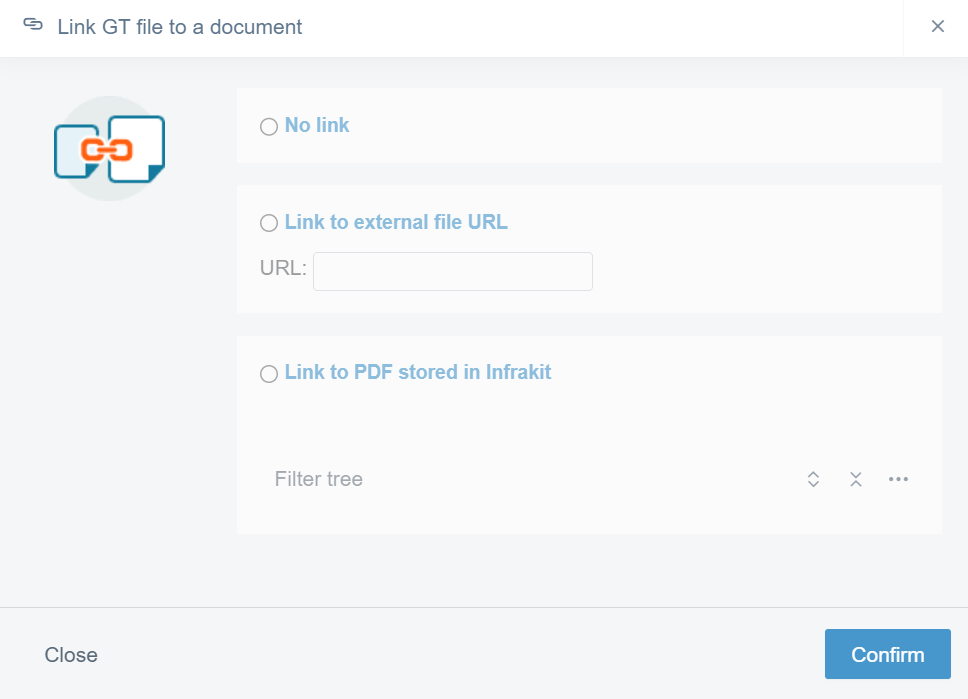
By checking the "No link" circle, the user can detach a previously linked PDF file.
By checking the "Link to external URL" circle, the user can attach an external link to the file.
By checking the "Link to PDF stored in Infrakit" circle, the user can attach a PDF file from the project's folder tree.
In the "Filter tree" bar, the user can search PDF files from the folder tree.
The folder tree can be managed with the same tools introduced in the section "Folder Tree Tools".
The user must click the "Confirm" button to complete the attachment detachment. If the user wants to close the box without attaching or detaching, the "Close" button can be clicked.
By clicking the "Open PDF in new browser tab" button, the user can open the PDF file in a new browser tab.

Selecting Multiple Files ^
The user can select multiple files by holding the Ctrl button and clicking files with the left button on the mouse. When multiple files are selected, the same tools are provided depending on the file formats. Format-specific tools are only provided if all the files are in the same format. In addition to the aforesaid tools, there is a bulk reparsing tool.
By clicking the "Reparse" button, a confirmation box will appear.


By clicking "OK", the user can confirm the reparsing, and the reparsing will start.
By clicking "Cancel", the user can close the box without reparsing the files.
Comment a File ^
On the right side of the file view, the user can add a comment for a file. The comment will be visible to the users who have permission to access the folder where the file is located. Folder permissions can be managed in the section "Folder Tools and Features" with the feature "Folder permissions".
In the box, the user can write a comment.
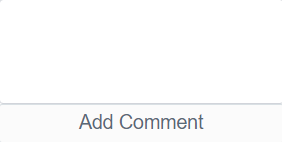
By clicking the "Add Comment" button, the comment will be attached to the file. The comments can be seen on the right side of the file view.
By clicking the "Hide Comments" button at the top right corner of the file view, the user can hide the comments from the view.

3. General Features ^
At the right corner of the top ribbon, four general features can be found.

By clicking the pen icon, the user will be directed to the "Project Editing" page.

From the drop-down box, the user can select the active project.

By clicking the magnifying glass icon, a new box appears.

In this box, the user can search for content from "Files" page by using the search bar at the top.

By clicking the bell icon, a new box appears.
This box contains six tabs: "All", "Files", "Folders", "Photos", "Services", and "Chat".

"All" is the default tab when the box opens. In this tab, all the notifications on the project are listed.
The "Files" tab contains all notifications concerning files.
The "Folders" tab contains all notifications concerning folders.
The "Photos" tab contains all notifications concerning image files.
The "Service" tab contains general notifications concerning Infrakit software.
Through the "Chat" tab, users can send messages inside a project.
By clicking "Load more," the user can observe older notifications.

By clicking the speech bubble icon, a new box appears.

Through the "Search for articles" bar, the user can browse Infrakit's knowledge base using key words that, for example, represent functions, tools, or operations.
By clicking the "Create support ticket" button, a new view will appear.
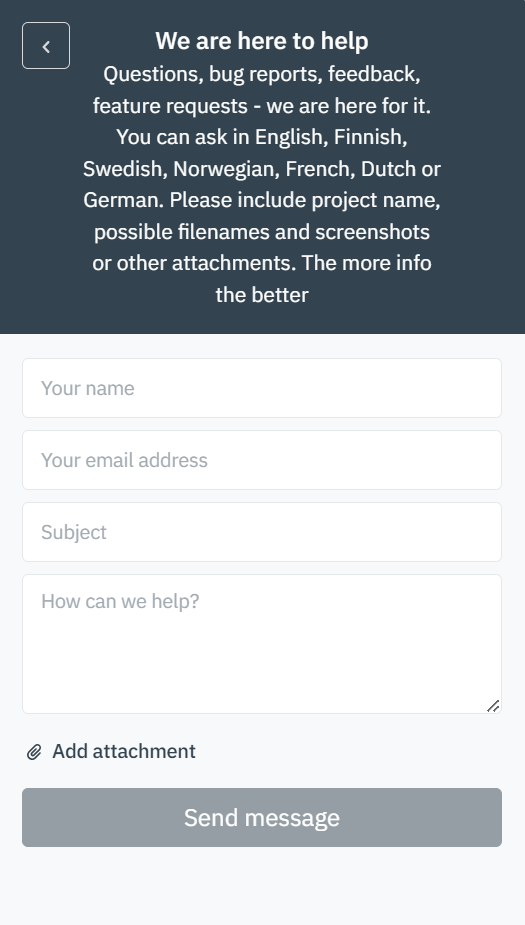
In this view, the user can send a message to Infrakit's customer support team.
In the "Your name" bar, the user can insert his or her own name.
In the "Your email address" bar, the user can insert his or her own email address.
In the "Subject" bar, the user should write a succinct description of the issue.
In the "How can we help?" box, the user should describe the issue as detailed as possible. The more related information is provided, the easier it is for the support team to investigate the issue.
By clicking "Add attachment", the user can add attachments to the message. Attaching images, videos, and files where the issue occurs will help to solve the issue more efficiently.
By clicking the "Send message" button, the message will be sent to the support team.
By clicking the arrow icon button, the user can change to the previous view.

By clicking the x icon button, the user can close the customer support box.


By clicking the gear icon, a new box will open.
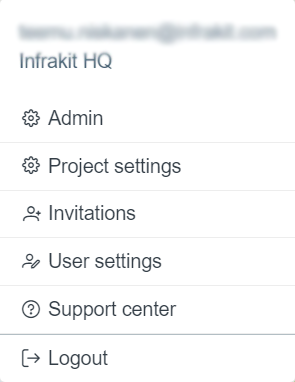
This box contains six options: "Admin", "Project settings", "Invitations", "User settings", "Support Center", and "Logout".
By clicking "Admin", the user will be directed to the starting page of the "Admin" features.
By clicking "Project settings", the user will be directed to the "Project Settings" page.
By clicking "Invitations", the user will be directed to a new page where invitations can be viewed and accepted or rejected.
By clicking "User settings", the user will be directed to the "User Settings" page.
By clicking "Support center", the user will be directed to the "Support Center" web page, where guidelines for how to use Infrakit software can be searched and contact information can be found.
By clicking "Logout", the user will be logged out of the Infrakit software.
2. Mouse Actions ^
By clicking a folder in a folder tree with the right button on the mouse, two options will appear.
By clicking "Upload", the same box will open as when the "Upload" button is clicked. In this box, the user can upload files to the selected folder.
By clicking "New Folder", the same box will open as when the "Create Folder" button is clicked. In this box, the user can create a new folder in the selected folder.
By clicking a file with the right button on the mouse, depending on the format, the same tools are provided as introduced in the sections "Basic File Tools and Features", "Format-Specific Tools and Features", and "Selecting Multiple Files".
3. Keyboard Actions ^
By pressing Ctrl + space, the user can open the search box.
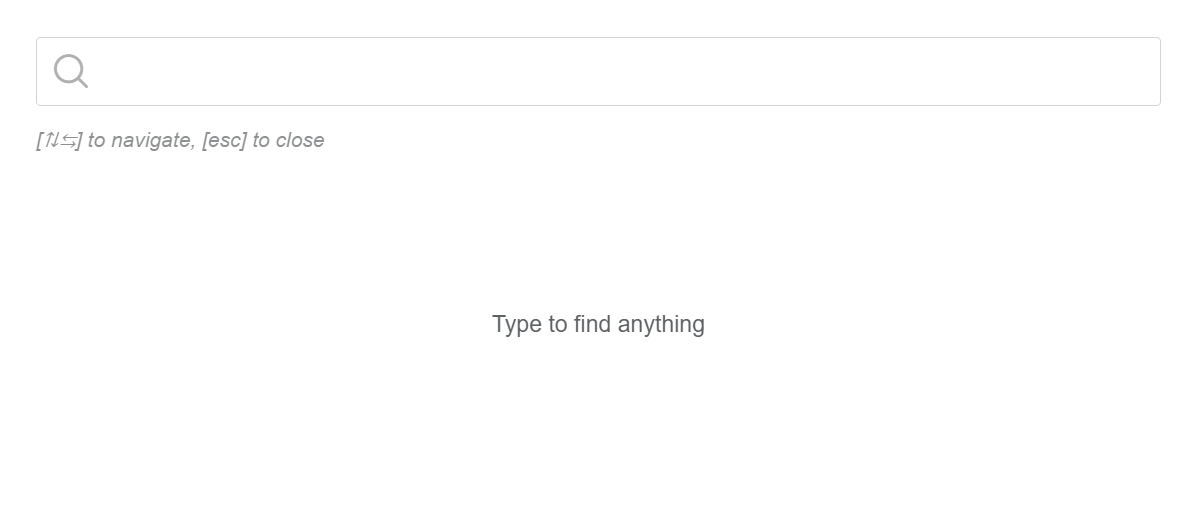
In this box, the user can search for content from "Files" page by using the search bar at the top.
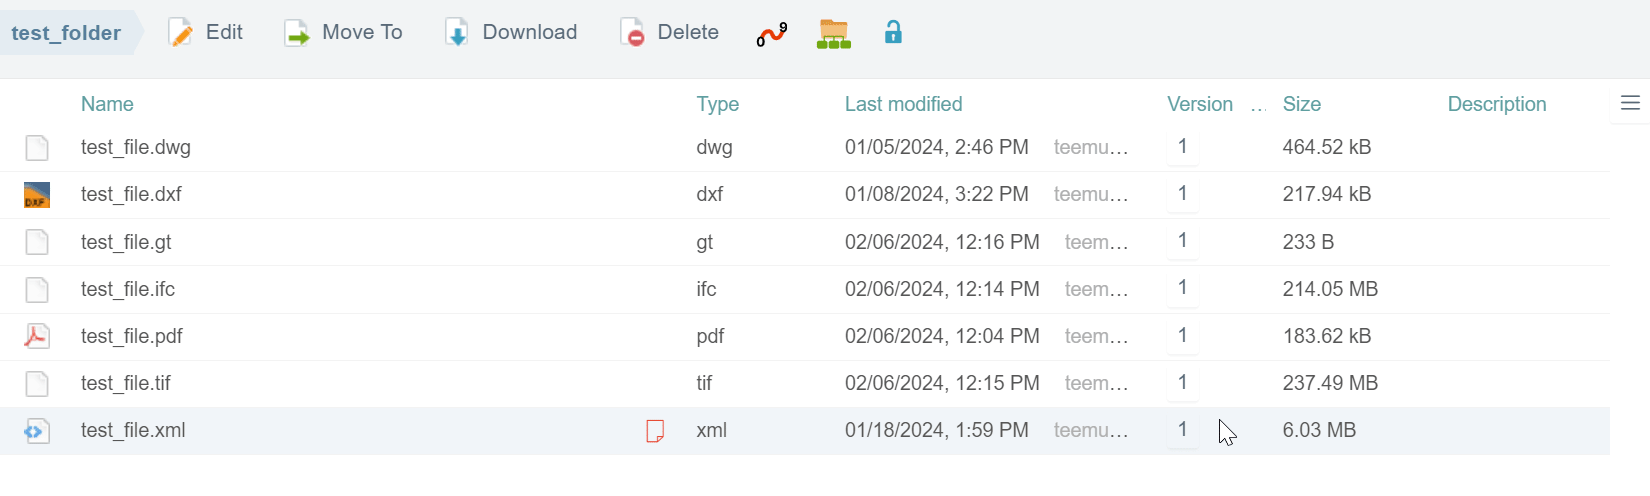
4. Supported File Formats ^
The user can upload different file formats for different purposes to Infrakit. In this section, supported file formats are listed.
Compressed Folder
ZIP
Models
LandXML, IFC, DWG, DXF, Geonic (GT), SHP, GEO, KOF, CSV, PXY, IREDES XML, VGP, JXL, SOS
Drawings
Documents
PDF, DOCX
Image Files
JPG, PNG, HEIC
Orthophotos
TIF, TIFF, JP2
Point Clouds
LAS, LAZ, E57
Code Lists
NFCL
Datum Transformation Grid File
SGF, GSB
Height System (Geoid) File
GGF
5. Supported Storage Integrations ^
The user can integrate third-party cloud storage systems into Infrakit. In this section, supported integrations are listed.
6. FAQ ^