Linked pages:
By clicking the name, you will be directed to a new page.
Basic Functions
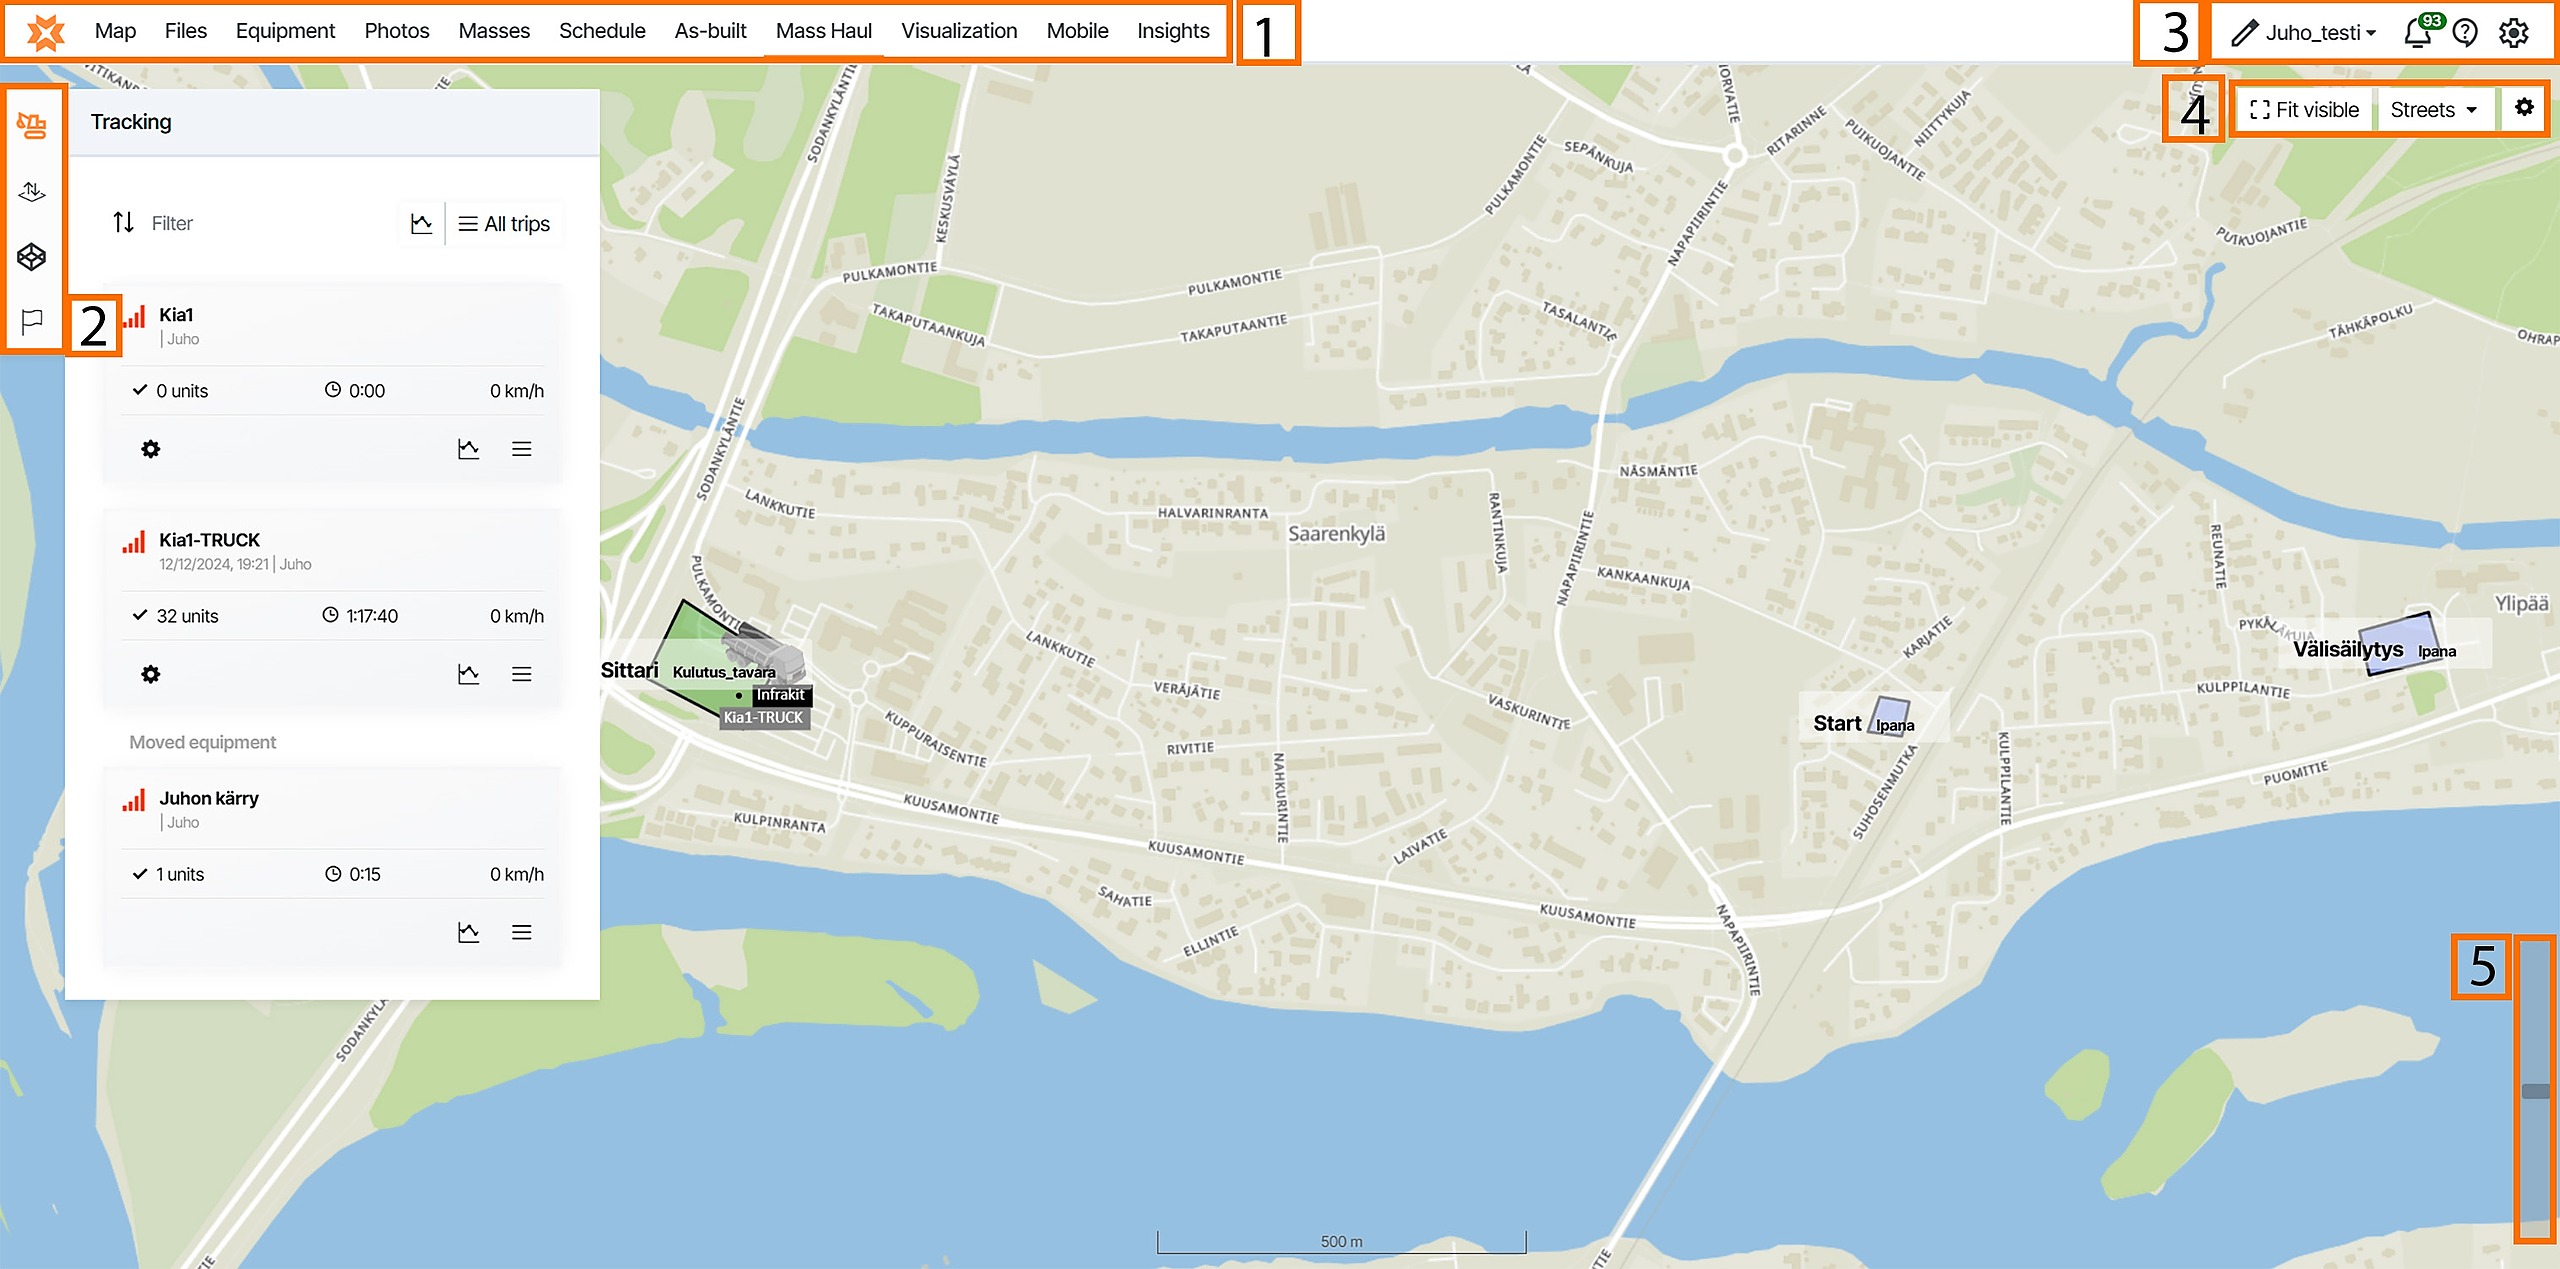
Pages
The ribbon at the top indicates all the pages that are included in the Infrakit software. Map is the default starting page when you log in to Infrakit software.
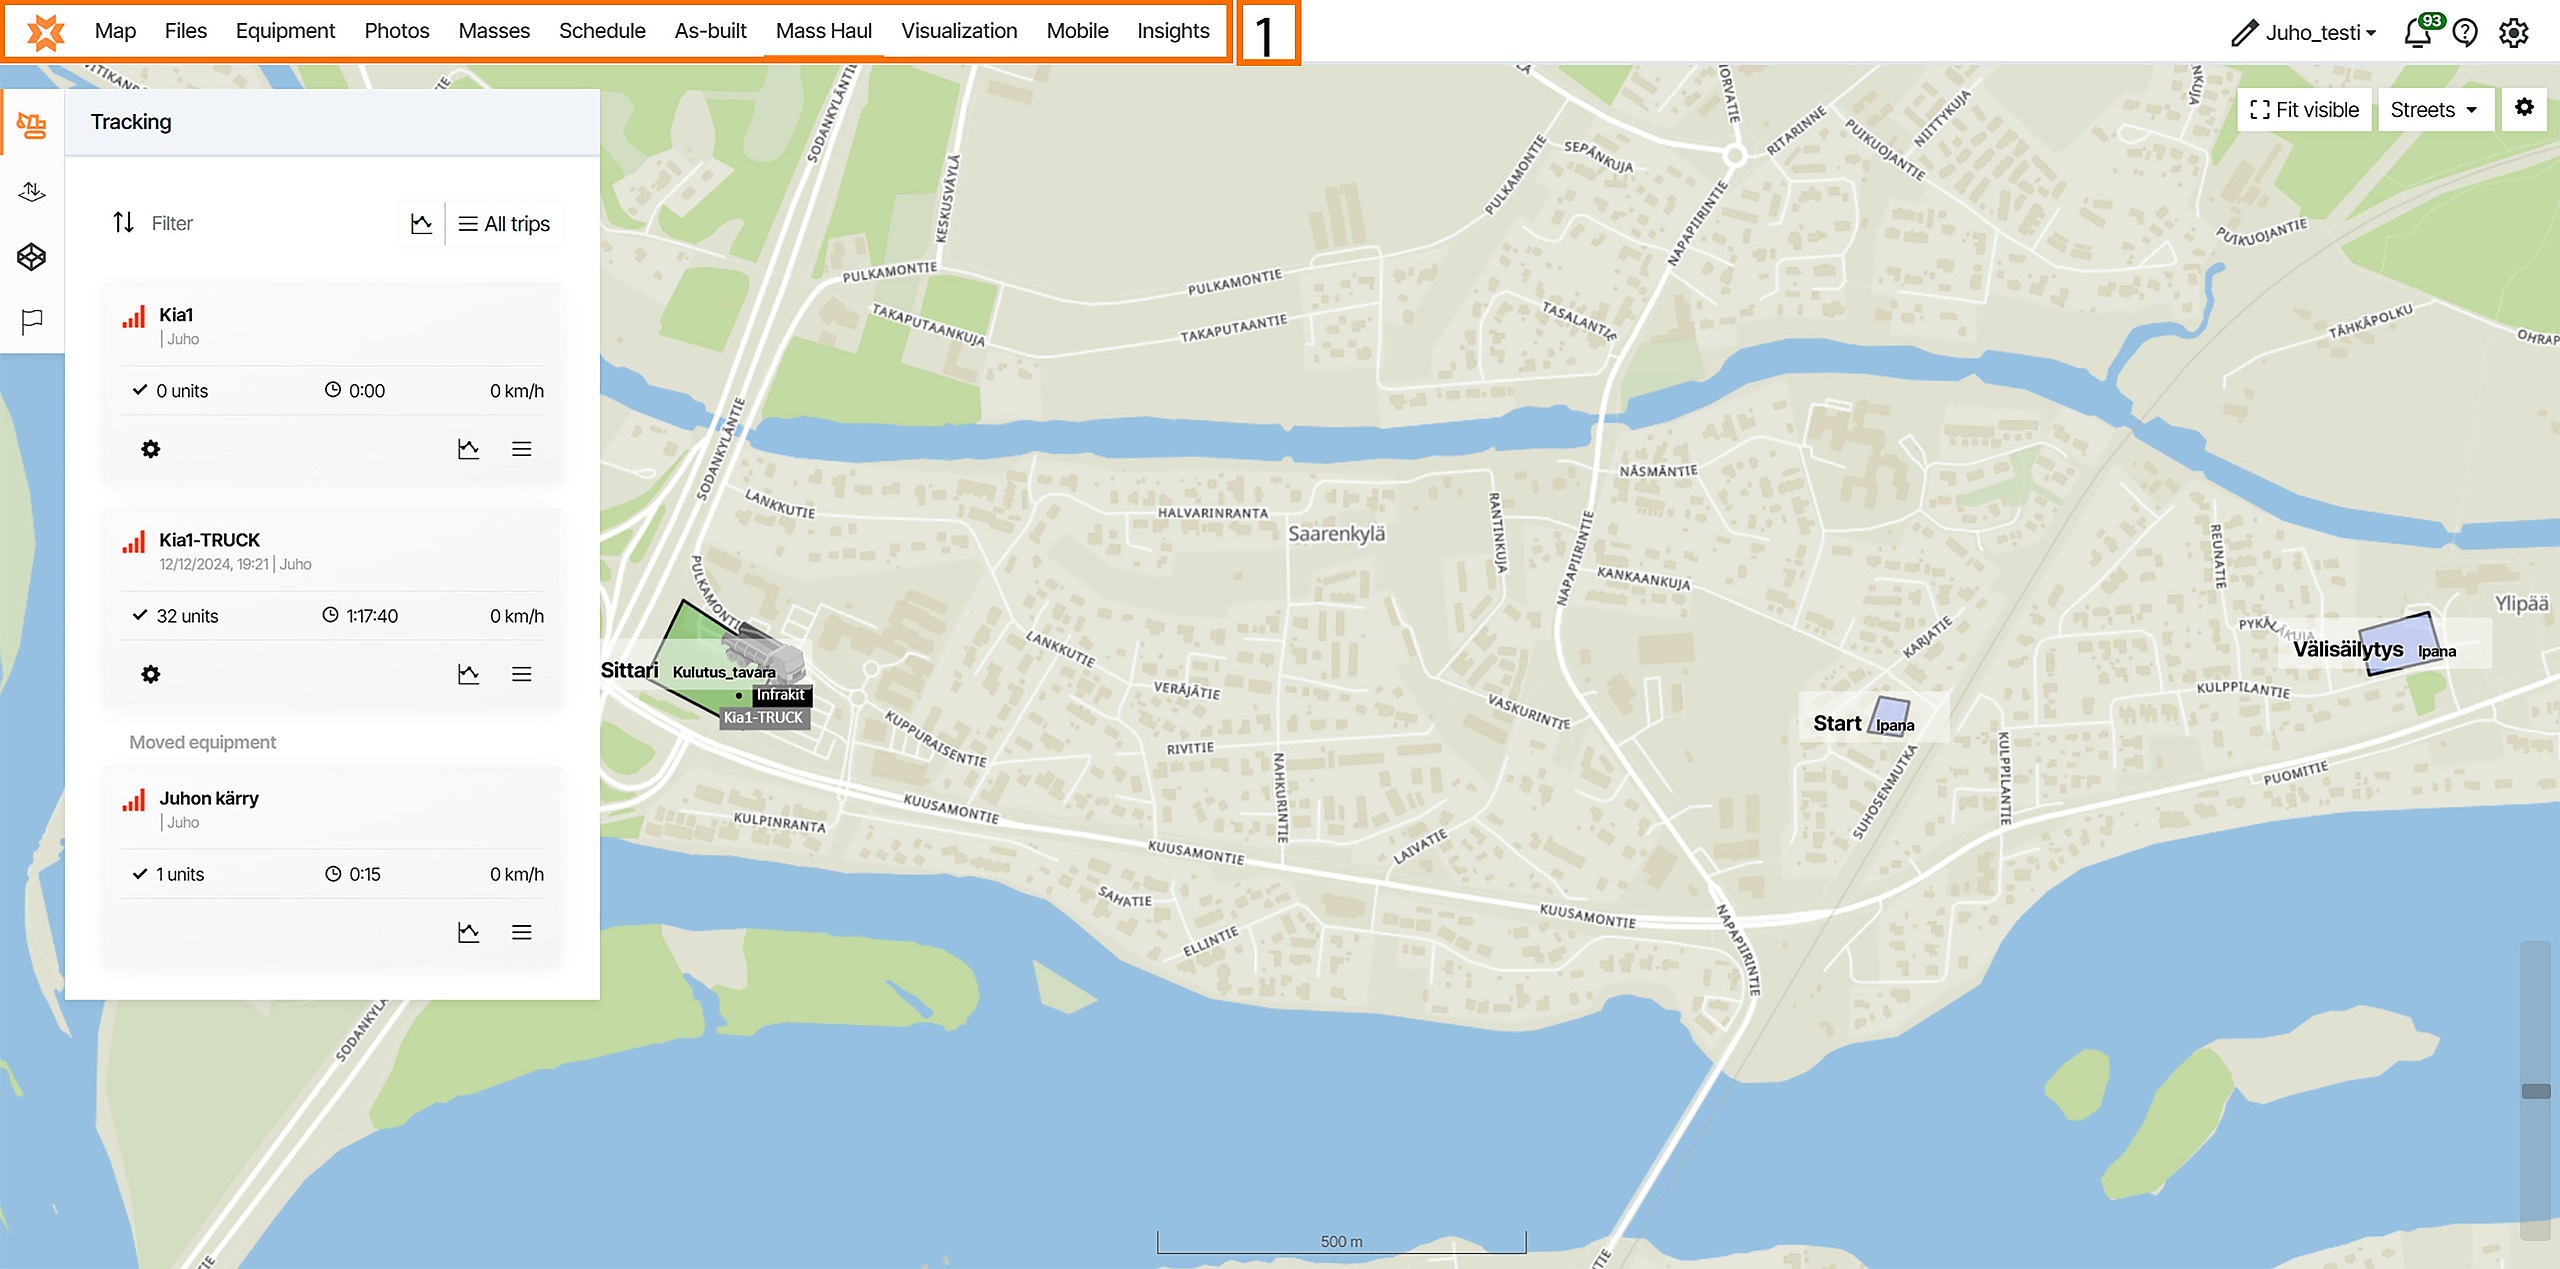
By clicking the page icon below, you can find more information about each page.


By clicking the Infrakit logo on the left-top corner of the page, the user will be directed to the Infrakit starting page.

Tabs
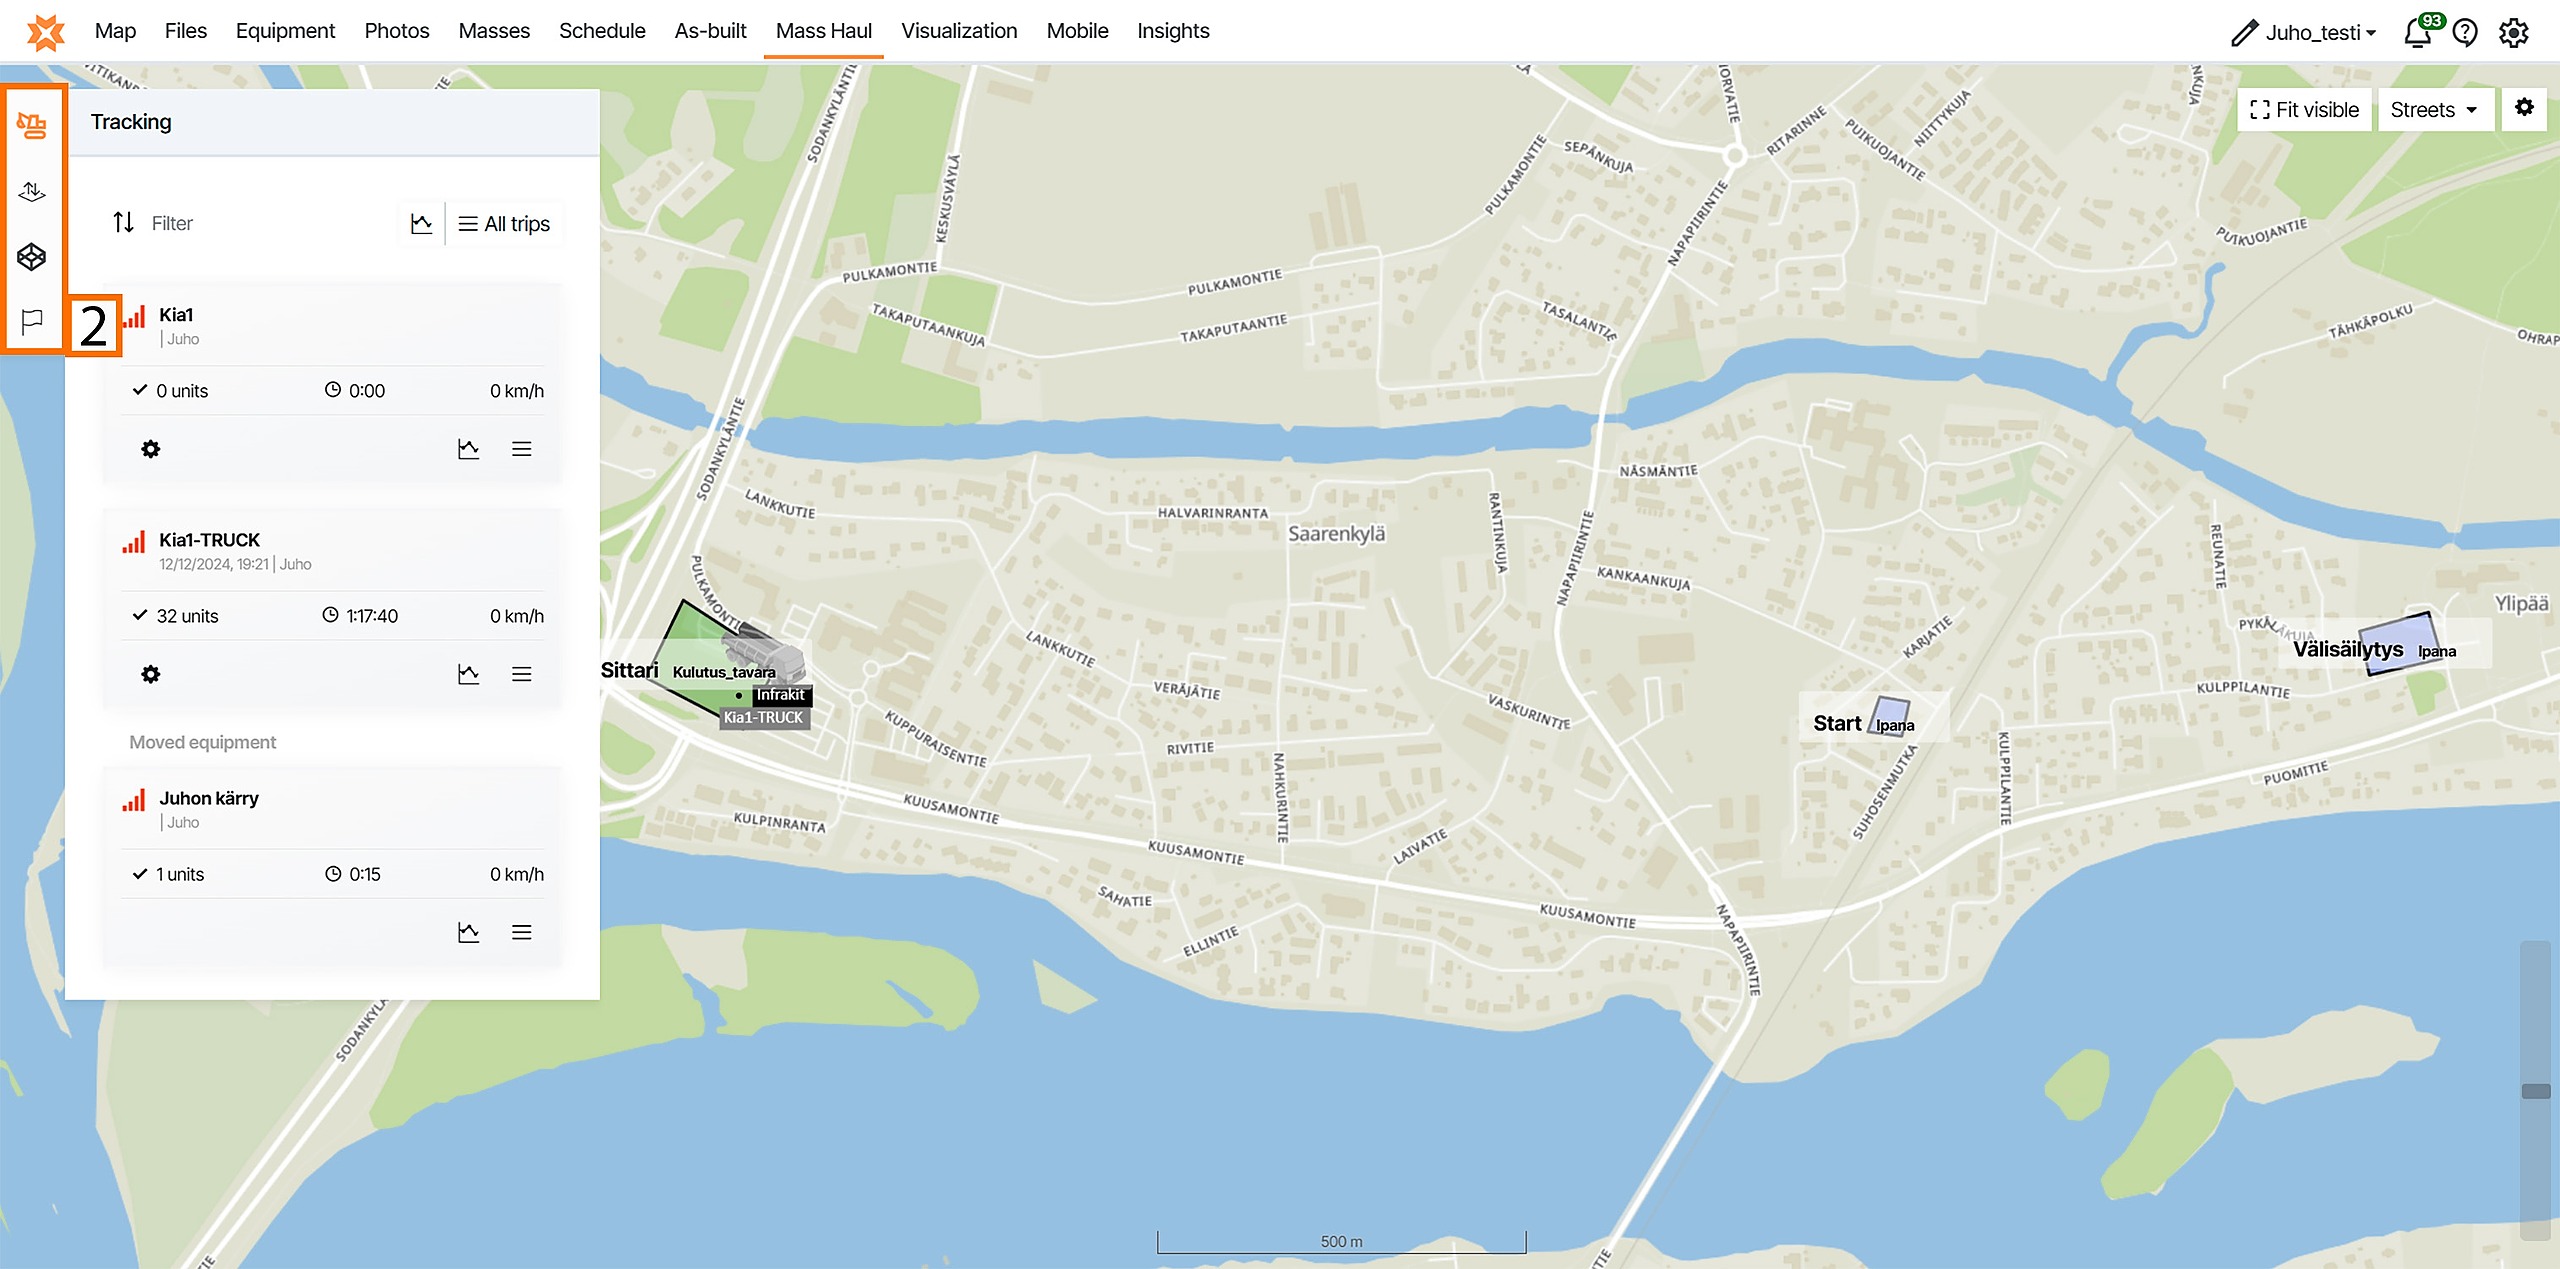
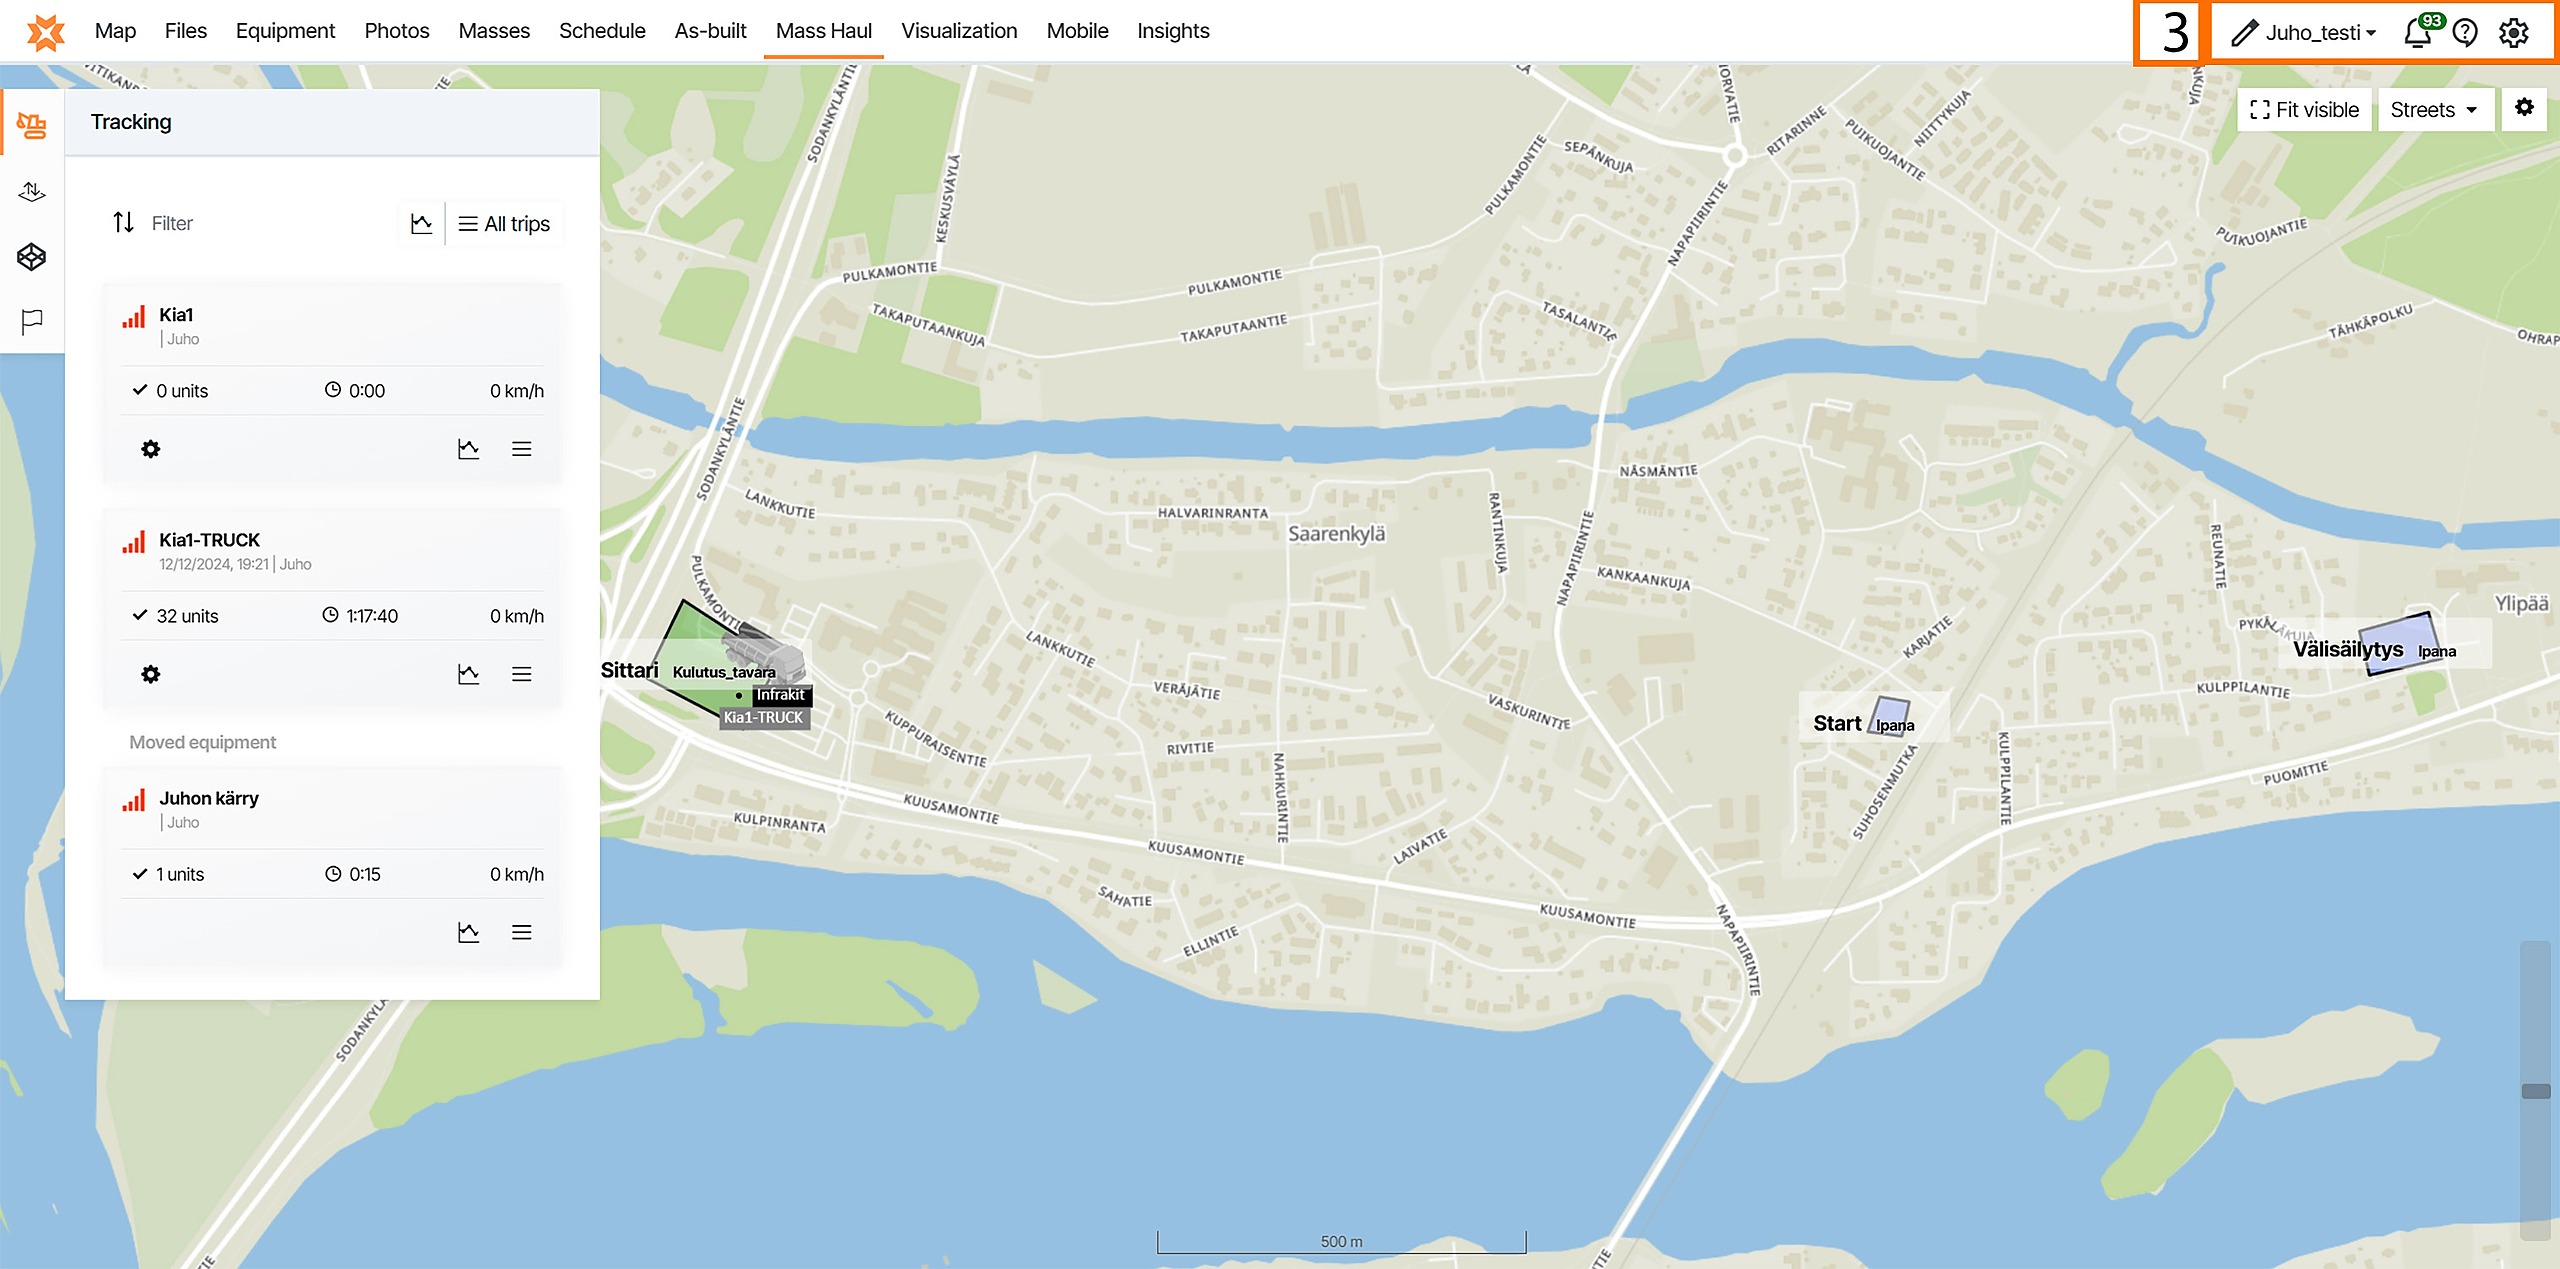
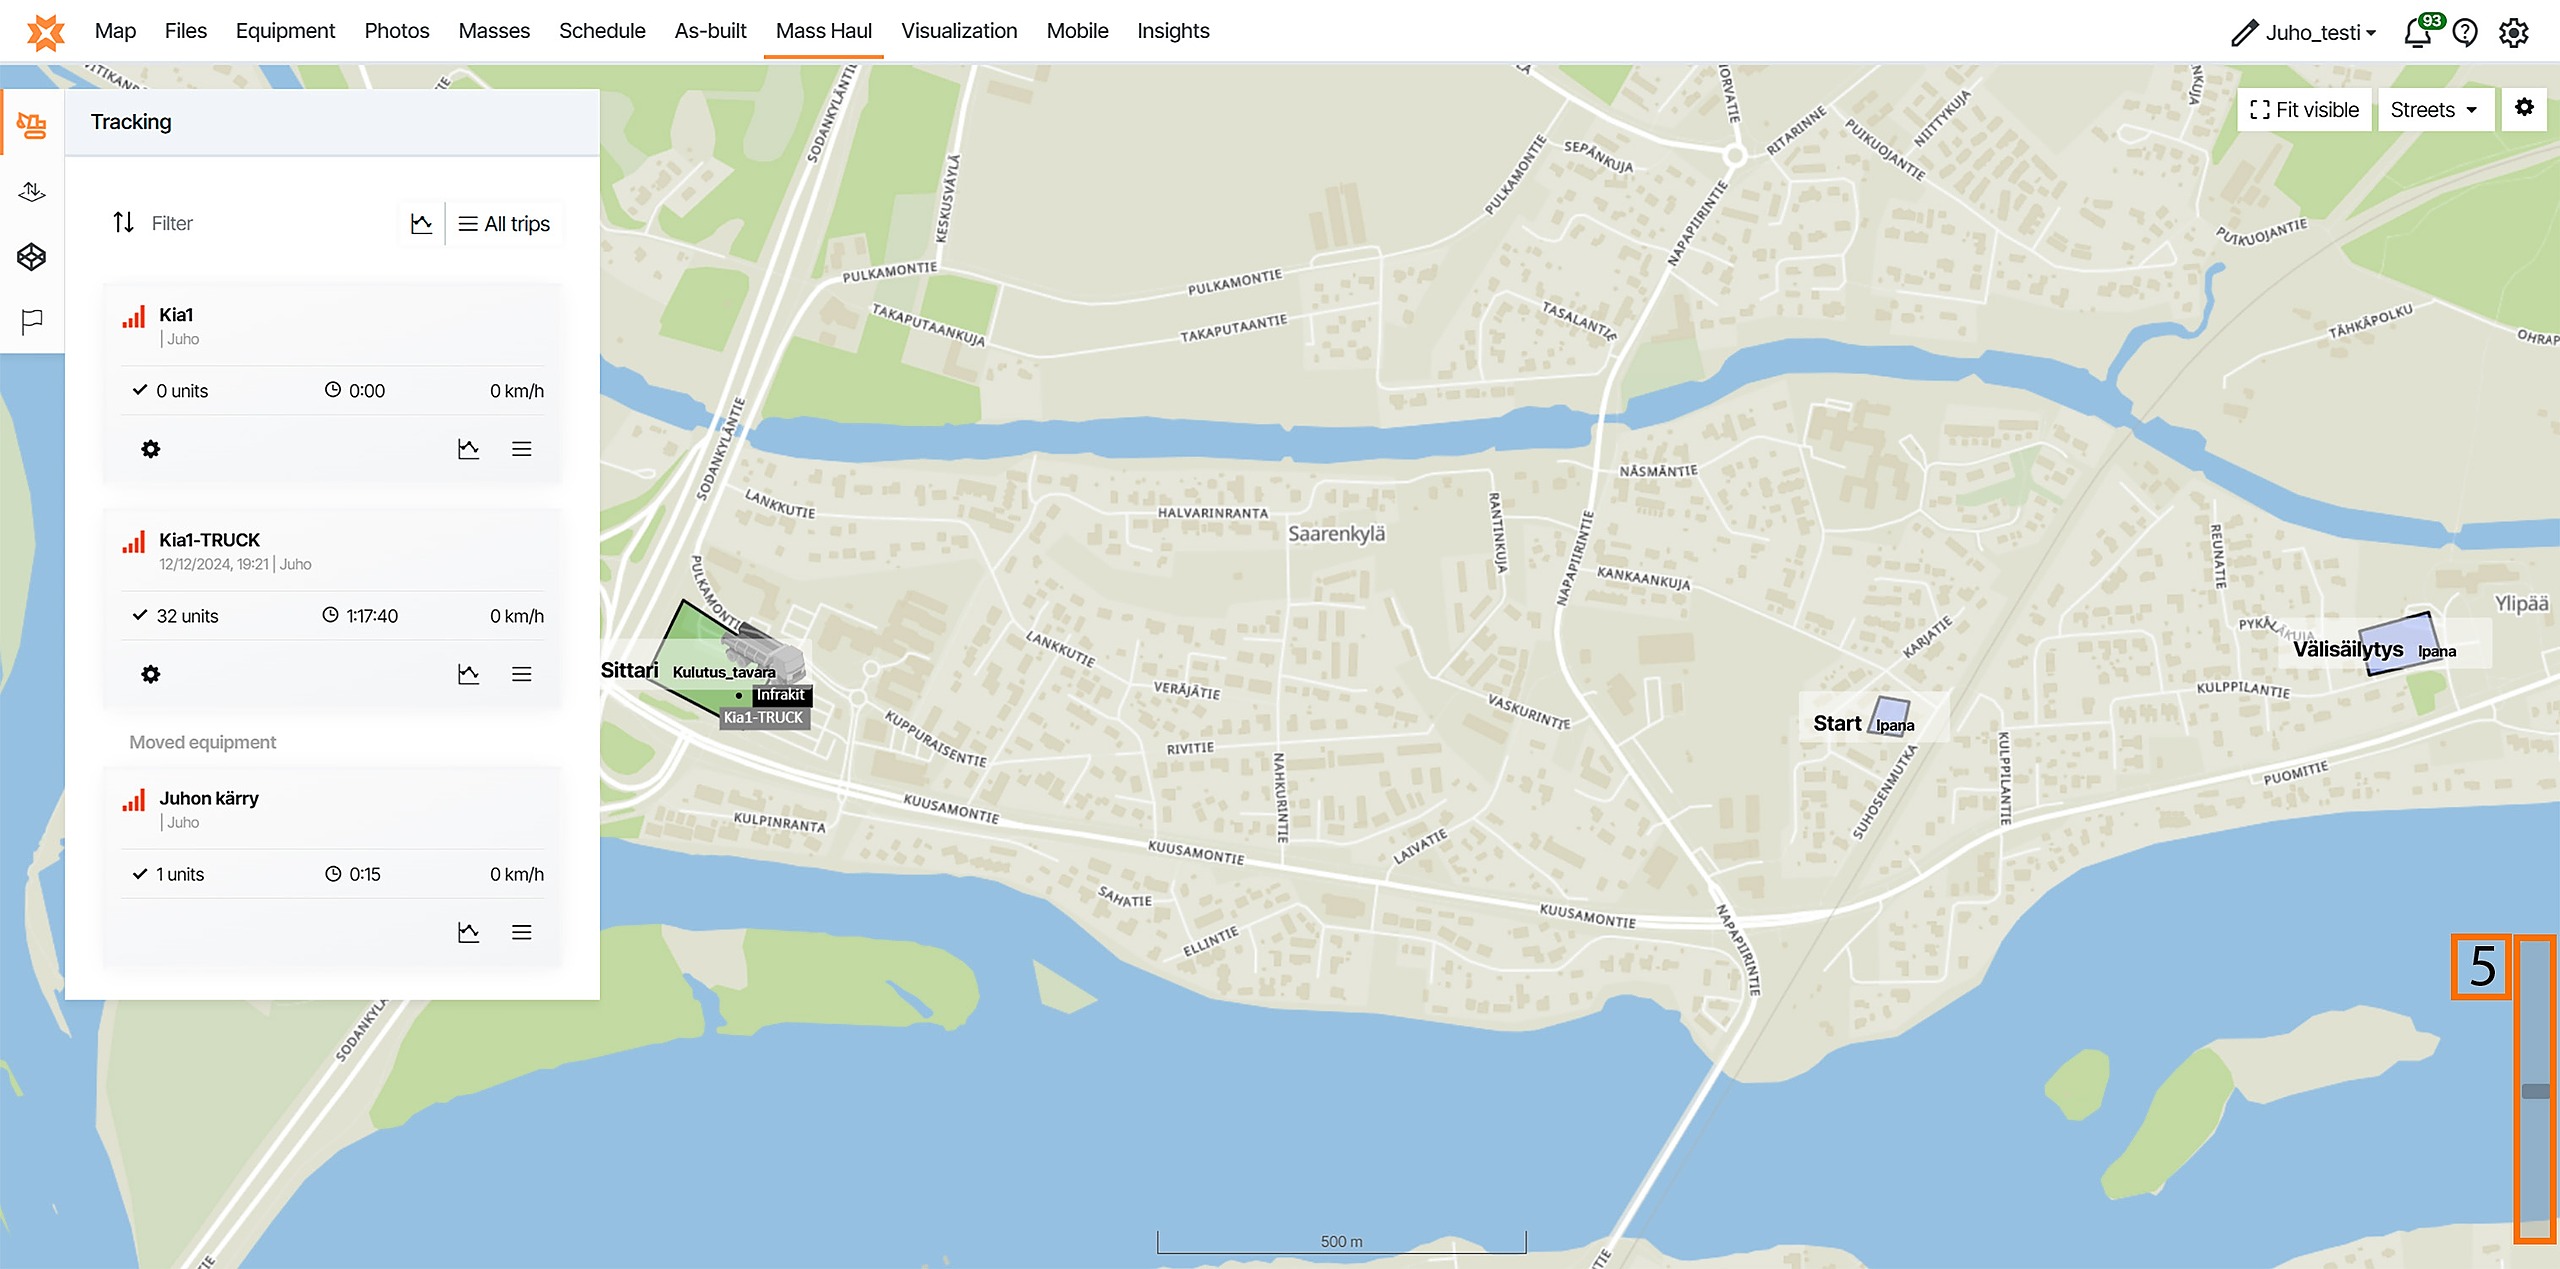
Tracking
In the "Tracking" tab, all the trucks that have been connected to the project will be listed as modules.

At the top of the tab, different tools can be found. These are general tools that apply to all of the trucks in the project.
By clicking the "Sort" button, a box will appear.

By checking the circle next to the option, the user can determine if the truck modules are sorted by "Name", "Last contact", "Vendor", or "Type".

By inserting a name in the "Filter" bar, the user can filter the truck modules by name.

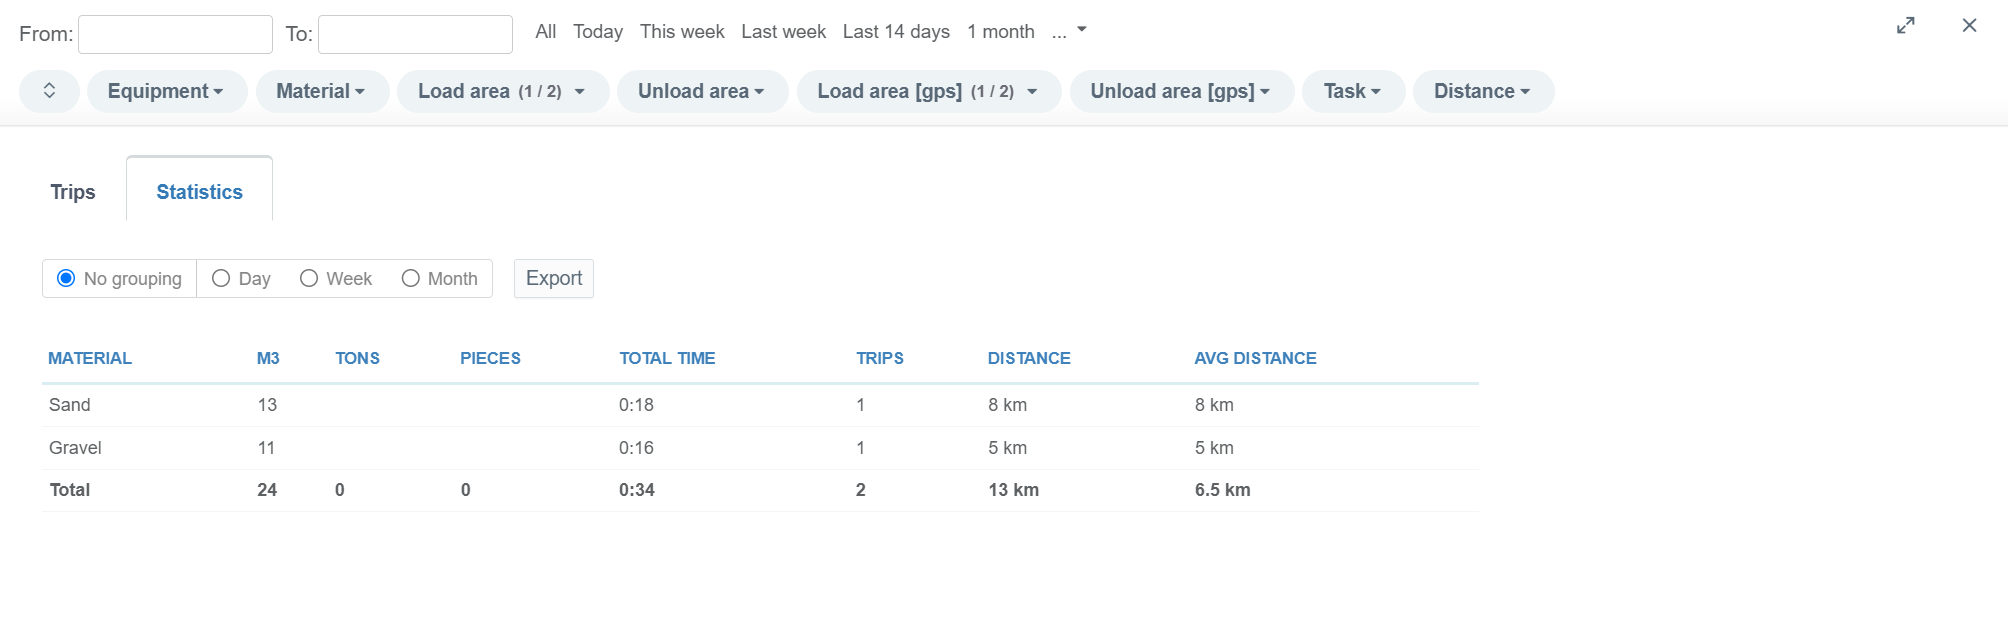
By clicking the "All statistics" button at the top of the tab, a new window will open where the "Statistics" sub-tab is active. All the trips from every truck are counted in the visible statistics.

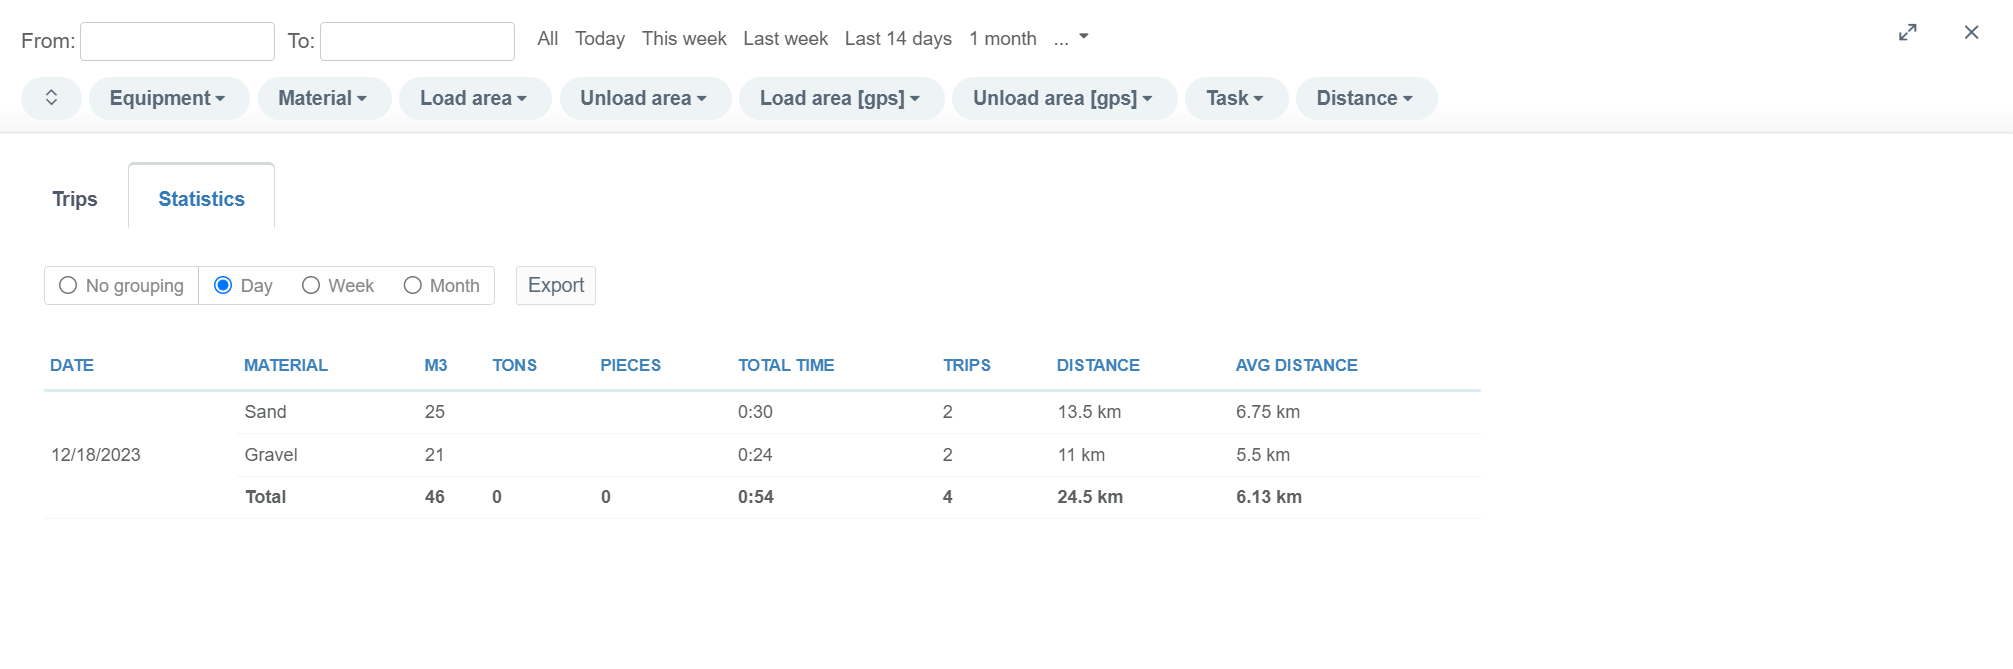
At the top of the window, the user can filter statistics based on different requirements.
By inserting values in the "From" and "To" bars, the user can filter a timespan for the statistics. All the trips that have been recorded during this period will be visible. The user can also select predetermined time periods such as "Today", "This week", "Last week", "Last 14 days", "1 month", "3 months", "6 months", or "1 year" next to the "From" and "To" bars.
The user can filter trips based on different criteria using modules at the top of the page. Available modules are "Equipment", "Material", "Load area", Unload area", "Load area [gps]", "Unload area [gps]", "Task", and "Distance".
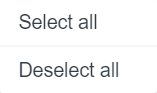
By clicking the double-arrow icon, two options appear.

By clicking "Select all" or "Deselect all", the user can select and deselect all the options in the module filters.
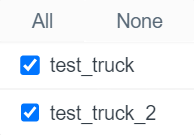
By clicking an individual module, all the available options appear.

By checking the boxes next to the option, the user can make the option active. By clicking "All", all the options will be checked, and by clicking "None", all the options will be unchecked.

By selecting "No grouping", "Day", "Week", or "Month", the user can define how the "Statistics" data will be grouped.

By clicking the "Export" button, the user can download a CSV file that contains the "Statistics" data.

By clicking the double-arrow icon at the top right corner of the page, the user can expand the window to full screen.

By clicking the x icon at the top right corner of the page, the user can close the window.

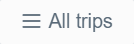
By clicking the "All trips" button at the top of the tab, a new window will open where the "Trips" sub-tab is active. All the trips from every truck are listed in the visible table.

At the top of the window, the user can filter statistics based on different requirements.
By inserting values in the "From" and "To" bars, the user can filter a timespan for the statistics. All the trips that have been recorded during this period will be visible. The user can also select predetermined time periods such as "Today", "This week", "Last week", "Last 14 days", "1 month", "3 months", "6 months", or "1 year" next to the "From" and "To" bars.
The user can filter trips based on different criteria using modules at the top of the page. Available modules are "Equipment", "Material", "Load area", Unload area", "Load area [gps]", "Unload area [gps]", "Task", and "Distance".
By clicking the double-arrow icon, two options appear.

By clicking "Select all" or "Deselect all", the user can select and deselect all the options in the module filters.

By clicking an individual module, all the available options appear.

By checking the boxes next to the option, the user can make the option active. By clicking "All", all the options will be checked, and by clicking "None", all the options will be unchecked.
By clicking the "Add new trip" button, a new side window will open.

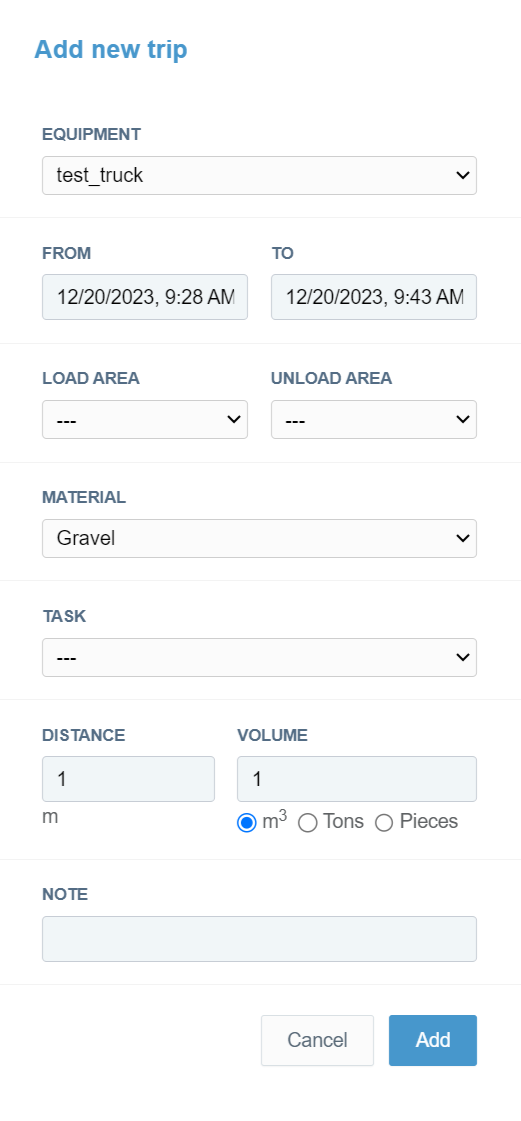
Using the side window, the user can manually create trips.
From the "EQUIPMENT" drop-down bar, the user can select the equipment to which the trip will be assigned.
In the "FROM" and "TO" bars, the user can determine the time period of the trip. In the "FROM" bar, the user can insert the starting date and time of the trip. In the "TO" bar, the user can insert the ending date and time of the trip.
From the "LOAD AREA" drop-down bar, the user can select a load area that has been created in the "Geaofence" tab.
From the "UNLOAD AREA" drop-down bar, the user can select an unload area that has been created in the "Geaofence" tab.
From the "MATERIAL" drop-down bar, the user can select a material that has been created in the "Materials" tab.
From the "TASK" drop-down bar, the user can select a task that has been created in the "Tasks" tab.
In the "DISTANCE" bar, the user can determine the distance of the trip.
In the "VOLUME" bar, the user can determine the volume of the material delivered during the trip. The user can define the unit of the volume by selecting "m3", "Tons", or "Pieces".
In the "NOTE" bar, the user can add notes for the trip.
The user must click the "Add" button at the end to complete the creation. If the user wants to close the window without creating a trip, the "Cancel" button can be clicked.
At the beginning of each row on the table is a box that can be checked or unchecked. When checked, the row will be selected.
By checking the box in the header row, all the rows in the table can be selected.
When a row or rows are selected, certain features will become available.
By clicking the "Edit" button, a new side window will open.
In this window, the user can edit the properties of a single or multiple trips.

From the "LOAD AREA" drop-down bar, the user can change the loading area used in the trip.
From the "UNLOAD AREA" drop-down bar, the user can change the unloading area used in the trip.
From the "MATERIAL" drop-down bar, the user can change the material used in the trip.
From the "TASK" drop-down bar, the user can change the task attached to the trip.
In the "DISTANCE" bar, the user can change the distance of the trip.
In the "VOLUME" bar, the user can change the volume of the material delivered during the trip. The user can also change the unit of volume by selecting "m3", "Tons", or "Pieces".
In the "NOTE" bar, the user can alter or add notes for the trip.
By clicking the trash can icon button, the user can delete a trip. This button is only available while editing a single trip.

The user must click the "Save" button at the end to save the modifications. If the user wants to close the window without modifying a trip, the "Cancel" button can be clicked.
By clicking the "Draw trips paths" button, the user can visualize the route of the trips on the map.

By clicking the downward arrow icon button, four options appear.

From these four options, the user can choose if the table or the page is downloaded in CSV or XLSX format.
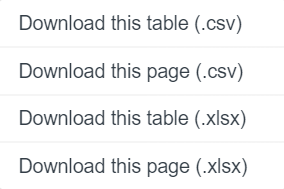
By clicking "Download this page", the user can download the current page. By clicking "Download this table", the user can download the whole table with all the pages. The downloaded file will comply with the selected filters.
By clicking the arrows, the user can browse the pages in the table. The current page and the number of pages are separated by a slash character.

From the table page size selector drop-down bar, the user can determine how many rows one page will contain.

By clicking the "Show columns" button, a box will open.
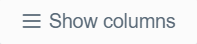
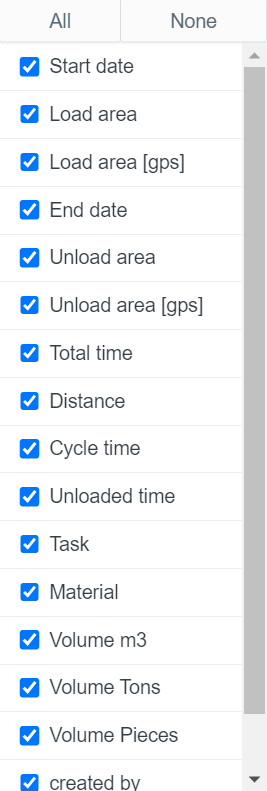
From the box, the user can check and uncheck column names to determine which columns will be shown in the table.
By clicking "None", all the column names will be unchecked. By clicking "All", all the column names will be checked.
At the end of each row, several features can be found.
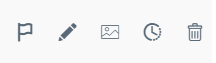
By clicking the "Draw trip path" button, the user can visualize the route of the trip on the map.


By clicking the "Edit" button, a new side window will open.
In this window, the user can edit the properties of a specific trip.
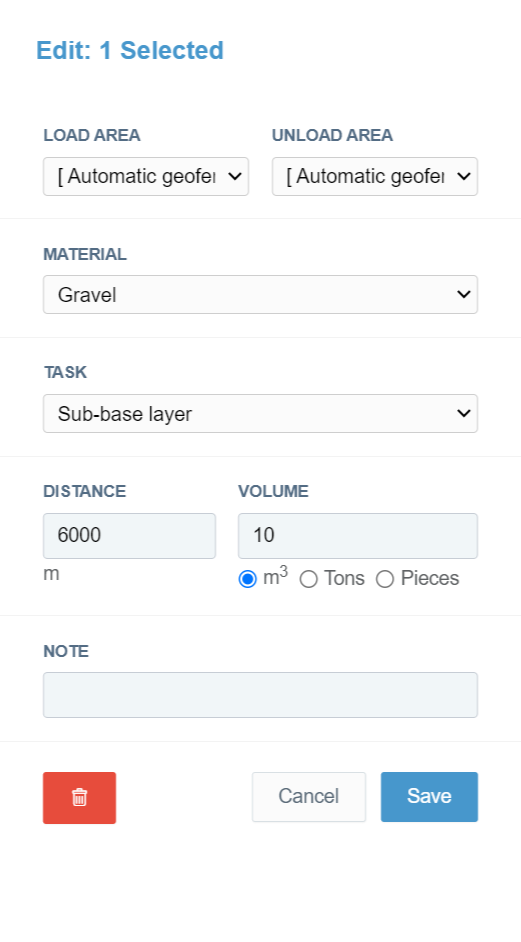
From the "LOAD AREA" drop-down bar, the user can change the loading area used in the trip.
From the "UNLOAD AREA" drop-down bar, the user can change the unloading area used in the trip.
From the "MATERIAL" drop-down bar, the user can change the material used in the trip.
From the "TASK" drop-down bar, the user can change the task attached to the trip.
In the "DISTANCE" bar, the user can change the distance of the trip.
In the "VOLUME" bar, the user can change the volume of the material delivered during the trip. The user can also change the unit of volume by selecting "m3", "Tons", or "Pieces".
In the "NOTE" bar, the user can alter or add notes for the trip.
By clicking the trash can icon button, the user can delete a trip. This button is only available while editing a single trip.

The user must click the "Save" button at the end to save the modifications. If the user wants to close the window without modifying a trip, the "Cancel" button can be clicked.
By clicking the "Trip images" button, a new side window will open where the user can observe all the images attached to the trip.

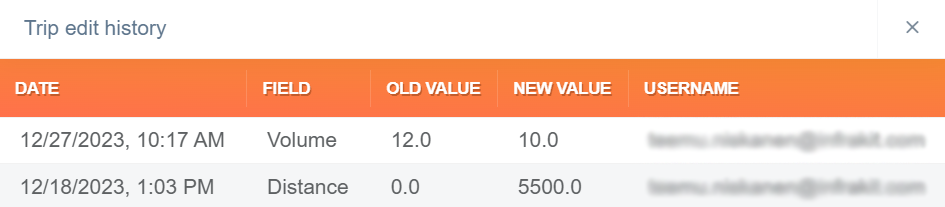
By clicking the "Trip edit history" button, a box appears.

In this box, the user can observe the edit history of the trip.
By clicking the trash can icon, the user can delete the trip.

By clicking the double-arrow icon at the top right corner of the page, the user can expand the window to full screen.

By clicking the x icon at the top right corner of the page, the user can close the window.

Each truck in the project has its own module.

Each module has a set of tools that only apply to a specific truck.
By clicking the gear icon button, a side window will open.

In this side window, the user can add or modify basic information about the truck driver.
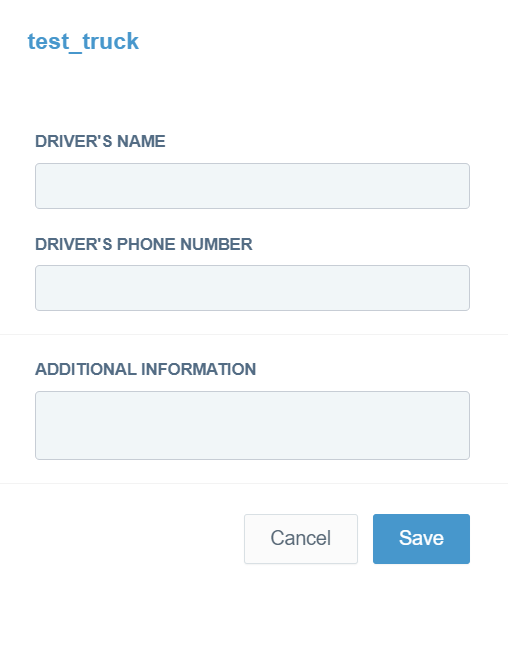
In the "DRIVER'S NAME" bar, the user can add or modify the driver's name.
In the "DRIVER'S PHONE NUMBER" bar, the user can add or modify the driver's phone number.
In the "ADDITIONAL INFORMATION" bar, the user can provide additional information about the truck.
By clicking the "Show last 12h path" button, the user can visualize the path of the truck on the map from the time period of the last 12 hours.

By clicking the "Statistics" button in the truck-specific module, the same window will open as in the previously mentioned general tools when the "All statistics" button was clicked. The "Statistics" sub-tab is active, and the statistics are filtered based on the trips made by a specific truck.

By clicking the "Trips" button in the truck-specific module, the same window will open as in the previously mentioned general tools when the "All trips" button was clicked. The "Trips" sub-tab is active, and the trips are filtered based on a specific truck.


Geofence
In the "Geofence" tab, the user can create loading and unloading areas.

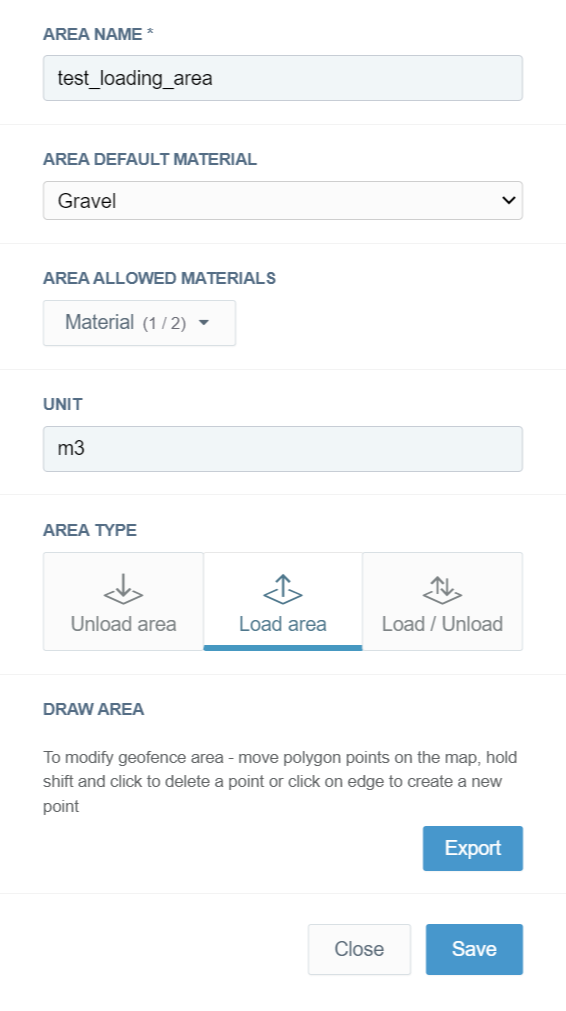
By clicking the "+ Add" button, a new side window will open.
To create a new area, the user must insert a name for the area in the "AREA NAME" bar. This name will represent the area in Infrakit.
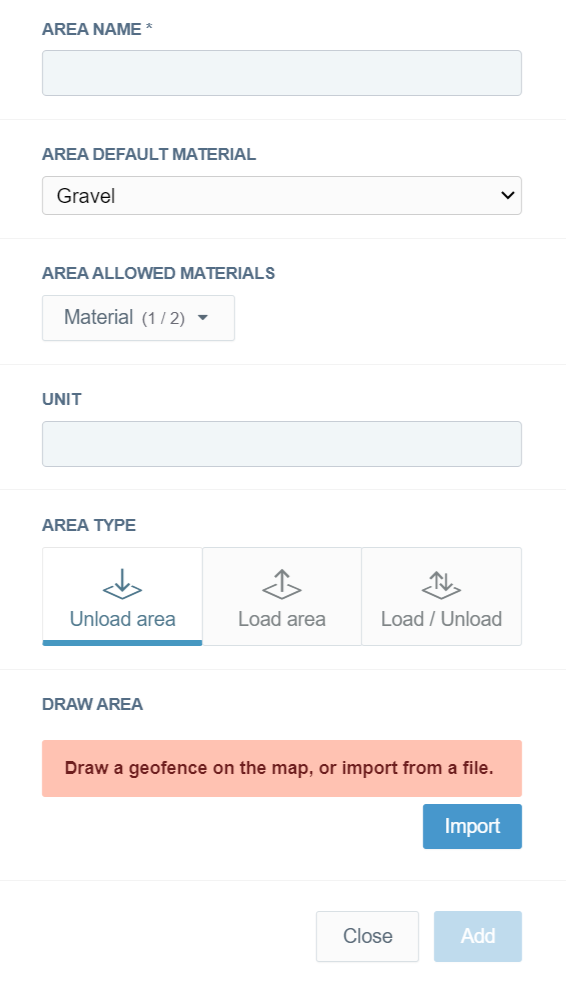
From the "AREA DEFAULT MATERIAL" drop-down bar, the user can select the default material for the area. All the materials created in the "Materials" tab will be available to select.
From the "AREA ALLOWED MATERIALS" drop-down bar, the user can determine all the materials that are allowed in the area. All the materials created in the "Materials" tab will be available to select or unselect.
In the "UNIT" bar, the user can define the unit used in the area.
In the section "AREA TYPE", the user can define if the area is for loading, unloading, or both. The "Load/Unload" option is only available if the "Truck mode" is defined as "Advanced mode disabled" in the "Project Editing" page, section "Edit project".
In the section "DRAW AREA", the user can draw the area on the map by clicking points, and a double click will close the area. By clicking the "Import" button, the user can import a file that contains the boundaries for the area. The supported format for import is KML.
The user must click the "Add" button at the end to complete the creation. If the user wants to close the window without creating an area, the "Close" button can be clicked.
All the loading and unloading areas will be listed as modules in the tab.
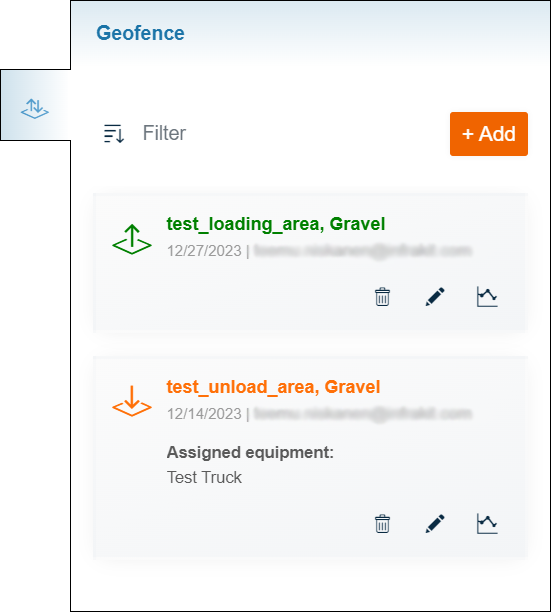
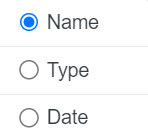
By clicking the "Sort" button, a box will appear.

By checking the circle next to the option, the user can determine if the area modules are sorted by "Name", "Type", or "Date".
By inserting a name in the "Filter" bar, the user can filter the area modules by name.

Each area has its own module.
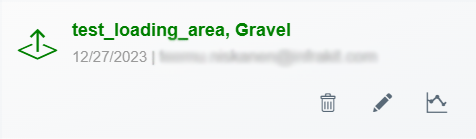
Each module has a set of tools that only apply to a specific area.
By clicking the "Delete" button, the user can delete the area.

By clicking the "Edit" button, the same window will open as previously when a new area is created.

In this window, the user can edit the previously defined properties of a specific area.
By clicking the "Export" button, the user can export the existing area boundaries as a KML file.
The user must click the "SAVE" button at the end to complete the modifications. If the user wants to close the window without modifying an area, the "Close" button can be clicked.
By clicking the "Statistics" button, the same window will open as in the "Tracking" tab when the "All statistics" or "Statistics" buttons are clicked.

In this window, the "Statistics" data is filtered based on a specific area.
When the "Trips" sub-tab is clicked, the same window will open as in the "Tracking" tab when the "All trips" or "Trips" buttons are clicked.

In this window, the "Trips" data is filtered based on a specific area.
Materials
In the "Materials" tab, the user can create materials that will be available to use in the "Tracking" and "Geofence" tabs and in the Trucks app.
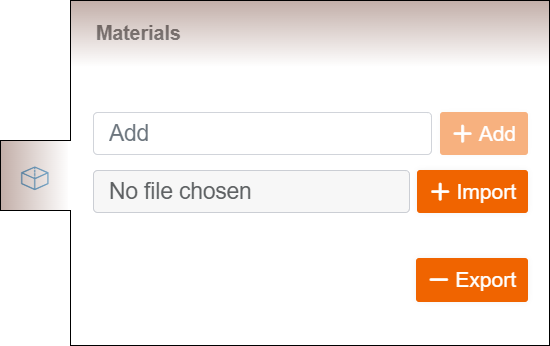
In the "Add" bar, the user can insert the name of the material. By clicking the "+ Add" button, the material will be added to the list of materials and will be available to use.
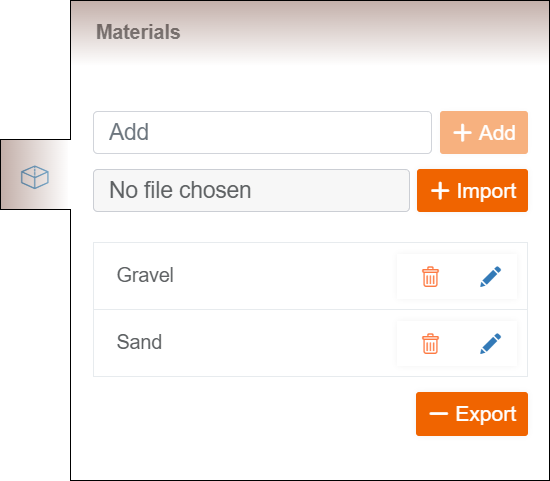
By clicking the "No file chosen" bar, the user can browse local folders and open a CSV file. By clicking the "+ Import" button, the data from the file will be imported to the material list.
The CSV file must contain one header, "materials". Under the header, all the materials must be listed.

By clicking the "- Export" button, the user can export the materials list as a CSV file.
By clicking the trash can icon button at the end of an individual row, the user can delete material.

By clicking the pen icon button at the end of an individual row, the user can modify the material's name.

Tasks
In the "Tasks" tab, the user can create tasks that will be available to use in the "Tracking" and "Geofence" tabs and in the Trucks app.
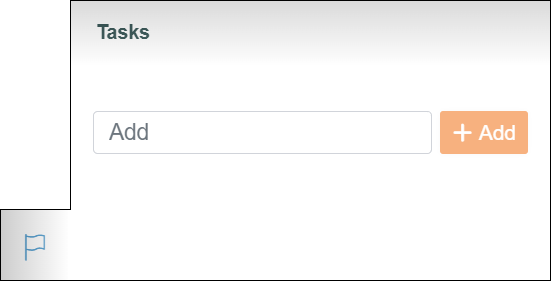
In the "Add" bar, the user can insert the name of the task. By clicking the "+ Add" button, the task will be added to the list of tasks and will be available to use.
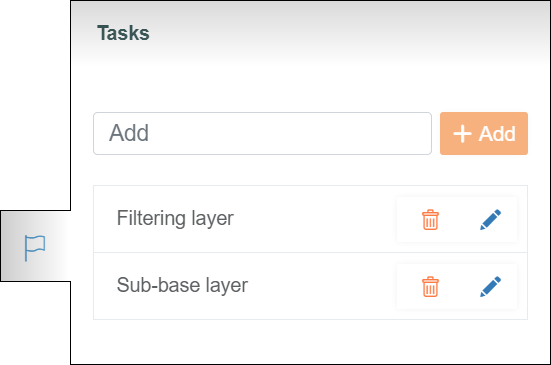
By clicking the trash can icon button at the end of an individual row, the user can delete a task.

By clicking the pen icon button at the end of an individual row, the user can modify the task's name.

General Features
At the right corner of the top ribbon, four general features can be found.

By clicking the pen icon, the user will be directed to the "Project Editing" page.
From the drop-down box, the user can select the active project.

By clicking the bell icon, a new box appears.
This box contains six tabs: "All", "Files", "Folders", "Photos", "Services", and "Chat".
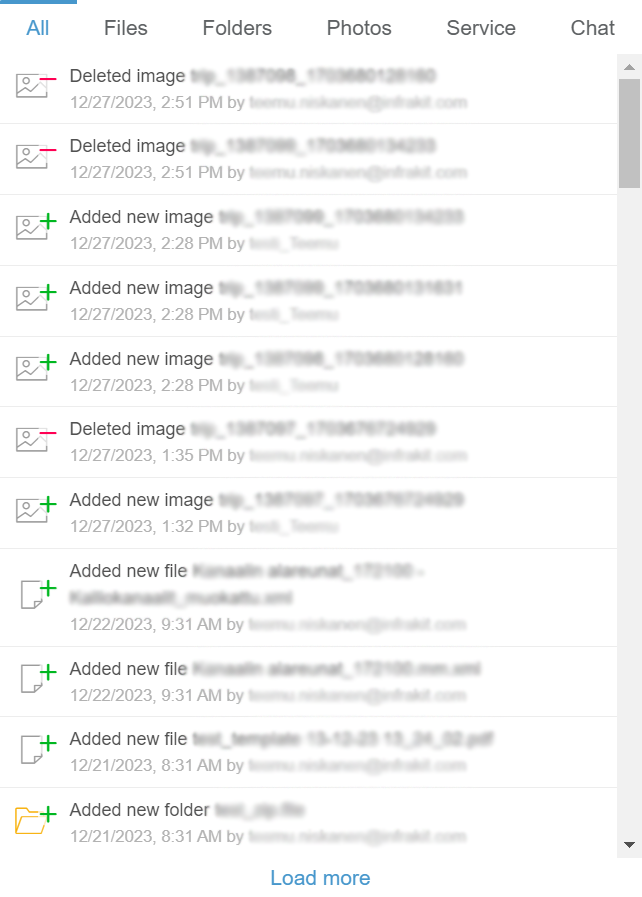
"All" is the default tab when the box opens. In this tab, all the notifications on the project are listed.
The "Files" tab contains all notifications concerning files.
The "Folders" tab contains all notifications concerning folders.
The "Photos" tab contains all notifications concerning image files.
The "Service" tab contains general notifications concerning Infrakit software.
Through the "Chat" tab, users can send messages inside a project.
By clicking "Load more," the user can observe older notifications.

By clicking the speech bubble icon, a new box appears.
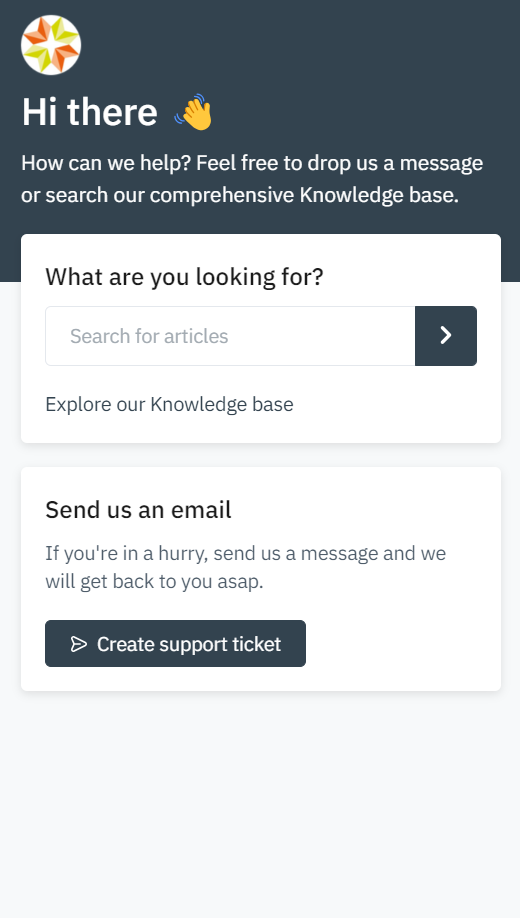
Through the "Search for articles" bar, the user can browse Infrakit's knowledge base using key words that, for example, represent functions, tools, or operations.
By clicking the "Create support ticket" button, a new view will appear.
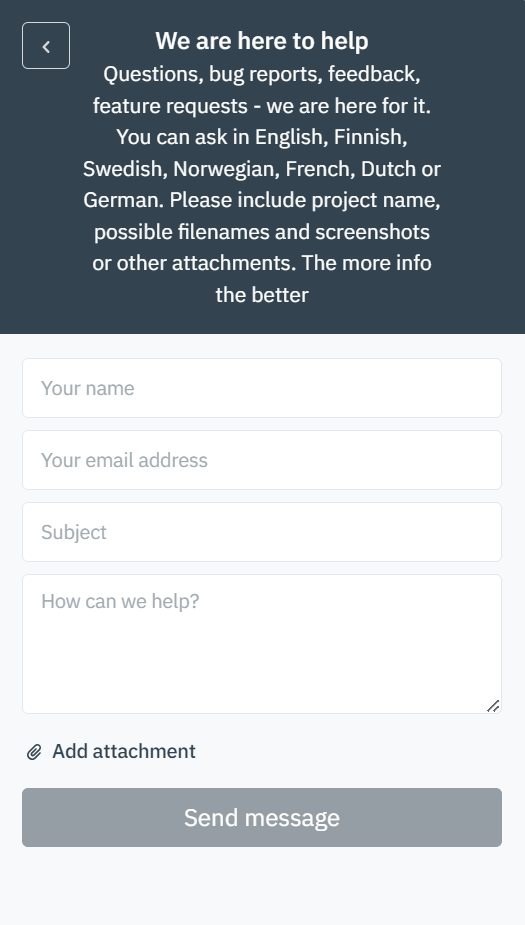
In this view, the user can send a message to Infrakit's customer support team.
In the "Your name" bar, the user can insert his or her own name.
In the "Your email address" bar, the user can insert his or her own email address.
In the "Subject" bar, the user should write a succinct description of the issue.
In the "How can we help?" box, the user should describe the issue as detailed as possible. The more related information is provided, the easier it is for the support team to investigate the issue.
By clicking "Add attachment", the user can add attachments to the message. Attaching images, videos, and files where the issue occurs will help to solve the issue more efficiently.
By clicking the "Send message" button, the message will be sent to the support team.
By clicking the arrow icon button, the user can change to the previous view.

By clicking the x icon button, the user can close the customer support box.


By clicking the gear icon, a new box will open.
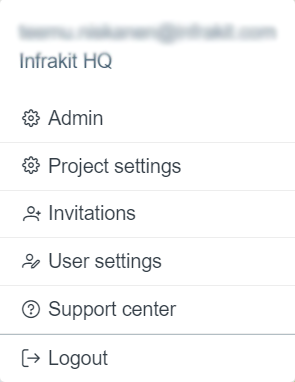
This box contains six options: "Admin", "Project settings", "Invitations", "User settings", "Support Center", and "Logout".
By clicking "Admin", the user will be directed to the starting page of the "Admin" features.
By clicking "Project settings", the user will be directed to the "Project Settings" page.
By clicking "Invitations", the user will be directed to a new page where invitations can be viewed and accepted or rejected.
By clicking "User settings", the user will be directed to the "User Settings" page.
By clicking "Support center", the user will be directed to the "Support Center" web page, where guidelines for how to use Infrakit software can be searched and contact information can be found.
By clicking "Logout", the user will be logged out of the Infrakit software.
General Tools
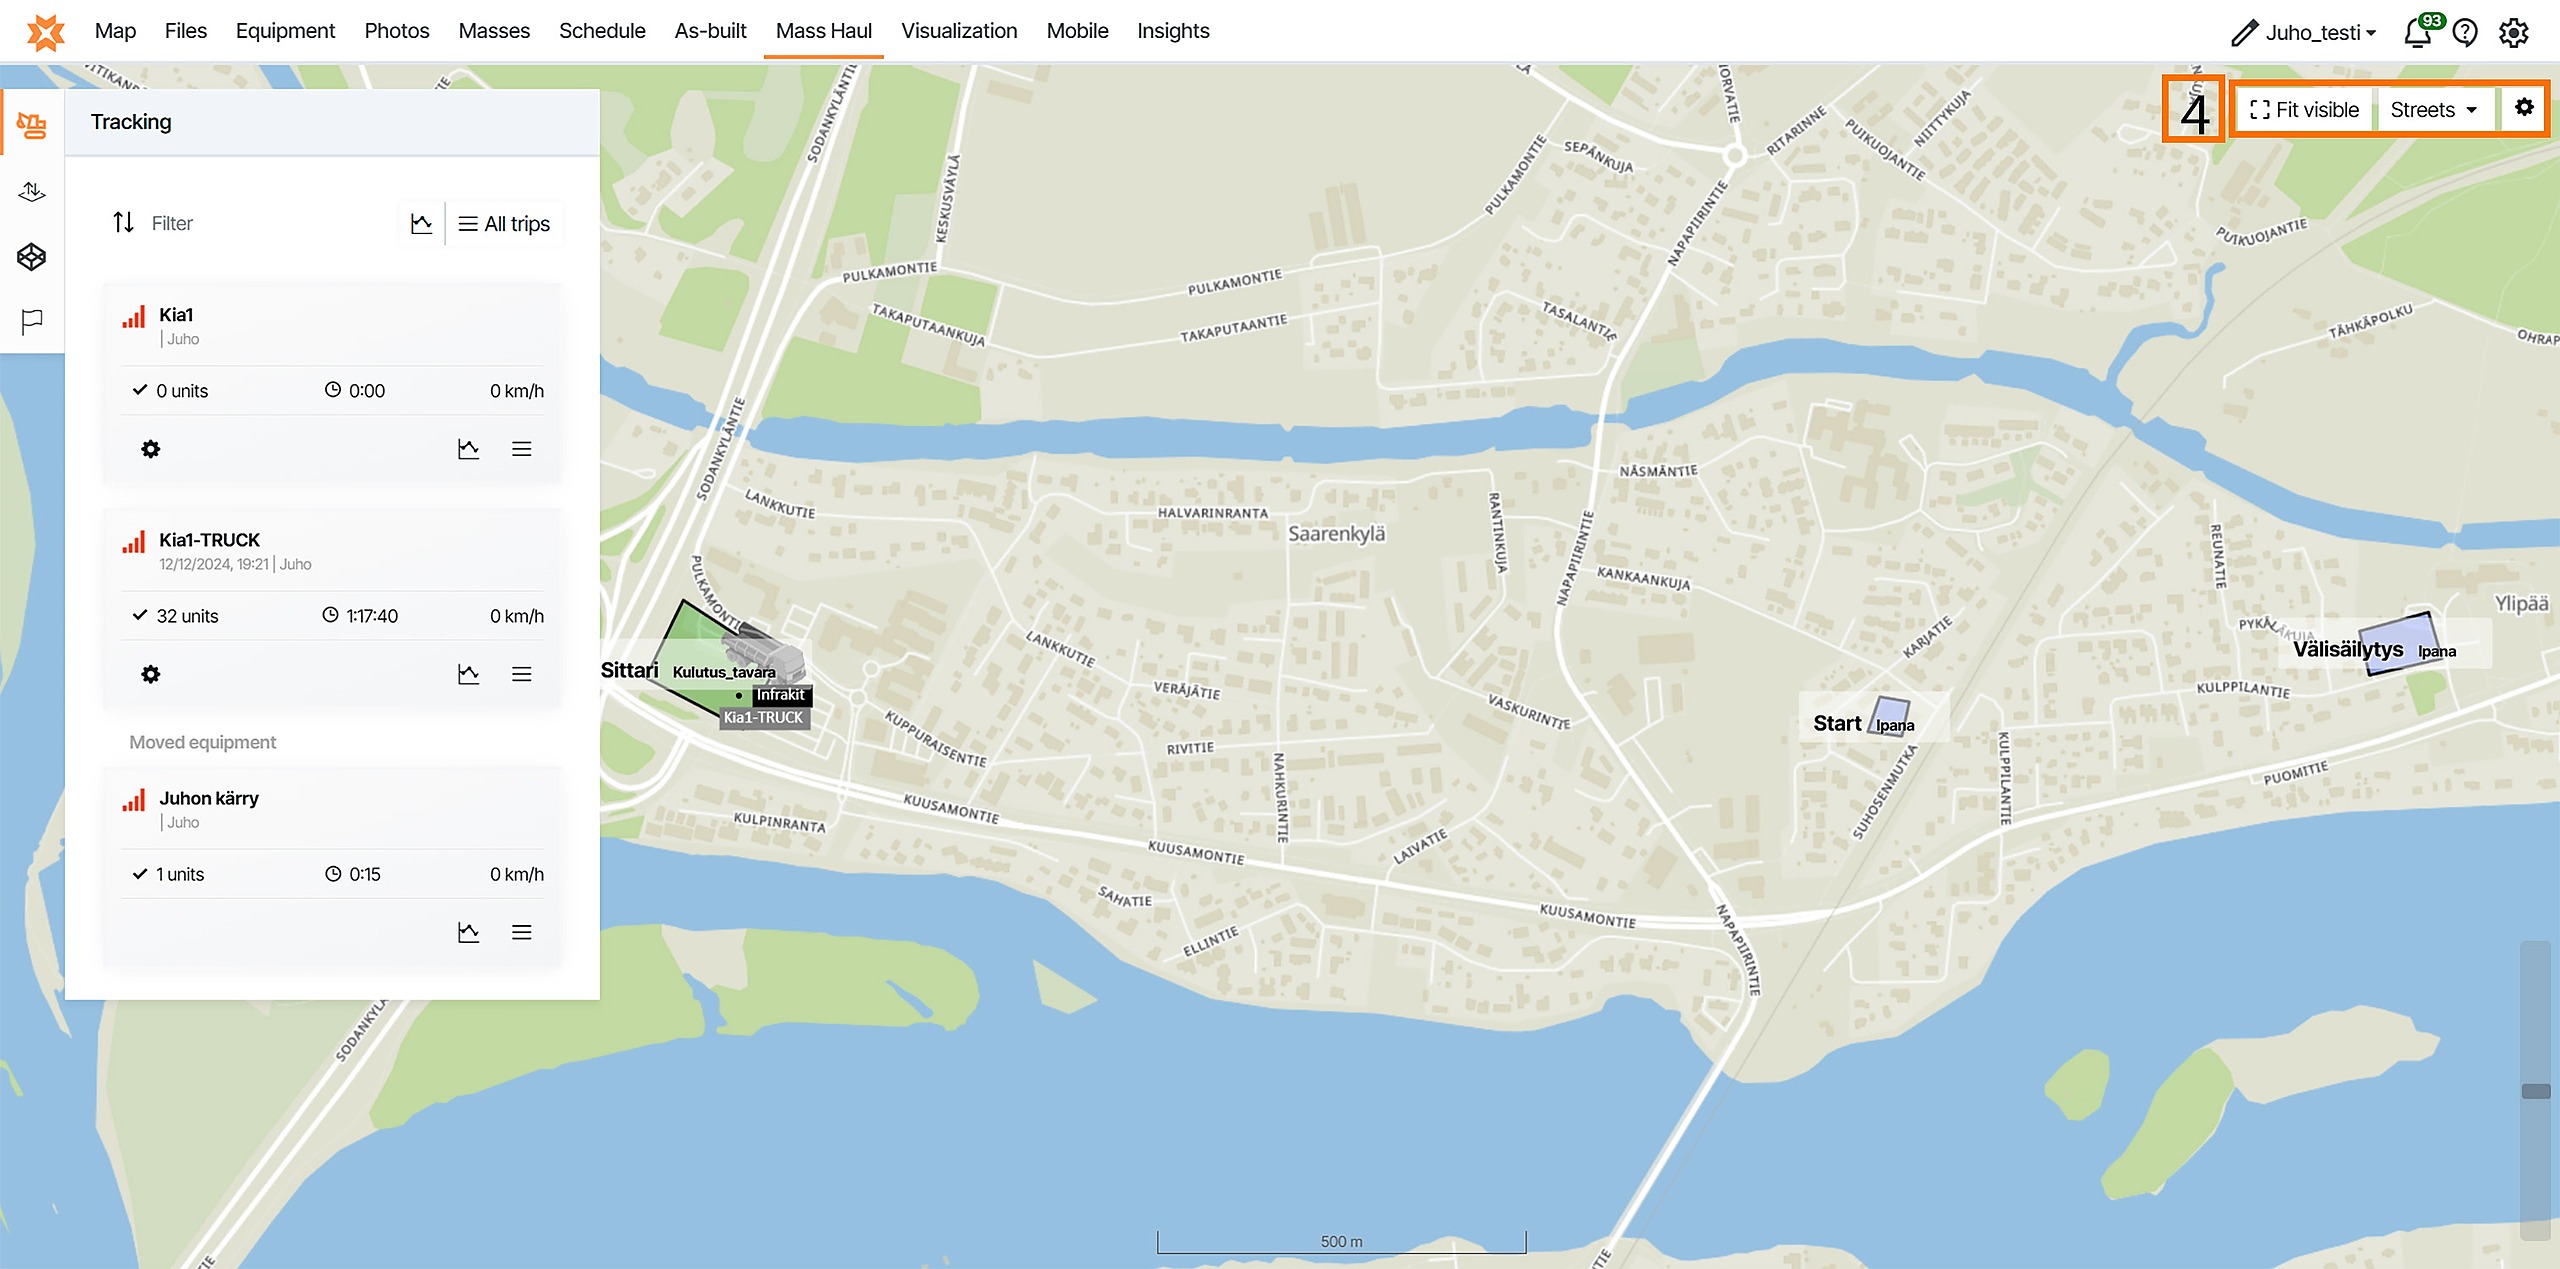
By clicking the "Fit visible" button, the user can fit all the visible objects on the map to the screen.

By clicking the map tile layer drop-down bar, a box will open.

In this box, all the available map tile layers are listed under the "Tile layer" section. By checking the circles next to the layer name, the user can select which tile layer is active.
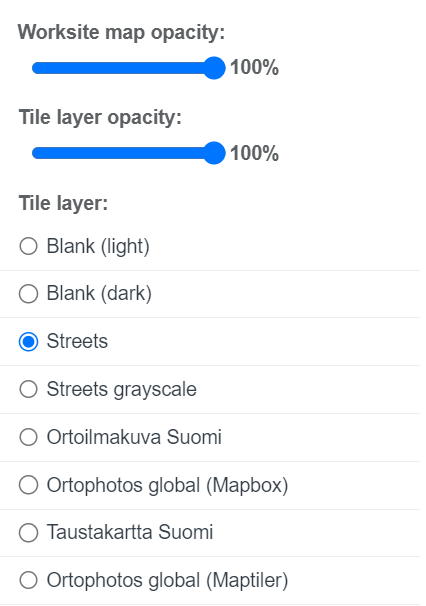
In the section "Worksite map opacity", the user can adjust the opacity of the base drawing determined for the "Trucks" page. The base drawing can be defined on the "Project Settings" page, section "Base Drawing".
In the section "Tile layer opacity", the user can adjust the opacity of the active map tile layer.
By clicking the gear icon button, a box will appear.

By checking and unchecking the box next to "Show geofence name on map", the user can determine if the names of the geofences are visible on the map.
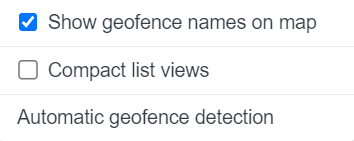
By checking and unchecking the box next to "Compact list view", the user can determine how the modules are shown in the tabs.
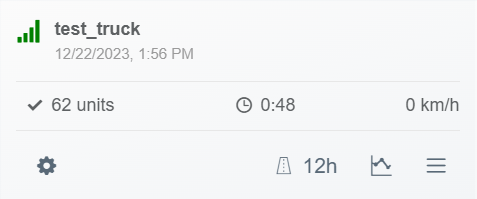
An example of a truck module when the box is unchecked:
An example of a truck module when the box is checked:

By clicking "Automatic geofence detection", a new box will appear.
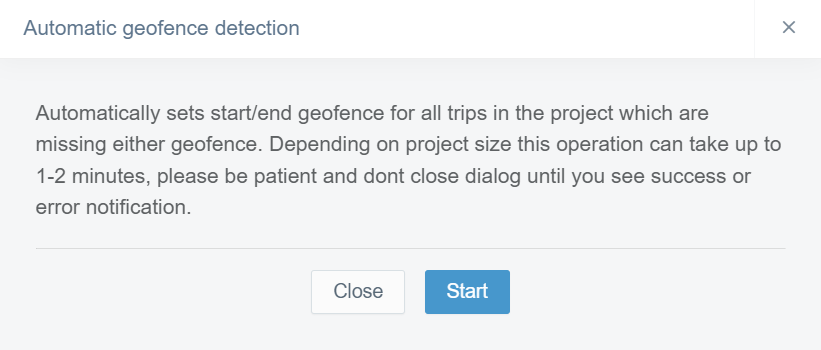
By clicking the "Start" button, the user can start the process where missing geofences will be set for the trips.
By clicking the "Close" button, the user can close the box without setting any missing geofences.
Map Tools
By dragging the bar along the slider at the bottom right corner of the page, the user can zoom in and zoom out of the map view.
